On the Service Desk Settings page, the system administrator can fine-tune how different parts of the Service Desk workspace work. Settings are organized across several tabs:
- General. Set up how requests are received and processed, invite users to the external portal, archive resolutions, display configuration item locations, and more.
- Portal. Customize the look of the external Service Desk portal to match your company’s branding.
- Request Classification. Define the target time for classifying requests and specify what happens if that time is missed.
- Service Catalog. Control how service catalogs and services are displayed and organized on the external portal.
- Feedback Form. Configure how client feedback is collected on request handling and design the feedback form. For more details, see the Set up feedback form article.
- Request Notifications. Manage when and how notifications are sent about requests moving through different processing stages.
- Request Merging. Set up rules for finding duplicate requests and merging them into a master request.
- Business Rules. Define conditions for automatically populating request fields and routing requests to the right support group. Once a request is submitted, it’s checked against these rules. If the conditions are met, the specified data is automatically added to the request page. This lets you automate classification for requests coming from the Service Desk portal, for example.
General
On the General tab, you can configure the following parameters:
- Applicant. Specify the author who will be listed on automated equipment failure requests in the CMDB app.
- Client type for creating a request. By default, requests in the Requests app can only be created on behalf of a company employee. To allow operators to enter client contact information when creating a request, select External.
- Channel for creating sessions. By default, if a request is not linked to a specific session, the client will receive notifications about request processing via email. You can specify a universal channel connected to a live chat, for example, for communicating with clients via Telegram. Through this channel, users will receive alerts about request processing stages.
- Control of active users in the app. This option tracks which company employees are viewing app pages. It’s useful for monitoring how useful and actively used the information is. The list of employees is displayed using the Active Users widget. By default, the toggle is set to Yes. If you do not want to track app views, switch the option to No.
- Display a map of the CI location. Select Yes to track the location of configuration items on a map within the CI page using Yandex Maps.
- API key for CI location map. Enter your Yandex Maps API key to integrate it with BRIX.
- Archive old resolutions. Select Yes to automatically delete items from the Resolutions app after a specified period. In the Archiving in* field that appears, enter the number of days the resolution will be stored in the app. After that, the record will be sent to the archive. To restore it, use the search parameters with the Deleted filter. If you do not want to archive resolutions, select No. Records will be stored in the app indefinitely.
- Channel block list. By default, when a client contacts a live chat, their request is automatically registered in the Service Desk workspace. Use this option to only record requests from specific channels. Add the remaining channels to the block list by entering them in the field.
- Automatically send invitations to external users for the self-service portal. This option allows you to send an invitation to the external portal immediately after creating an external user page:
- Yes. In the fields that appear, enter the subject and text of the invitation. In the template text, you can use variables in the format {$variable_name} so that user data is written to them when the invitation is sent. The list of variables used in the text will be displayed below on the page. Next to each variable in the text, an Attribute field will appear. Use the
 icon to open the list of properties from the External Users app. Select a property to map it to the variable in the text.
 - No. The invitation must be sent manually. For more details, see the Invite users to the Service Desk portal article.
- Yes. In the fields that appear, enter the subject and text of the invitation. In the template text, you can use variables in the format {$variable_name} so that user data is written to them when the invitation is sent. The list of variables used in the text will be displayed below on the page. Next to each variable in the text, an Attribute field will appear. Use the
- In the upper-right corner of the page, you can view the current version number of the Service Desk solution.
Portal
On this tab, you can customize the portal’s appearance to match your company’s corporate style. To do this:
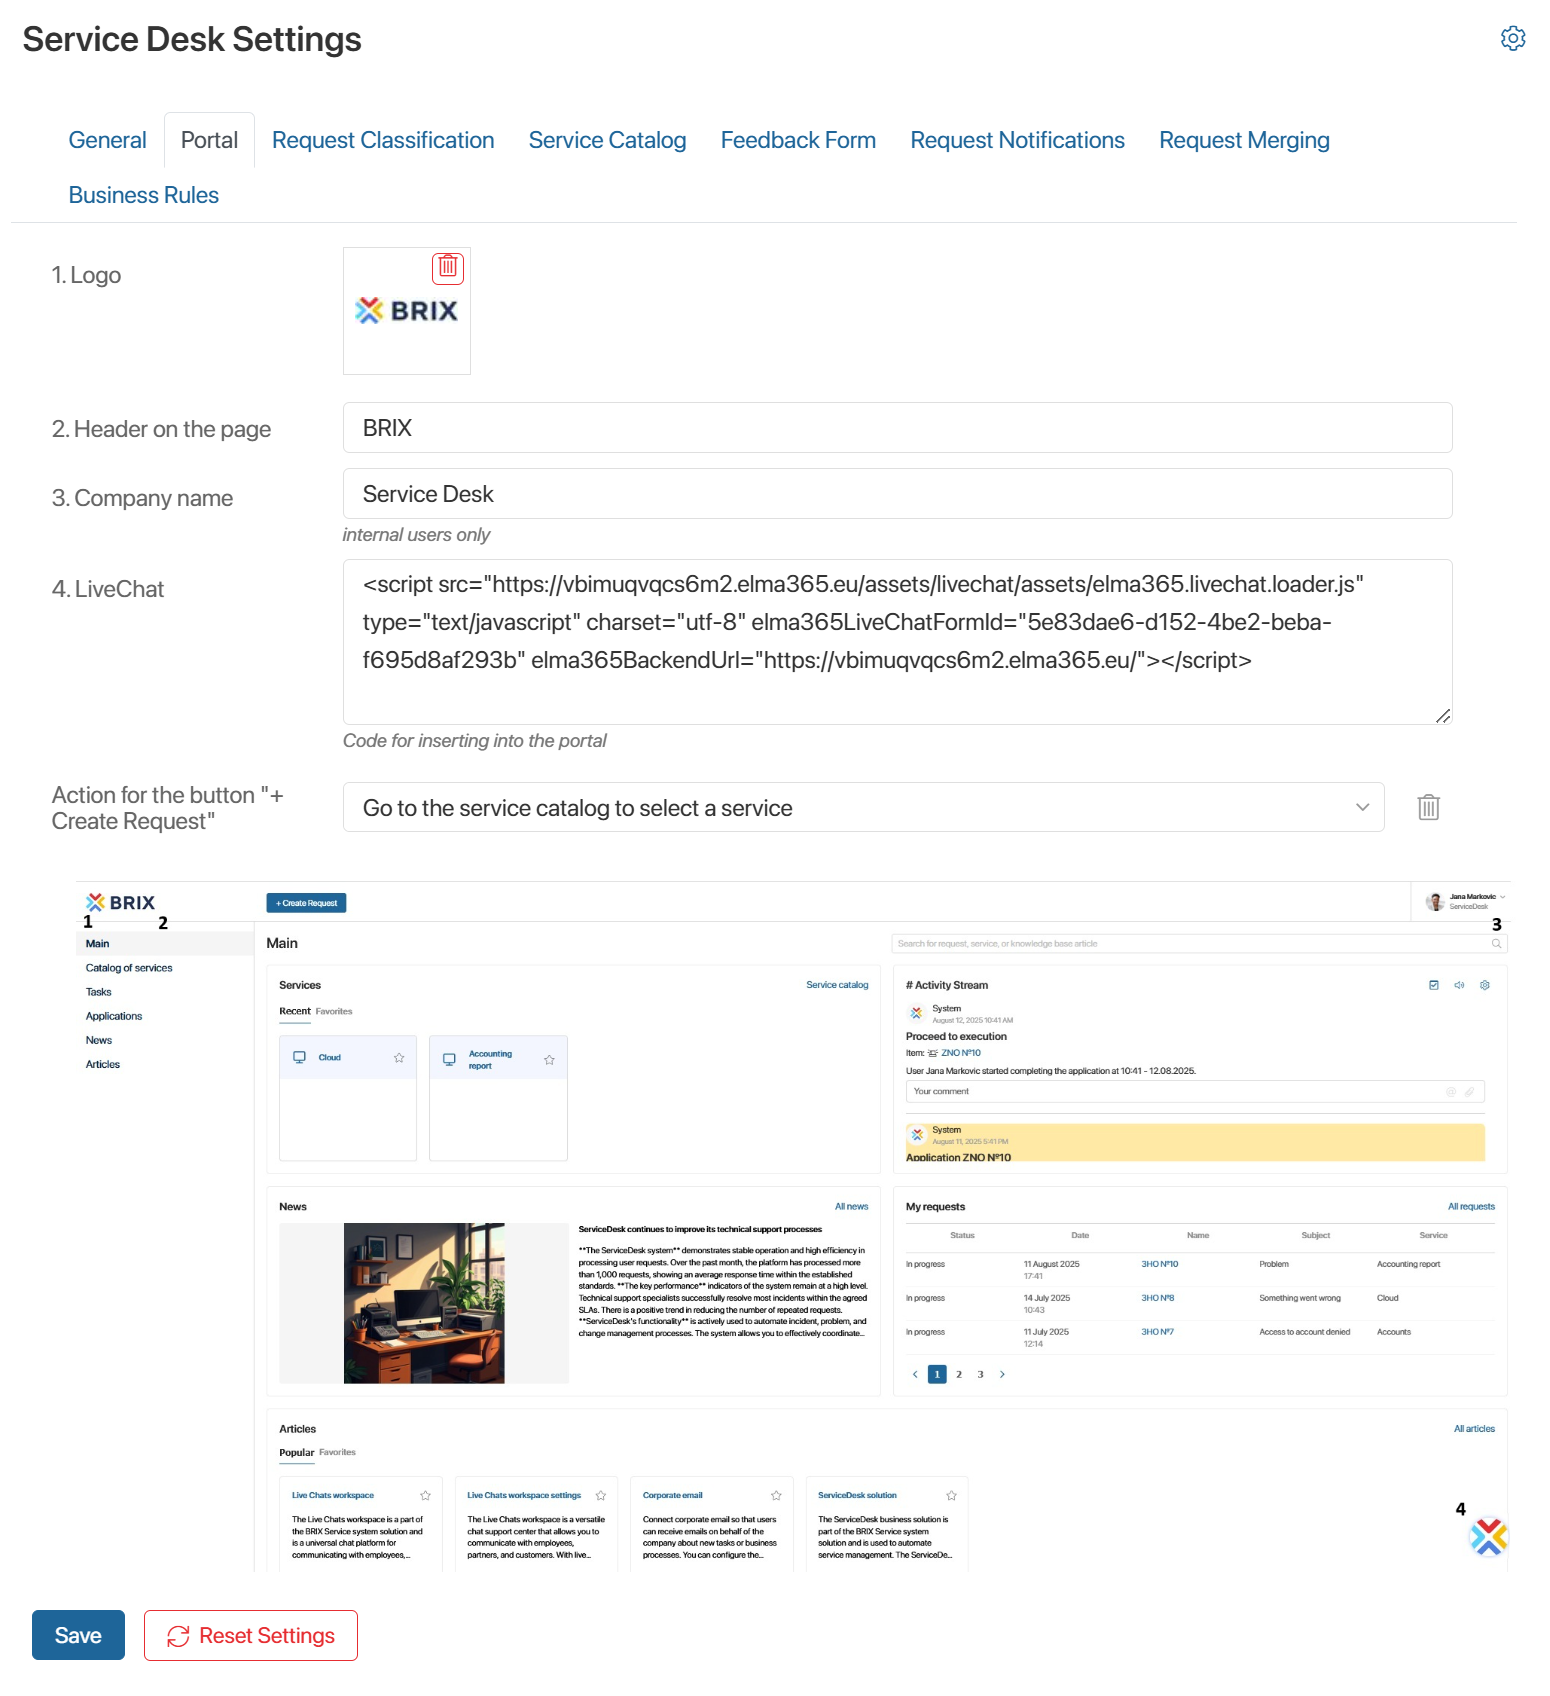
- Upload the organization logo and enter the header that will be displayed in the upper-left corner of the portal, for example, the company or product name.
- Enter the company’s legal name, which will be displayed on the portal in the user profile.
- If you have configured LiveChat for communicating with clients on the external portal, paste its code to connect the chat to the portal.
- To allow users to submit requests from the portal, configure the logic of the + Create Request button, which is located on the top toolbar of the external portal:
- Open the request creation form without service selection. The client will be able to create a request without selecting a service.
- Go to the service catalog to select a service. To create a request, the client first selects the service they are requesting. After clicking the button, the Service Catalog portal page will open.
- Provide a choice of the two options above. By clicking the button, the user will be able to choose one of the options from a dropdown list: create a request without specifying a service so that the operator can classify it, or open the service catalog and create a request for a specific service.
At the bottom of the tab, a preview of the portal page is displayed, where you can see the layout of the configurable components.
Request Сlassification
By default, requests from live chats and the external Service Desk portal arrive with the Pending Classification status. They contain only the subject, request text, and attached files.
To be able to process requests, they need to be classified, meaning the required fields must be filled in. This can be done in two ways:
- Automatically. Depending on the communication channels used, configure:
- Routing rules in the live chat settings for requests from live chats.
- Business rules on the Service Desk Settings page for requests from the external Service Desk portal.
If a request does not match the configured rules, the responsible employee classifies it manually. To ensure they do this on time, set the target classification time and define actions to take if it is violated. To do this, fill in the following fields:
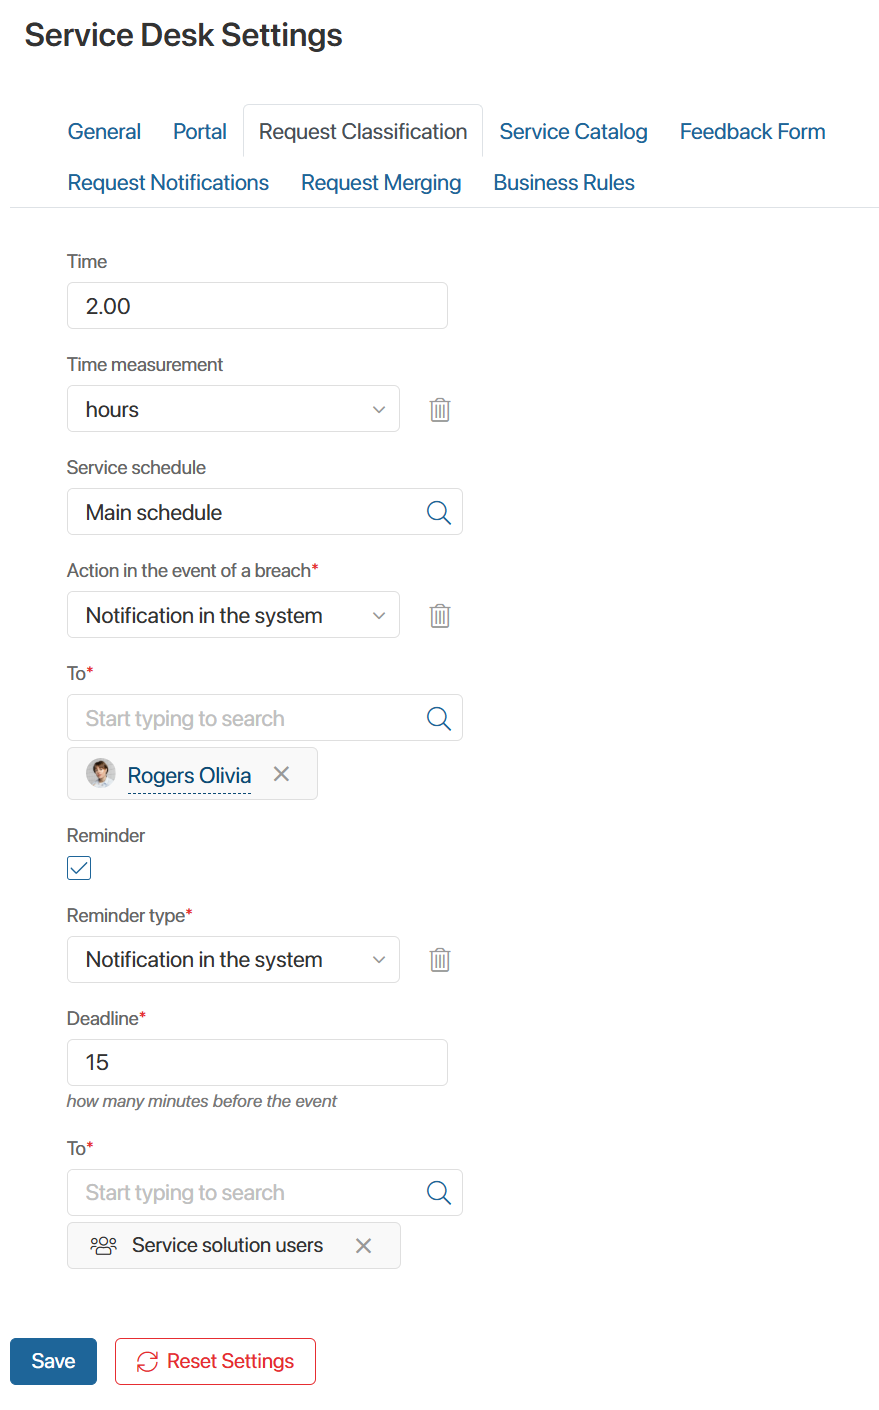
- Time. The timeframe for reviewing and classifying the request.
- Time measurement. The unit of measurement for the timeframe: Minutes, Hours, or Days.
- Service schedule. From the Work Schedule system app, select the company’s working hours during which operators will review the request.
- Action in the event of a breach*. Select the action that will occur if the classification time is exceeded: Not required, Notification in the system, Notification in the system and email alert, or Email alert and task in the system.
- To*. If a notification action is selected, specify the user, user group, or org chart item.
- Reminder. Enable this option to configure a reminder about the expiring classification time:
- Reminder type*. Specify where the user will see the reminder. Available options: Notification in the system or Email alert.
- Deadline*. Specify when to send the notification.
- To*. Specify who will receive the reminder about the expiring classification time: a user, user group, or org chart item.
Service Сatalog
Configure which services and service catalogs will be available to users for creating requests on the external portal.
On the portal, all catalogs and services are displayed in a specified order as cards with a name and brief description. You can change this order and customize the appearance of the cards by setting a color and adding an image.
You can also customize the appearance of information cards when creating or editing items in the Services and Service Catalogs apps.
To configure the design of service catalogs on the portal:
- Click + Catalog. In the window that opens:
- Select items from the Service Catalogs app.
- Create a new catalog.
The added catalogs will appear on the current page to be displayed on the portal.
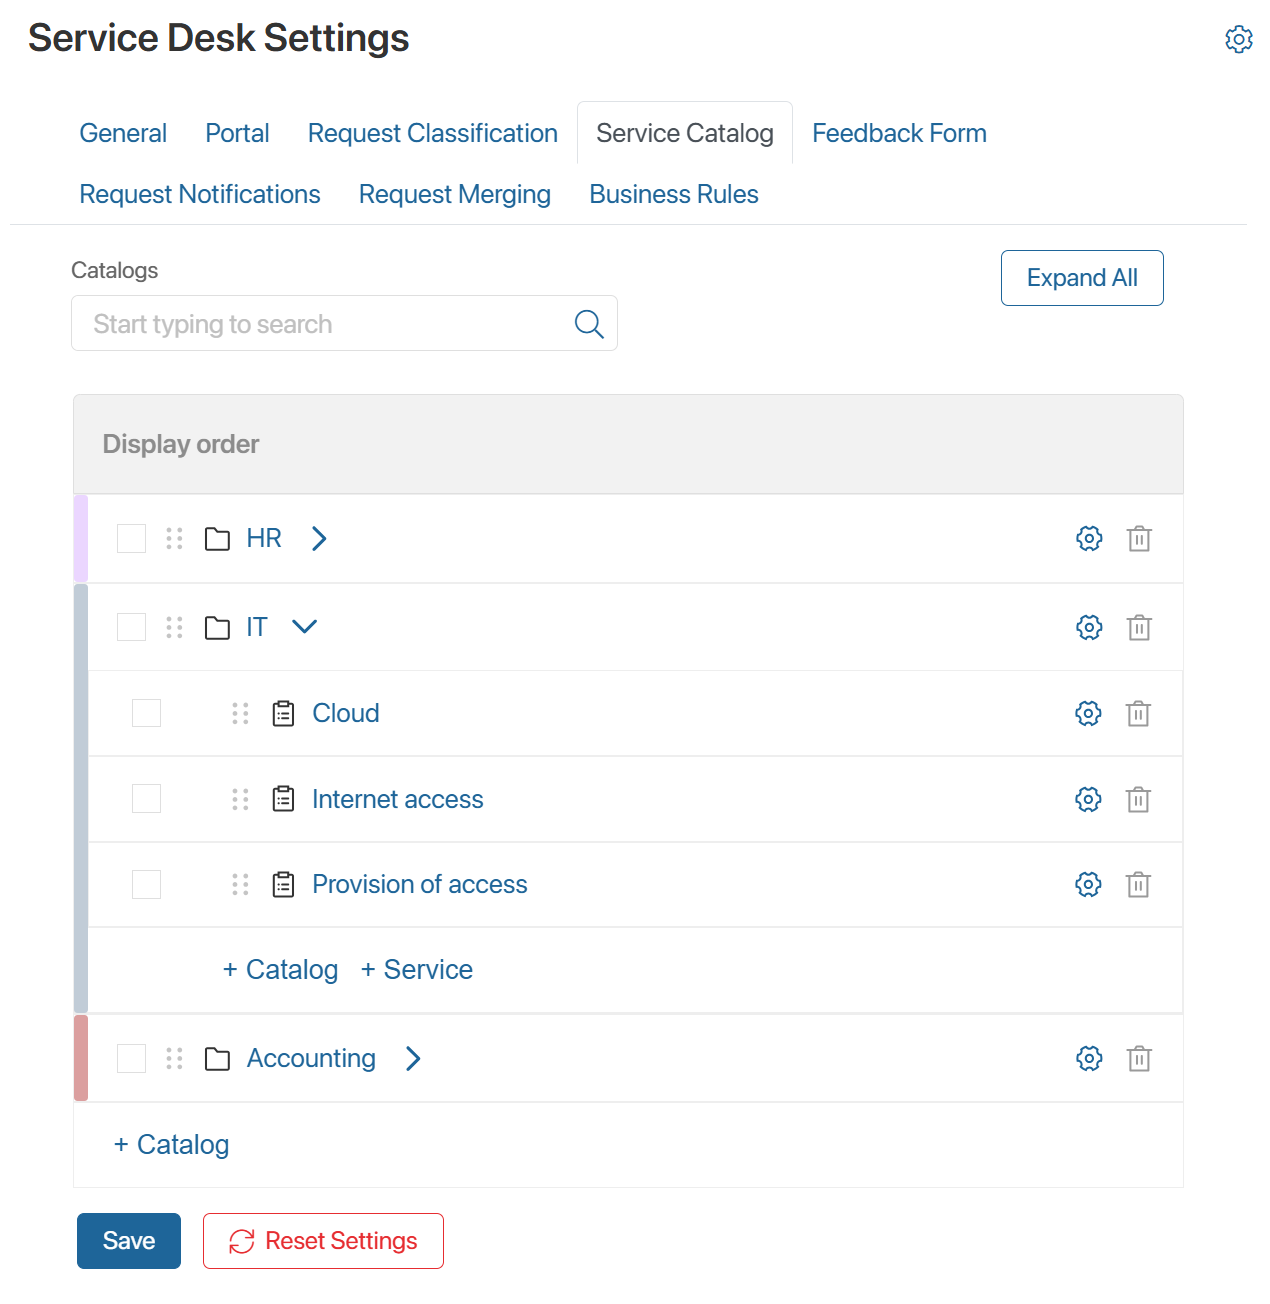
- In each service catalog, add child catalogs and services so that clients can create a request for them on the portal. To do this, click the arrow icon next to the catalog name, then click + Catalog or + Service. In the window that opens, select the items and click Add, or create new records.
- To change the order in which catalogs and services are displayed on the portal, hold the
 icon next to the item name on this page and drag the row up or down in the list.
 - To change the appearance of the information card for a service or service catalog, do one of the following:
- Select one or more items and click the Change Color button that appears in the upper-right corner of the page. In the window that opens, select a shade and click Apply.
- Click the gear icon next to the catalog or service name. In the window that opens, select a shade in the Color field and upload an image in the Icon field.
Request Notifications
By default, operators and clients receive system notifications about various stages of request processing. In Service Desk > Service Desk Settings, you can adjust notification parameters.
For example, send notifications to the client’s email or notify them only about specific steps of request processing.
In addition, you can save the history of system notifications for a request on its page.
To do this, on the Request Notifications tab, follow these steps:
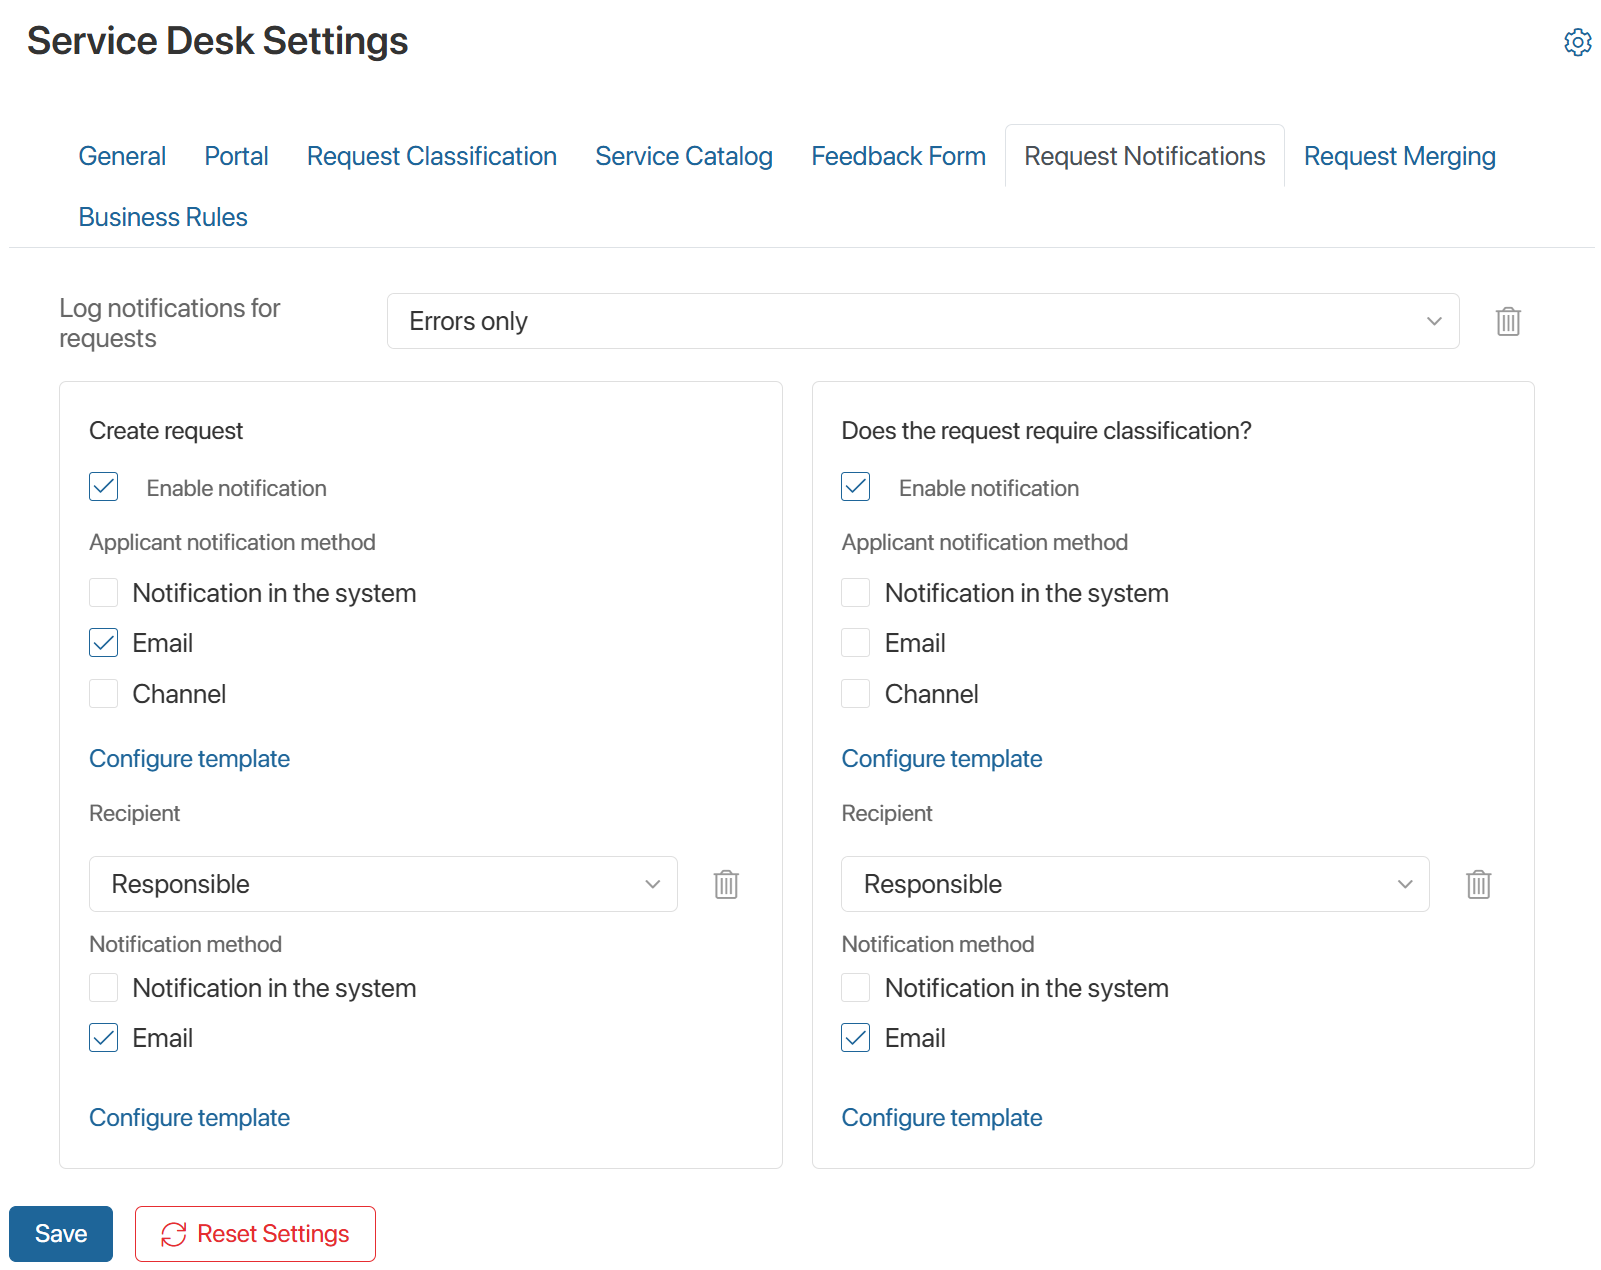
- In the Log notifications for requests field, select one of the following values:
- Not required. By default, the history of generated notifications about various request processing stages is not saved. Therefore, the Notifications tab is hidden on the request page.
- All events. All generated notifications about request processing stages are saved and displayed as a table on the Notifications tab in the request page.
- Errors only. Only data about notifications that encountered an error during sending is saved on the request page.
- Define which stages of request processing to notify the client and operator about. All notifications are enabled and have default settings. You can modify them.
Configure notifications for request processing stages
On the Request Notifications tab, blocks are displayed for configuring notifications, for example, about request creation or classification, about completion of work on the request, and so on.
Let’s look at the configuration using the notification about request creation as an example:
- Enable notification. The notification is enabled by default. To disable sending the notification, clear the checkbox. No users will receive messages about created requests.
- Configure parameters for notifying the request author. To do this:
- In the Applicant notification method field, select how the client will receive the notification that their request has been registered in the Service Desk workspace:
- Notification in the system. If the requester is a company employee, they can receive notifications in the #Activity stream of the Messages workspace. The client will receive the notification in the activity stream on the external portal.
- Email. To the email address specified in the user’s page.
- Channel. The message will be sent to the session with the client where the request was created. If the request came in through another method, for example, from the external portal, the notification will be sent to the universal channel specified on the General settings tab.
- Click Configure template to create a notification template. In the window that opens, enter the subject and text of the notification.
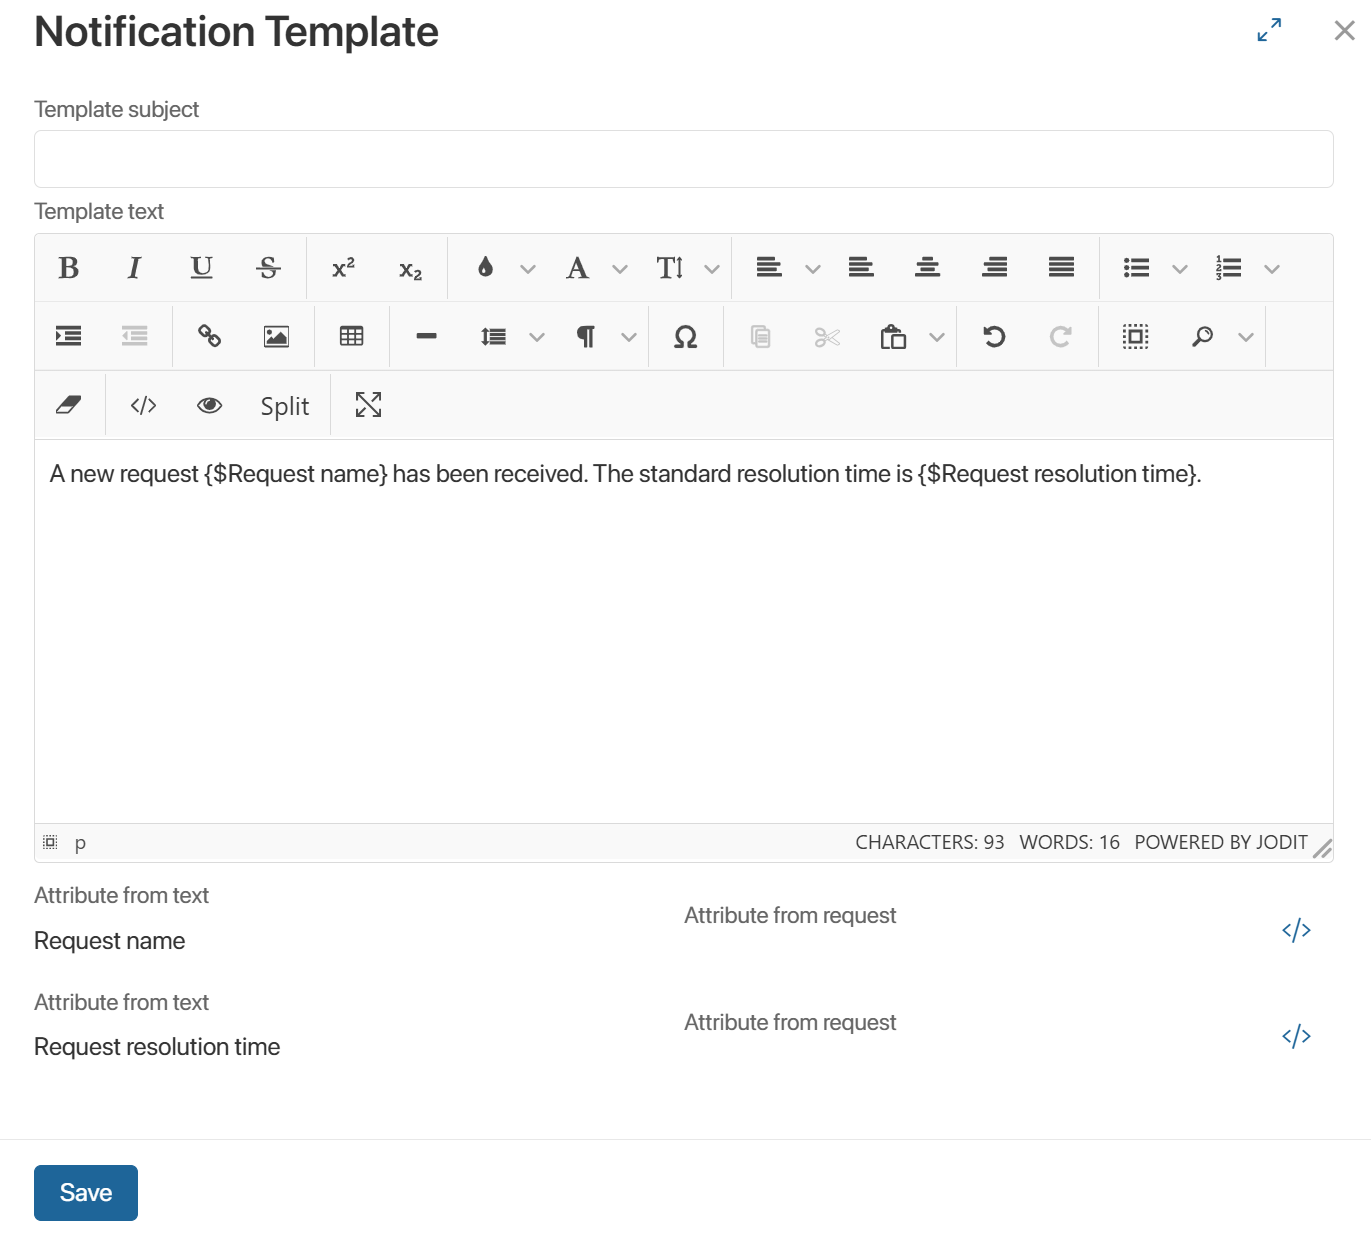
In the template text, you can use variables in the format {$variable_name} so that client data from the request is written to them when the notification is sent. The list of variables used in the text will be displayed below on the page.
Next to each variable in the text, a Attribute from request field will appear. Use the icon to open the list of properties from the Requests app. Select a property to map it to the variable in the text.
- Configure parameters so that the notification about request creation is also sent to company employees. To do this:
- In the Recipient field, specify who should be notified:
- Responsible. The Service Desk operator assigned as responsible for the request.
- Technical support group. Employees of the support group to which the request is assigned.
- Role. An arbitrary company employee. In the Role field that appears, select a user, group, or org chart item.
- Session operators. The live chat operator who is handling the session linked to the request.
- In the Notification method field, select where to send the notification to the employee: to the #Activity stream or via email.
- Click Configure template to create a message template.
If you decide to revert to the default notification settings, click Default next to the name on the notification block.
Request Merging
After a request is created, a check is performed for similar open requests. By default, the operator can manually link duplicate requests, selecting a parent request. When this request is closed, work on the child requests will also be completed.
On the Request Merging tab, you can configure automatic grouping of similar requests into a master request:
- Select the duplicate search level:
- Among all requests in the system.
- Among requests for specific services.
- Among requests in selected service catalogs.
- Set conditions for identifying similar requests:
- The period during which requests are submitted.
- A request processing rule that defines match criteria, such as subject, description, and so on.
Search conditions among all requests are configured on this tab. For services and service catalogs, merging parameters are configured when creating or editing items in the corresponding apps.
To activate request merging at one or more levels, select the options:
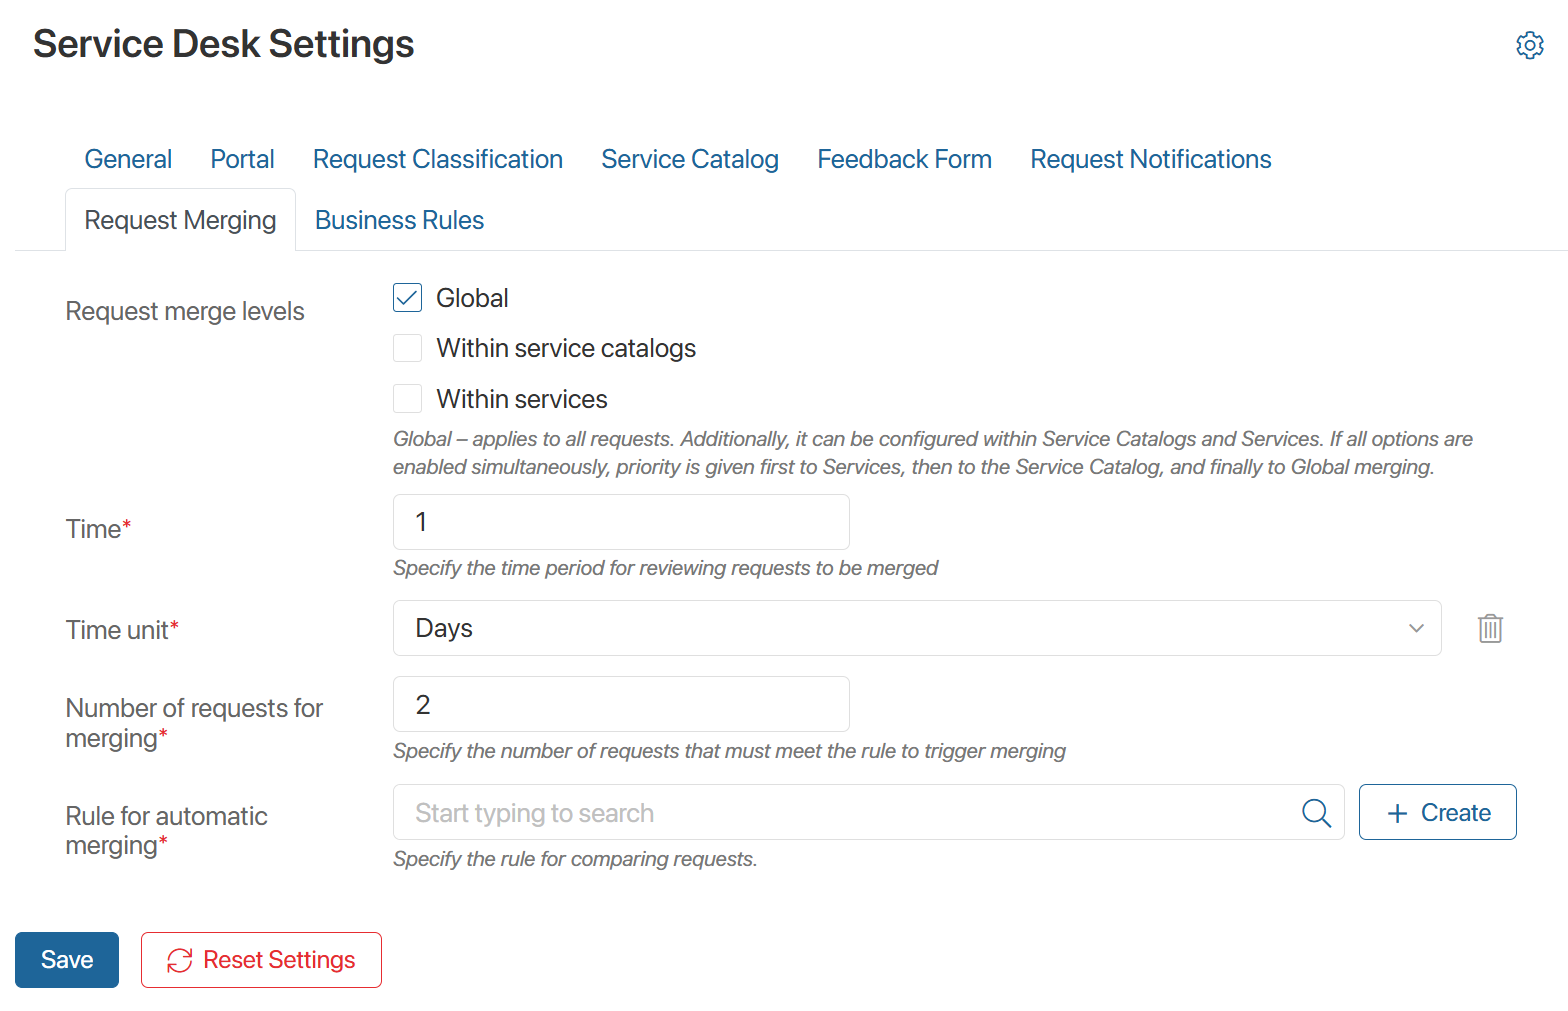
- Global. Duplicate search is performed among all requests. Requests that meet the following conditions will be linked into a master request:
- Time*. The period during which requests are submitted to the system.
- Time unit*. The unit of measurement for the period: minutes, hours, or days.
- Number of requests for merging*. The minimum number of requests that meet the conditions and will be linked into a single master request.
- Rule for automatic merging*. Create or select an item from SD Rules > Rules that contains the request criteria for merging.
- Within service catalogs. Duplicate search is performed among requests for specific service catalogs. Merging conditions are configured for each catalog when it is created or edited.
- Within services. Duplicate search is performed among requests for specific services. Merging conditions are configured when creating or editing a service.
Business Rules
You can configure request fields to be automatically populated with specific values after a request is created: define a type and priority, assign a responsible operator or support group.
This allows you to, for example:
- Configure automatic classification for requests from the external Service Desk portal.
The request will receive the type, priority, and other values you specify in the business rule. The person responsible for distributing requests will not have to do this manually.
- Configure automatic field population for requests created from live chats based on specified conditions. For example, you can assign a high priority and the appropriate support group for requests from a specific company.
Let’s look at how to do this using business rules:
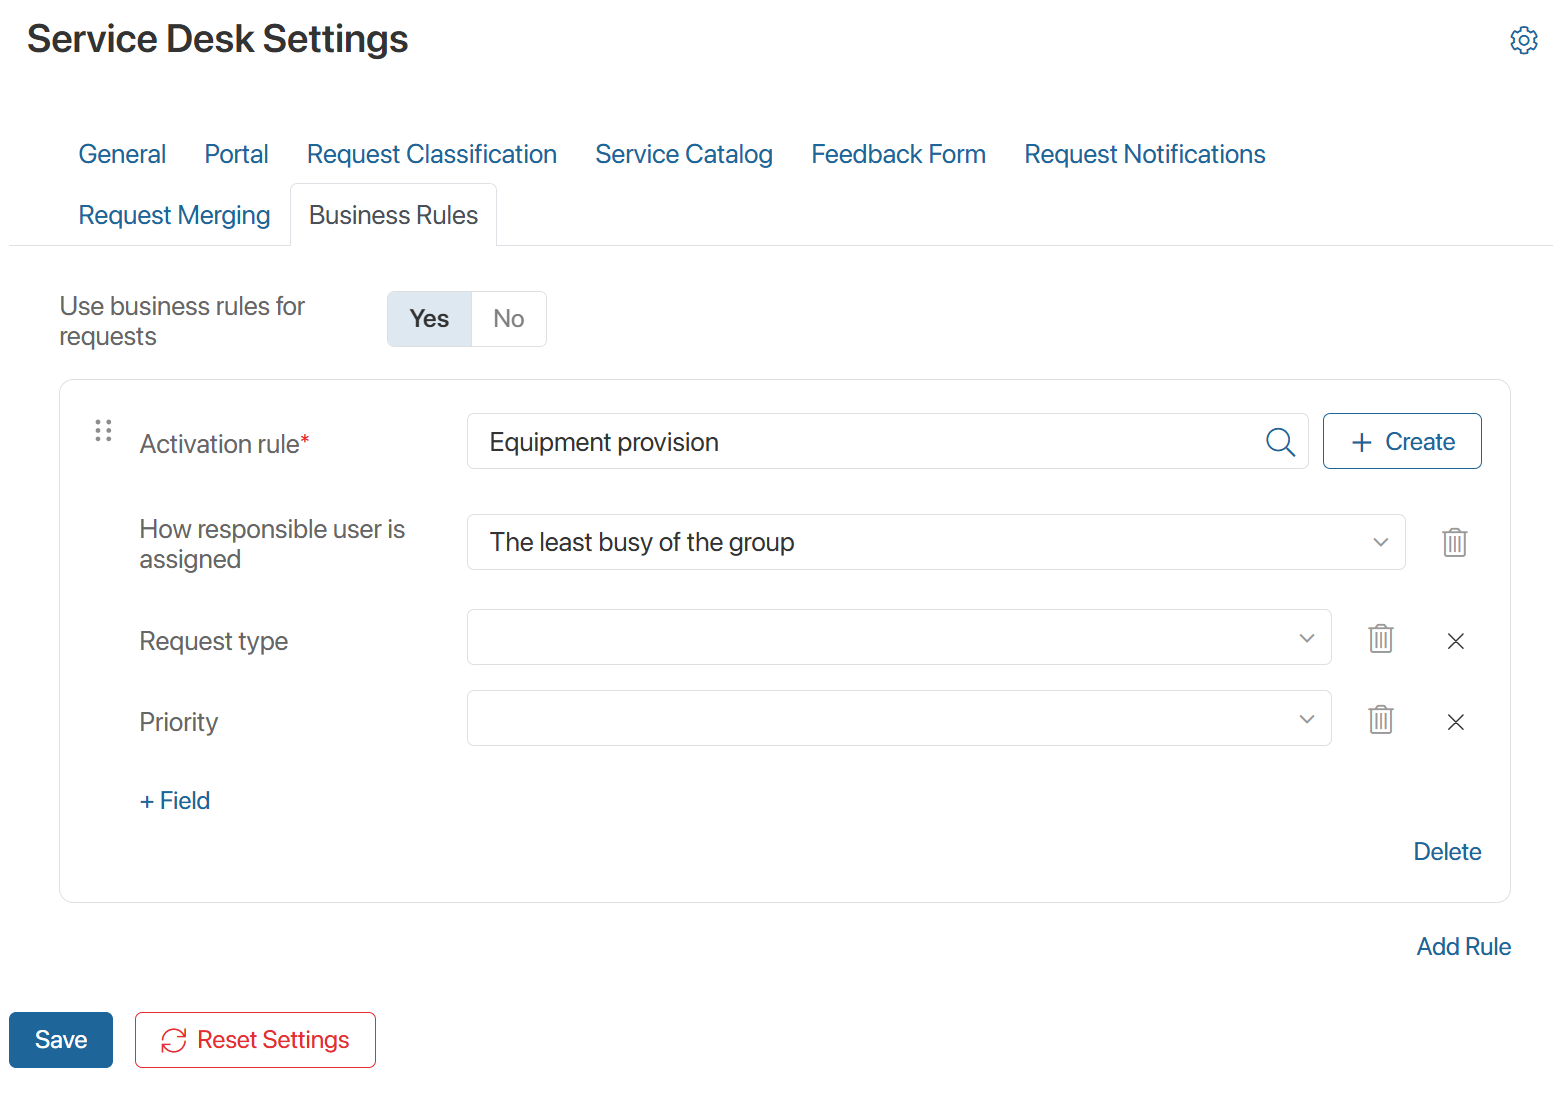
- Enable the Use business rules for requests option.
- Click Add Rule and specify:
- Activation rule*. Add a condition that triggers automatic field population for the request. To do this, select a request processing rule from the SD Rules app or create a new rule. For example, you can check that the request came from a specific company and contains certain words in the subject or text. When these conditions are met, the business rule will apply, meaning the data specified using the + Field link will be added to the request.
- How responsible user is assigned. Define who will become responsible for the request:
- The least busy of the group. The operator in the support group for the request who has the fewest current requests.
- Remains empty. The responsible field on the request page is not populated. The request must be distributed manually.
- + Field. Select properties from the Requests app context and specify the values to be written to them when the activation rule is triggered.
- To create the next rule, click Add Rule.
If multiple business rules exist, their conditions are checked sequentially in the order they appear on the Service Desk Settings page. As soon as the first matching business rule is triggered, the request is populated with the data specified in it. The remaining business rules are not checked.
To apply the configured settings, click Save on any tab.
If you want to revert the Service Desk settings to default, click Reset Settings on any tab.