When work on a request is completed, a client who submitted the request through Live Chats receives a request closure notification in their session. You can include a link to a feedback form in this notification so the client can rate the service. Submitted feedback is stored in the Feedback directory.
To set this up, a system administrator needs to:
- Enable feedback collection and customize the appearance of the feedback form on the Service Desk Settings page.
- Place the form on the external portal or an external website if you do not use the portal.
Enable and configure the feedback form
- Go to the Service Desk > Service Desk Settings workspace, then open the Feedback Form tab.
- Enable feedback collection by toggling the Customer Satisfaction Index (CSAT) switch to the right.
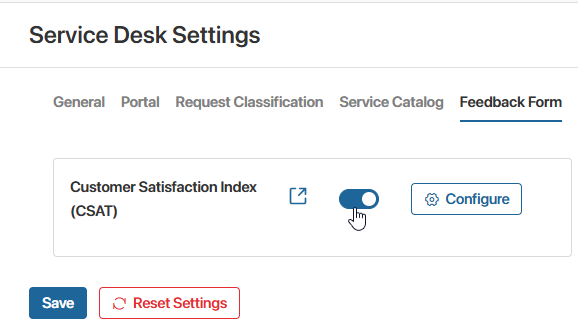
- The feedback form uses a default appearance. To preview the form, click
 .
- To modify form settings and download an .html file for embedding the form on the external portal or an external website, click Configure.
- In the opened window, fill in the fields:
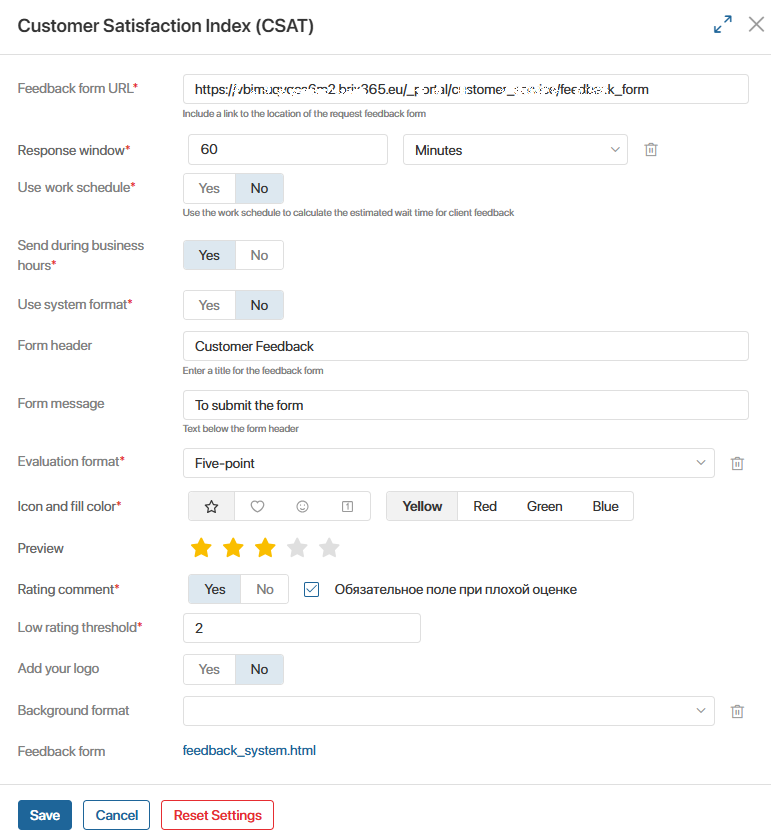
- Feedback form URL*. By default, displays the link to the external portal page where the form is hosted. If you plan to collect feedback on an external website, enter the link to that page.
- Response window*. Specify how much time the client has to submit feedback. Once this time expires, the request changes to the Closed status, and the client can no longer leave a rating. You can set the timeout in minutes, hours, or days.
- Use work schedule. By default, the customer feedback timeout is calculated based on your company's business hours, excluding non-working hours. Enable this option to use operator work schedules instead. In the Which schedule to use?* field, select:
- SLA. Uses the work schedule specified in the SLA rule applied to the request.
- Specify manually. In the Work schedule* field that appears, select one of the available operator schedules from the Work Schedule app.
- Send during business hours*. Select Yes so operators only receive feedback notifications during working hours. If customer feedback can arrive at any time, select No.
- Use system format*. By default, the preconfigured feedback form is used. If you want to customize its settings, select No. Additional fields will appear so you can choose a rating scale, enable comments, upload a company logo, and more.
- Form header and Form message. Enter the form title and brief instructions for submitting feedback.
- Evaluation format*. Select one of the following formats: 5-point scale, 10-point scale, Positive/Negative, or Positive/Neutral/Negative. In the Preview field, you can preview each format and set a default rating by clicking the desired icon (such as 5 out of 5 or 8 out of 10).
- Icon and fill color*. For point-scale rating formats, you can choose the icon shape and color.
- Rating comment*. Select Yes to display a comment field on the form. You can make this field required when a specific rating is selected.
- Add your logo. Select Yes to display your company logo on the form, then upload an image in the Logo field that appears.
- Background format. Choose a background for the feedback form—either a solid color fill or an image. Depending on your selection, pick a color from the palette or upload an image.
- Feedback form. Contains the generated .html file with your form parameters. Download this file and use its code to embed the form on the external portal or an external website.
- Click Save.
If you want to restore the form's default appearance, click Reset Settings.
- Save your changes.
Place the feedback form on the external portal
Important: Adding a feedback page to the portal is available only if the Service Desk solution is unlocked and external user licenses have been purchased for it. Default licenses included with the solution are revoked upon upgrade.
To place the feedback form on the external portal, complete the following steps:
- In the Service Desk workspace, open the external portal settings page.
- Next to the Feedback Form page name, click the gear icon and select Page Builder.
If no feedback page exists, create one by clicking + Page in the upper-right corner. To learn more, see <%TARGETTITLE%>.
- In the interface designer that opens, go to the Template tab, click + Widget, and select the Code widget. You can also drag it onto the canvas from the widget list on the right sidebar.
- In the widget settings window that opens, paste the contents of the .html file downloaded after configuring the feedback form. Click Save.
- Save and publish your changes to the page.
- Go to Service Desk Settings > Feedback Form and open the form settings.
- In the Feedback form URL* field, verify that the default link points to the portal page hosting the feedback form. If not, paste the correct link.
Clients can now use this form to submit feedback on resolved requests.
Place the feedback form on an external website
To place the feedback form on an external website:
- Embed the code from the downloaded .html file into your website.
- Go to the Service Desk Settings > Feedback Form directory and open the form settings.
- In the Feedback form URL* field, enter the URL where the form is hosted on your website.
- Click Save.
Now, when a request is closed, the client will receive a link to the feedback form on your website. Submitted feedback is recorded in the Feedback app.