The request page stores all key information about the request, such as the request text, responsible, requester details, and more.
By default, the request page includes a side panel and the following tabs:
Let’s take a closer look at each part of the request page.
Available actions in the toolbar
The top toolbar of a request page provides the following actions:
 Open the new request form with fields prefilled with values from the current request.
 If duplicate requests with the same requester and service were detected when a request was created, link them and select the master request.
 Send the request for approval.
 Send the request for information purposes.
 If no responsible user has been assigned to the request, go to the Manual distribution page and assign one.
 If you have the Gran Access access type, grant other employees additional access rights to the request page.
 Add a user as a request follower. They will be able to view the request page.
 Open the window for searching the knowledge base for resolutions or known errors.
 Create a request for change (RFC) which is a proposal to add, modify, or remove hardware or software that may affect service delivery.
 Add a problem if the cause of the request has been recorded before or occurs regularly.
 View the status flow configured for requests.
 Subscribe to or unsubscribe from notifications about actions performed on the request.
Main tab
This tab displays request and requester information specified during creation: priority, urgency, impact level, service, user name and contact details, etc.
Closed requests also show the Description of the solution field.
Feedback from the requester is displayed in the Feedback section.
If the request was created automatically from an incoming message in a support live chat, the live chat messages widget displays the dialog with the client. On different sub-tabs, you can view the chat related to the current request and the full conversation history with the requester.

Standards tab
This tab lets you verify whether the request resolution time meets the SLA terms:
- SLA Indicators. A table showing SLA standards for the selected service and the actual performance values recorded during request handling.
- Time in Status. A table showing how much time the request spent in each status.

Advanced tab
This tab contains extra information about the request and the requester:
- Request activity stream displays all actions taken during the request’s lifecycle.
- Customer request history shows all requests submitted by the user, including their statuses and creation dates.

History tab
This tab provides a log of changes made to the request over time.

The data on the tab is displayed if the system administrator has enabled and configured the History of ServiceDesk Apps module.
The changes are displayed in a table with the following columns:
- Action. Description of the recorded change, e.g., status update or data modification.
- Attribute. The request parameter that was changed.
- Value Before / Value After. Old and new values of the changed attribute.
- User. The employee who made the change.
- Date. Date and time of the change.
To filter the data, click the  icon. In the dropdown, set your filter options (action, user, date) and click Apply.

You can export data from the table in .xlsx and .pdf formats. To do this, click the icon. In the dropdown window, select the format and click Generate.
Links tab
The tab is displayed if the request is linked to duplicates, similar requests, change requests, or problems.

The following are displayed here:
- Duplicates—requests with the same issue concerning the same service submitted by the same requester.
- Similar requests caused by the same underlying problem and linked manually or automatically. For example, multiple requesters submitting requests due to a technical failure
- Problems identified during request processing.
- Change requests created within the scope of the request.
Route Stages tab
This tab appears if a request workflow has been configured for the selected service. It shows how the request progressed through each stage of the route.

The table includes:
- The stage number and its associated OLA standard.
- The employee responsible for the task at that stage.
- The stage status and support group assigned to it.
- Planned and actual time spent by the employee on each stage.
- The outcome of the stage.
You can get more detailed information about the route by clicking More details. The window that opens will display a table with detailed data on OLA standards and the performance quality of each route stage.
OLA Gantt Tab
This tab is displayed if a request processing route is defined for the selected service. The route specifies the order in which operators work, the conditions for assigning executors, and SLA standards. The diagram shows the sequence of route stages, their relationships, and deadlines.
You can use the diagram to monitor the request’s progress along the route.

Notifications tab
The tab is displayed if the system administrator has enabled notification history logging for different stages of request processing.
Here you can check which notifications have been sent for a request and make sure that the customer was notified at the appropriate stage of request processing. If an error occurred during delivery, you can view its details. In this case, you can inform the customer about the current processing stage by sending a message through a configured communication channel.
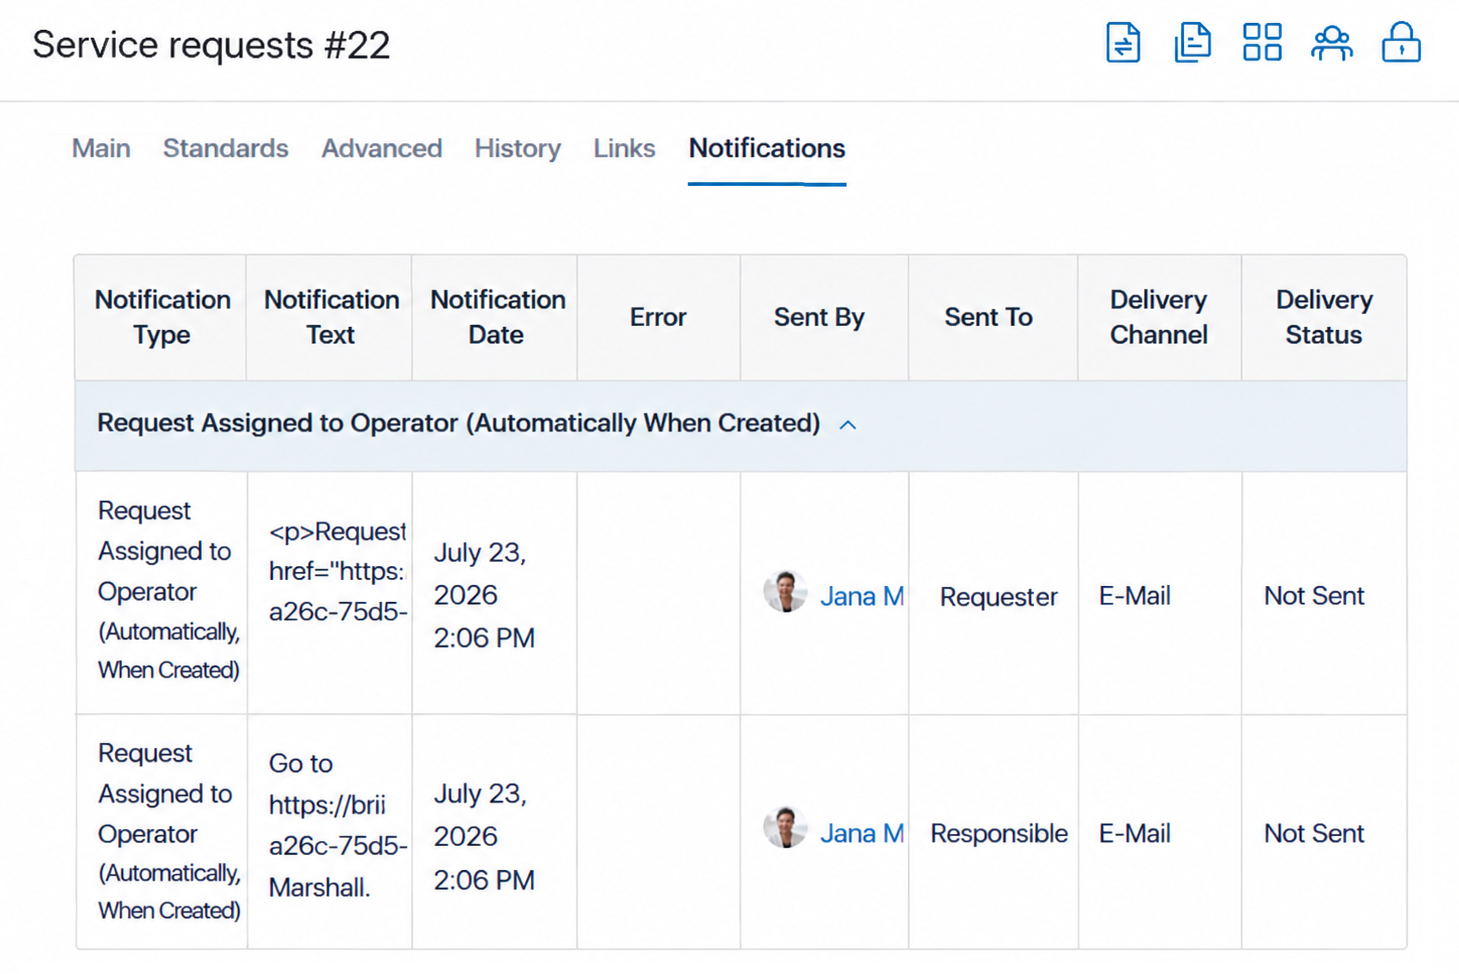
- Notification Type. The type of notification sent during request processing. The system administrator defines the list of notifications on the Service Desk Settings page.
- Notification Text. The notification text configured by the system administrator on the Service Desk Settings page.
- Notification Date. The date and time when the notification was sent to the user. Notifications are sent automatically at specific stages of request processing.
- Error. Information about an error, if the notification could not be sent.
- Sent By. The sender on whose behalf notifications are sent for the request. The system administrator specifies this on the Service Desk Settings page.
- Sent To. The notification recipients configured by the system administrator on the Service Desk Settings page.
- Delivery Channel. The channel used to send the notification, as configured by the system administrator on the Service Desk Settings page.
- Delivery Status. The status of the notification delivery.
Request page side panel
The right-hand side panel is shown on all tabs and includes the following:
- Request creation date.
- Request status.
- If work on the request is put on hold, the reason for putting it on hold will be specified on the page.
- Assigned operator and the support group responsible for the service.
- Active users currently viewing the request.
- An indicator of the time remaining until the request processing deadline. Once the time runs out, this will indicate whether the request was closed on time or not. Processing deadlines are set in the SLA app.
- An indicator showing allowable time for each workflow stage, based on OLA standards.
- Tasks linked to the request.
- A table showing how long the request stayed in each status.
Edit, cancel, and delete a request
Users with edit permissions can modify request parameters. To do this, open the request page and click the Edit button. After making changes, click Save.
If a request was created by mistake, click the Cancel button on its page and leave a comment. The responsible user and the requester will receive notifications. The request will be assigned the final status Canceled.
To delete a request, click the corresponding button on its page.