The Service Desk solution provides an external portal where users can read popular articles, submit service requests, and leave feedback.
Both clients and company employees can use the external Service Desk portal. For example, employees might access it to test portal functionality or conduct client onboarding. To do this, add the employee as an external user of the Service Desk portal and send them a sign-in link, since the portal operates separately from main BRIX workspaces.
Начало внимание
Only a system administrator can invite users to the portal.
Конец внимание
To allow clients and employees to interact with the portal:
- Verify the available number of named external user licenses for the Service Desk portal.
- Add users to the Service Desk external users directory.
- Invite users to the portal.
Step 1. Ensure named external user licenses are available for the Service Desk portal
For each invited portal user—both clients and employees—you must provide a named external user license.
Purchasing the Service Desk solution includes a default number of these licenses, which varies depending on your BRIX edition:
- SaaS Standard: 300 licenses.
- On-Premises Standard: 3,000 licenses.
- SaaS Enterprise and On-Premises Enterprise: unlimited licenses.
If you plan to customize the portal and add new pages, contact your BRIX account manager to purchase external user licenses for the Service Desk solution. Default licenses included with the solution will be revoked upon upgrade.
Step 2. Add an external user to the Service Desk portal
Information about Service Desk portal users is created in the External Users directory within the workspace. At the same time, this data is stored in the shared BRIX external user database under System Apps > External Users.
To add a user to the Service Desk portal:
- Go to the Service Desk workspace.
- Open the External Users directory and click + External User in the upper-right corner.
- Fill in the fields:
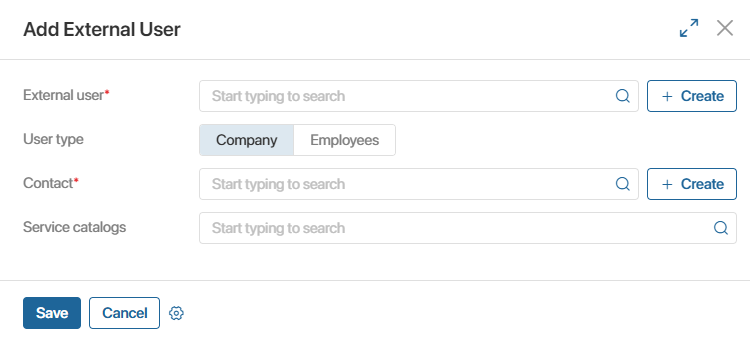
- External user*. Click + Create to open the item creation form of the External Users system directory. Enter the user's full name, phone number, email address, and upload an avatar.
If the user is already stored in the system directory, select them from the drop-down list.
- User type. By default, this creates a record for an external client. If you are creating a record for an internal company employee, select Employees.
- Contact*. For an external client, select or create a personal data record in the Contacts app in the CRM workspace.
- Internal user*. For an employee, select their record from the Internal Users system directory, which stores information about employees working in the Service Desk workspace.
- Service catalogs. Create or select the service catalogs that will be available to the user when submitting requests on the portal.
- Click Save.
The user record will appear in the External Users directory within the Service Desk workspace, as well as in the External Users system app, if it was not already there.
Step 3. Invite the user to the portal
After adding a user, generate an individual link that grants them access to portal pages. You can do this in one of two ways:
- Automatically. In Service Desk > Service Desk Settings, enable automatic portal invitations. An invitation is sent automatically once the external user's details are added.
- Manually. Generate a personal portal link and share it with the user.
To send a portal invitation manually:
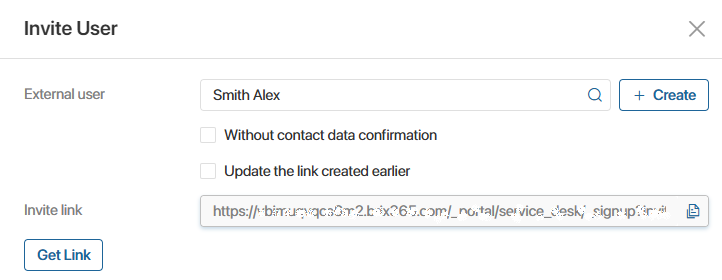
- Go to the Portal page in the Service Desk workspace and click + Invite a new user link.
- In the window that opens, click the magnifying glass icon to select the user you created.
- Click Get Link, copy the link, and send it to the user.
To learn more about inviting external users to the portal, see <%TARGETTITLE%>.