A toolbar with editing tools is displayed above the project plan, and available actions are displayed below it.
If the administrator has enabled plan versioning, you can select which version to apply changes to. To do this, click the magnifying glass icon in the search bar located in the lower-right corner of the plan.
To start editing the plan, use the options located above the plan table. These allow you to:
 Configure the task table in the plan: change the list of columns and their order. These changes apply to both the view and edit modes of the project plan. The system administrator can set the default table layout for all project participants, for example, to show time buffer for linked tasks, display participants, and so on.
 Show or hide all subtasks in the task list.
 Undo or redo the last actions. The option is active until the plan is saved.
 Import the project plan as an .mpp file.
 Export the project plan as an .mpp file.
 Set sorting parameters and sort plan items accordingly, preserving their hierarchy. The system administrator can define the sorting fields.
 Access auto-scheduling settings:
- Auto-scheduling, Reverse auto-scheduling. Automatically adjust the dates of linked tasks.
- Show time buffer, Show constraints. Display time buffer for tasks and control the movement of linked tasks.
For more details on these options, see the Auto-scheduling of linked tasks article.
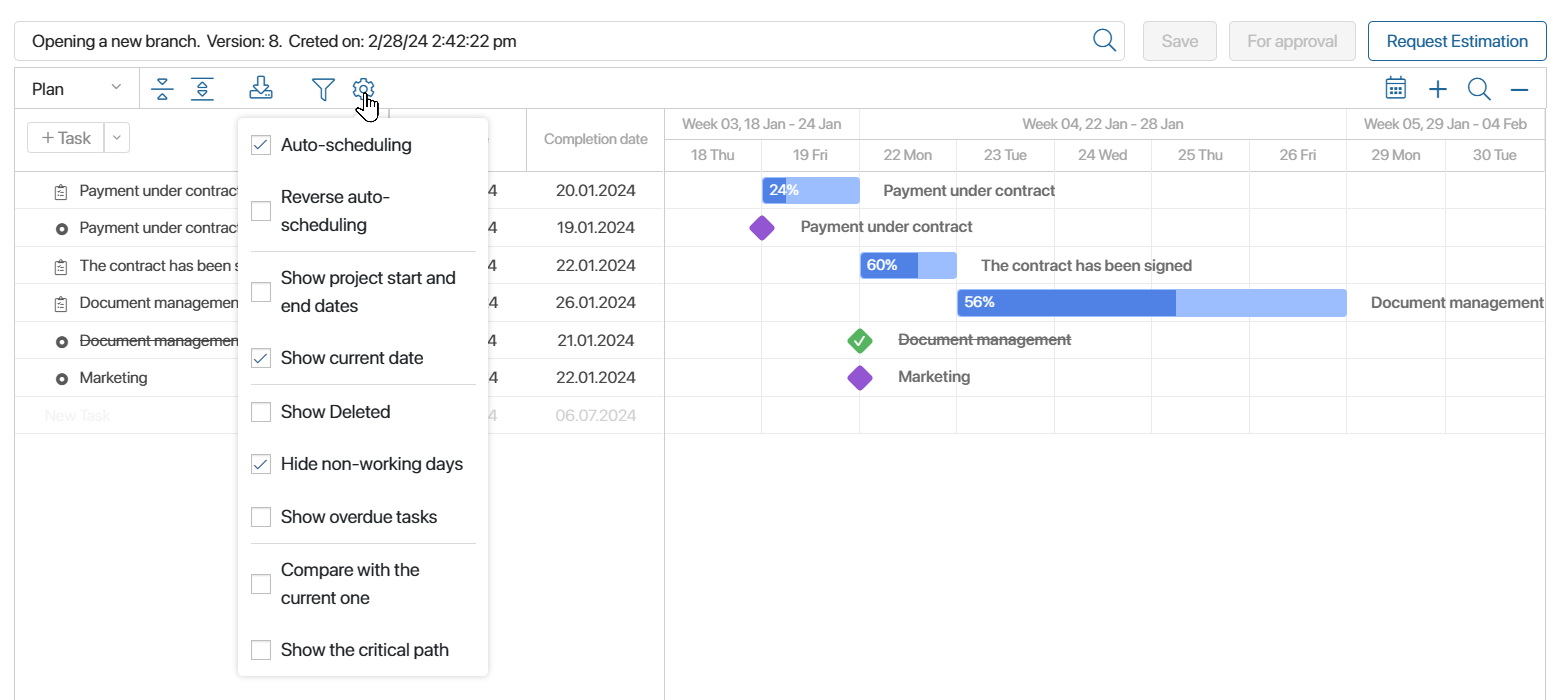
 In a separate window, select options for displaying additional data in the plan:
- Show project start and end dates. Mark the start and end of the project.
- Show current date. Display the current date.
- Hide non-working days. Hide weekends in the project plan. This option is available if the Use business calendar setting is enabled in the project.
- Show overdue tasks. Highlight overdue tasks.
- Compare with the current one.
- Show the critical path.
- Show deleted. Display plan tasks that were deleted in the current draft before publication. You can restore these tasks. They are only visible in plan edit mode.
- Hide executed. Hide completed tasks. However, a completed parent task with the Task type will still appear if it has incomplete subtasks.
 Access linked task settings:
- Highlight links. Highlight the line between tasks in the diagram in black when you hover over it or over one of the linked tasks.
- Auto delays. When creating links between tasks, automatically preserve the delay equal to the interval between the end of one task and the start of another at the moment the link is created. To view or change this value, double-click the link line.
The configured auto-scheduling, task link, and additional data display settings will be applied the next time the plan is opened. Note that saving these values does not apply to the Auto-scheduling and Reverse auto-scheduling options.
 Apply bulk actions to tasks: Create, Copy or Delete.
 Display planned, estimated, or actual task dates for Task and Milestone types in the published version of the project plan. To do this, select an option from the toolbar on the right:
- Plan. Show the dates specified in the task pages in the Start date* and Due date* fields. After the project plan is published, these dates are approved for execution.
- Estimation. Show forecast dates, i.e., the currently estimated completion dates. These are set in the task pages in the Start date (Estimated) and End date (Estimated) fields. Task assignees can change these dates if they receive a corresponding request.
- Actual. Show the actual completion dates of tasks. Start dates will remain as planned. Note that the project plan is read‑only in this mode.
 Jump to the current date on the diagram.
 Zoom in or out on the displayed time period. The plan can be shown with the following time breakdowns: day, week, month, quarter, or year.
Compare with the current one
This option displays the planned dates of tasks in the published version to compare them with the new due dates in the current draft, as well as with the estimated or received dates. The planned ones will be marked with a dark gray line. Please note that only data from the published version of the plan can be additionally shown in the chart. Use the option in the following cases:
- If you have changed the due dates of tasks in the new version of the plan, you can easily compare them with the due dates of the published version. To do this, enable the Compare with the current one option in the draft plan.

- If you want to compare the estimated dates of tasks with the planned ones, select the Estimation option on the toolbar. The estimated due dates will be displayed in the chart. Then enable the Compare with the current one option to show the planned deadlines on the same chart.

- To compare the actual completion dates with the planned dates, select the Actual option from the toolbar. The chart will display the end dates when those responsible clicked the Done button in their tasks. Then enable the Compare with the current one option to show the planned dates in the same chart. In the example below, you can see that the task is actually completed one day earlier than the planned date.

Show the critical path
A critical path is a sequence of linked tasks on which the project completion date directly depends. If any task on a critical path is late, the entire project is delayed.
Enable the Show the critical path option to highlight in red the tasks on the chart that are completed right before the project end date or later. Linked tasks will also be highlighted if their deadlines overlap or if one task is completed the day before the previous task. For example:
- Task 3 is completed right before the project end date (August 14 and 15). Task 2 is linked to it. It is completed right before the start date of task 3. Tasks 1 and 2 have the same difference in start and completion dates. Therefore, all three tasks will make up the critical path of the project.

- The dates of linked tasks 2 and 3 overlap, all three tasks are part of the critical path.

- Task 2 is completed three days earlier than task 3 start date (August 11 and 14). Therefore, task 2, as well as its linked task 1, are not included in the critical path.

Change project due dates
If you have changed the due dates of the plan tasks, they may be outside the project due dates. Then, when you publish the changes, select the next action in the opened window:
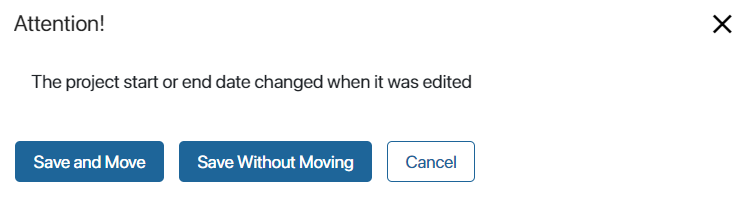
- Publish the plan and move the project due dates to match the changes in the due dates of the plan tasks.
- Publish the plan and leave the project due dates unchanged.
- Cancel the publication and return to editing the plan.
If the plan is published during the approval business process, the option to change the project timeline is not automatically applied.
Multiple selection
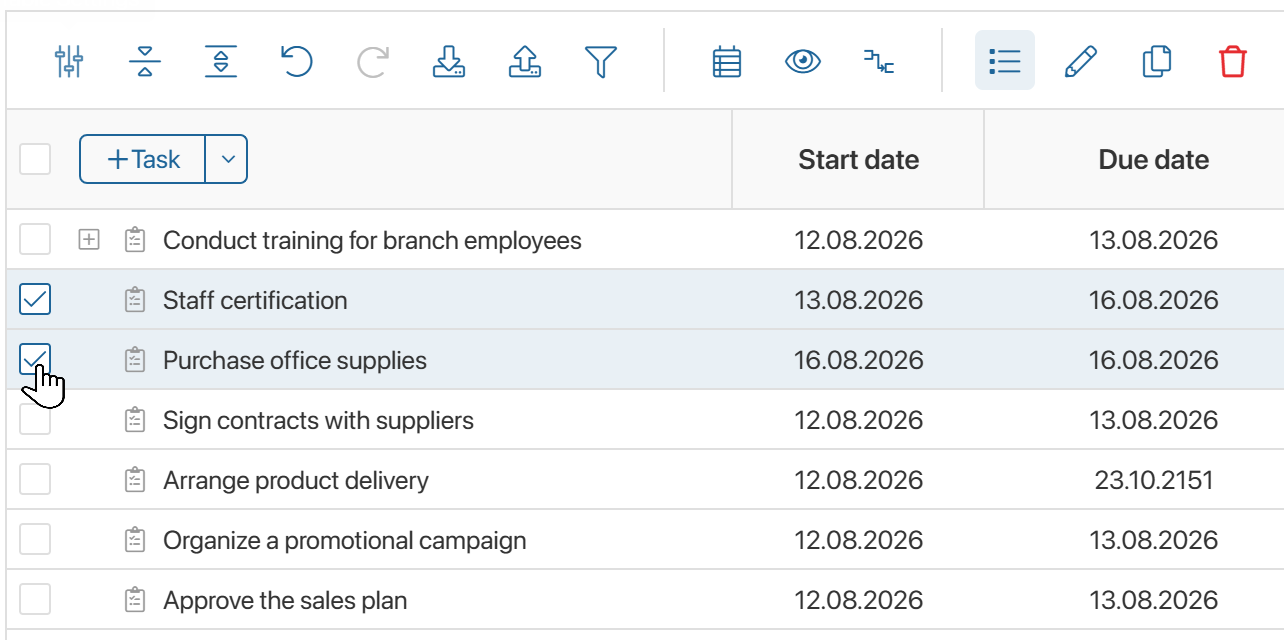
This option allows you to perform bulk actions on selected tasks. Use it when you need to copy multiple tasks or delete multiple plan items at once.
To apply actions:
- Click the icon on the toolbar.
- Select the desired tasks by checking the boxes, then choose an action by clicking the corresponding icon on the toolbar:
 to create a copy, or the trash icon to delete.
Available actions for the project plan
After making changes to the plan, you can perform the following actions available below the plan:
- Save. Create a draft of the plan and save the changes made to it.
- Send for Approval. Launch the plan approval process. This action is available if project plan approval is configured.
- Publish. Finalize the plan and publish the draft. If plan approval is enabled, this option is only available for the approved version of the plan.
- Request Estimation. Send a request to set forecast dates for tasks. This option is available for the published version of the plan and allows assignees to set their estimated completion dates using the request form.
- Cancel. Close plan editing without saving any changes made.