To create a task in the project plan, open it in the editing mode.There are three ways to add a task:
- In the task menu.
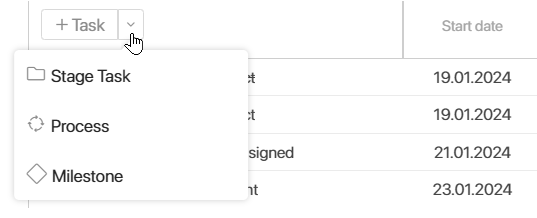
Determine the type of new task and select it in the upper left corner of the plan:
- Click +Task to add a plan item with the Task type.
- Expand the menu and click on the desired name to create a task of this type.
After this, the task creation form will open.
- In the plan bar.
Specify the name of a new task of the Task type in an empty bar in the plan. Then select Enter.
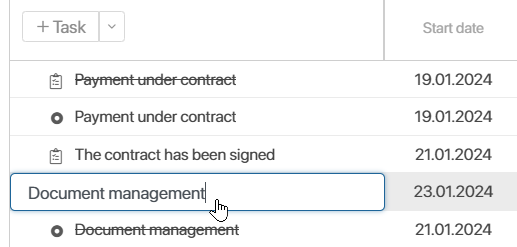
The task created in this way has the current start date by default, and its executor is the task author. You can change this data. To do this, in the task menu, select Open.
The system administrator can disable this method of task creation, as the task creation form does not open and you cannot see all the fields available for filling in.
- Copy the task.
Create a copy of an existing task. To do this, select the task and click Create Copy in its context menu. This will display a new task in the plan at the same level, with all its subtasks and links. The completion percentage will not be calculated. To edit the task details, go to its context menu and click Open.
You can also create copies of multiple tasks at once by applying a bulk action.
Add task details
In the task creation or editing form, specify the name and description of the task, and select the person in charge. Please note, that the Type* field is not available for editing, because its value was set at the previous step. Fill in other fields, the list of which depends on the selected type:
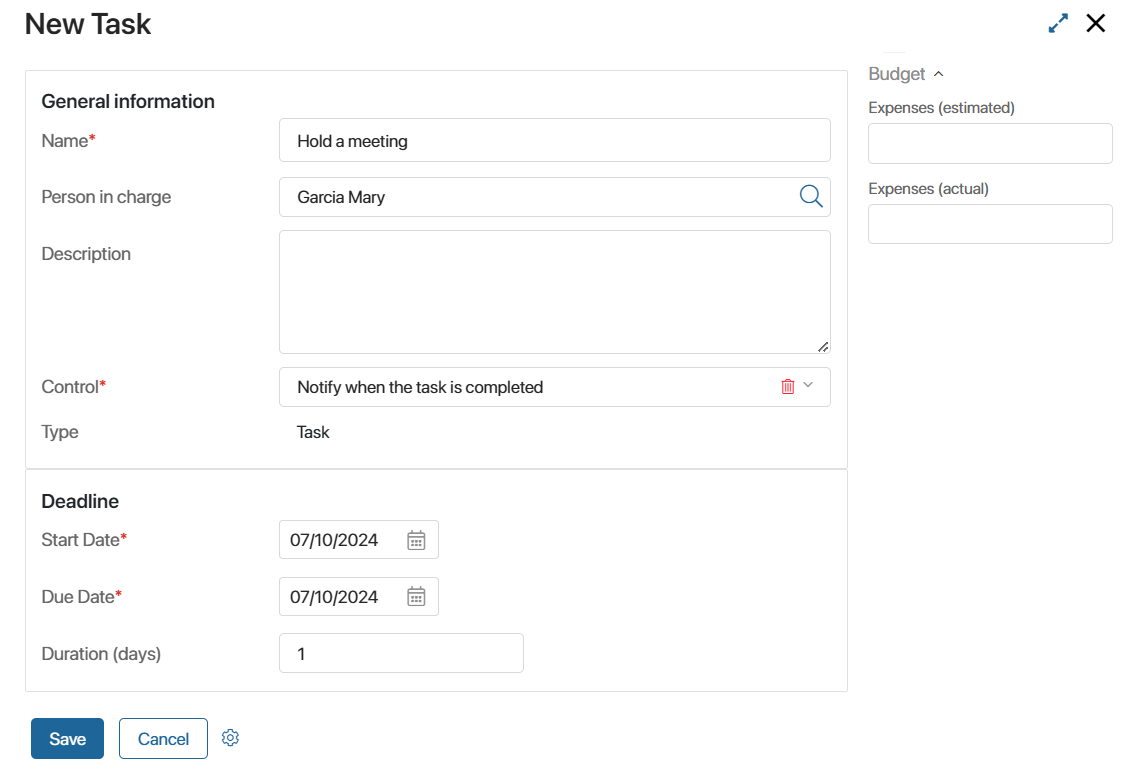
- Control*. This field is displayed for tasks of Task and Milestone types. Select one of the following options:
- Notify when the task is completed. The option is set by default. The project manager will be notified of the task completion in the #Activity stream.
- Submit for control. The project manager will be tasked to check the results of the completed task.
- Not required. Disable the control option.
- Participants. This field is available only for the tasks of the Task type. Here you can specify users who take part in fulfilling the task. After the project plan publication, a participant:
- Can open the task page in Task > Project tasks and leave comments in its activity stream.
- Cannot edit or complete the task, as well as edit the task progress, unlike the person who the task is assigned to.
- Is added to the Project Participants group and gets permissions granted to this group.
- Start date*, Due date*. Specify the due dates for task execution.
- Duration (days). It will be filled in automatically. If you change the value in this field, the end date will change according to the specified duration.
For tasks of the Milestone and Stage Task types, only the Start date* field will be displayed in the Deadlines section. - Expenses (estimated), Expenses (actual). These fields can be filled in the task sidebar and used to analyze the report on project expenses. The system administrator can customize such a report. To view the data on expenses, open the task in the project plan editing mode. Incomplete fields will not be displayed on the task page.
If you are creating a task of the Process type, you need to fill in the additional Business process section along with the previously mentioned fields:
- Context. Select the item to be used in the process instance: Current Project, Current Project Plan, Current Project Plan Element. The fields of this item will be used as values of the process context variables.
- Business process. Specify the process that needs to be launched when the project reaches the start date of this task set in the plan.
- Link to field. Specify the process context variables that the item selected in the Context field will be sent to.
- Configure input parameters. Map the process input variables with the properties of the item selected in the Context field.
The set of fields may differ if the system administrator has changed the layout of the task page. For example, the Planned workload field for resource accounting was added. Read more in the Working with resources article.
Add a subtask
You can create subtasks for the following task types:
- Task. You can add a subtask with the Task or Process type.
- Stage Task. You can add a subtask of any type.
Use the following ways to create a subtask:
- In the list of tasks, select the one you want to make a subtask and drag it to the parent task.
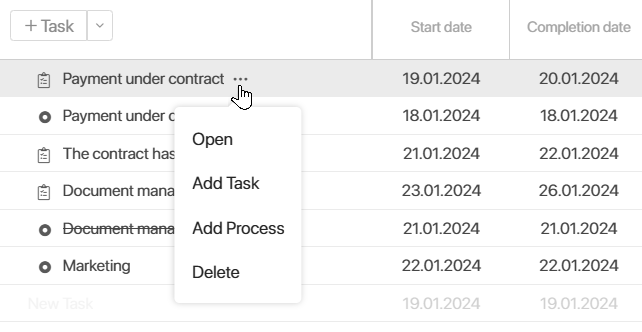
- Hover over the task name and click the three dots. From the context menu, select:
- Add Task. Create a subtask with the Task type.
- Add Process. Create a subtask with the Process type.
- In the subtask's context menu, click Create Copy. This will add a new child task with the same data, including all subtasks and relationships.
начало внимание
If you delete the parent task, the subtasks within it will also be deleted.
конец внимание
Once you’ve added all the tasks, set up their order of execution. To do that, define the dependencies between them. To learn more, see Link project plan tasks.