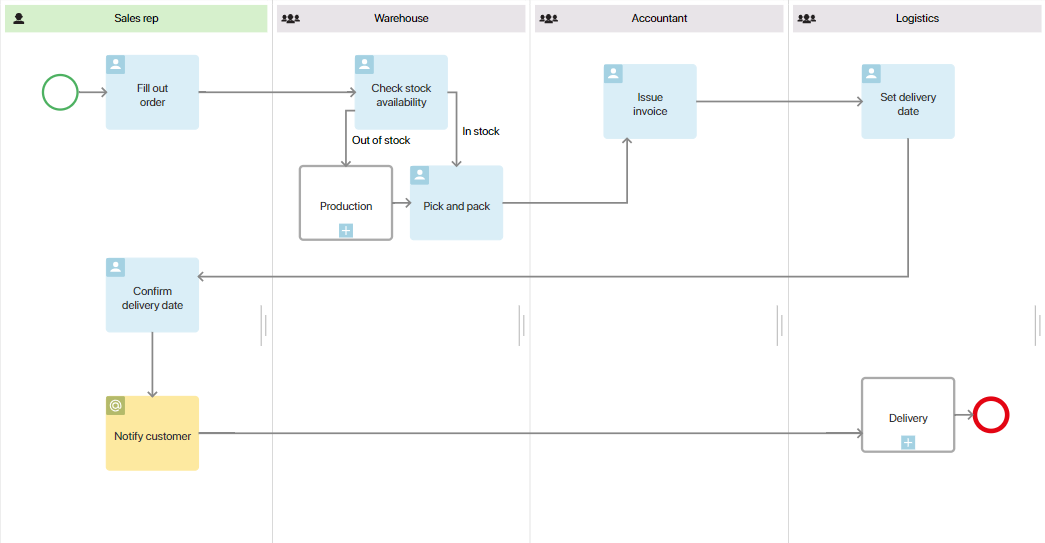
 A task is performed by an employee as a part of a business process. Tasks are assigned automatically in the order they appear in the process diagram. They represent the steps that the process participants have to complete to achieve a specific outcome. For example, in the order management process, employees will fill out the order form, check stock availability, pick and pack the order, etc.
Configure a user task
There are five tabs with settings: General, Form, Deadline, Schedule in Calendar, Connectors, Substitutions, Start Process, and Description.
You can add a template for the task name, select multiple-instance execution, change the form, specify a deadline, etc.
Double-click on the task shape in the process diagram to open the settings window.
General tab
The General tab contains the main information about the task:

- Name*. Specify the name of the task on the process diagram. Keep it short so that the diagram is easy to read.
- Task name. Select the Generate name from template option to include context variables into the name that the user will see in their task list and on the task page.
- Template*. Click the {+} icon in the right corner of the field and select a variable. You can also include conditions and functions to generate the item name according to a template. This will allow you to create a more informative name for the task. If this option is not used, the text specified in the Name* field will be displayed in the task list and on the form.
- Default block with form errors. Enable the option to show a widget with a list of errors if there are errors in the fields of the task form. It is checked that the user specified the data correctly in accordance with the settings of the system data types.
- Notification. When this option is selected, the executor will be notified in the #Activity stream about the assigned task. For the executor to additionally receive email notifications about new tasks, they need to enable this option in their profile settings.
- Reassignment. Use this setting to allow or forbid an employee to reassign a task to other users.
- Perform on behalf of. Select who will be specified as the task author:
- Current user. The person who started the process instance is specified.
- Context variable. Select a Users variable of the One type from the process context. The employee stored in this variable will be specified as the task author. For example, it can be the user who belongs to the swimlane where the previous tasks are located.
- System. The task will be assigned by the user selected as the system supervisor.
- Task description. Choose a String type variable from the process context to display an expanded description of the task. The value of the variable can be assigned within the script written in TypeScript. For example, you can place the Script activity before the task in the process diagram. You need to add the variable with the description in the task form settings.
- Task priority. Select a Number type variable from the process context to display the urgency of the task. The variable can be filled with any numerical value within the script written in TypeScript.
- Multiple instance task. This setting is available only if a swimlane represents a group of users or a department. The task will be assigned to all employees within the group or department. You can choose how users will perform the task:
- First Response. All the executors represented by the swimlane will be simultaneously assigned the task. Once somebody starts working on the task or marks it as completed, it will disappear from the task list of the other executors. You can additionally set up the task using one of the following options:
- Hide the Start Task button. In this case, only transition buttons will be displayed on the task form. Any employee from the group will be able to complete the task without actually starting working on it. This option is best for quick tasks.
- Hide transition buttons. There will only be one button displayed on the form: Start Task. After the employee clicks on it, the task will be assigned to them individually, and transition buttons will appear on the form.
- Show all buttons. The Start Work button and the transition buttons will be all displayed on the form. One of the employees from the group will be able to assign the task to themselves or mark it as completed right away.
- Parallel. The task will be assigned simultaneously to all executors specified in the swimlane settings.
- Sequential. The task will be assigned to the executors of the swimlane one by one. In a dynamic swimlane, tasks are assigned in the order in which the variable storing the executors was populated. For a static swimlane, the order is determined randomly.
If you select the Parallel or Sequential option, by default the process will proceed to the next step after each executor has completed the task.
Depending on the results of the assigned tasks, the process can be routed along multiple outgoing transitions. To do this, you should set conditions to determine when the process can continue along a particular branch. When the conditions are met:
- In the case of parallel execution, already assigned tasks will be canceled.
- In the case of sequential execution, the remaining executors will not receive the task.
For more information on setting conditions in multiple instance tasks, see the Connectors article.
We'll give use cases to better explain when each type of multiple instance task is used.
начало примера
First Response use case
Consider the operation of a warehouse. Any warehouse employee can prepare goods for shipping. It does not matter who exactly will be doing the packaging; what really matters is that the task is completed as fast as possible. If you select the First Response option, the task will be assigned to all the warehouse employees, and the person who is less busy at the moment will be able to immediately start working on it. As soon as BRIX one of the employees has started the task execution by clicking the confirmation button on the task page, the task will be canceled for other executors.
конец примера
начало примера
Use case of parallel task execution with one transition
Let's consider the task of reviewing meeting results. After the meeting, its results are recorded and sent to the participants. It's important that every employee present at the meeting reads this information, but the order in which the task is completed is not important.
To do this:
1. Select the Parallel option so that all meeting participants receive the Review Results task at the same time.
2. Add one outgoing transition from the task, name it Review, and mark it as the default transition.
Now, until every meeting participant completes the task, the process will not proceed to the next step.
конец примера
начало примера
Use case of sequential or parallel task execution with multiple transitions
Let's say we need several managers to review and approve a contract before the process continues. We also need to plan how the process will progress if someone requests revision or rejects the document. This is defined using task transition conditions. They are checked each time any assignee completes their task. To set up this process flow:
- Select how to assign the task:
- Sequential, so that the review task is assigned to managers one by one.
- Parallel, so that managers receive the task simultaneously.
- Use task transitions and their conditions to define how the process will be executed. You can set a condition so that if one assignee declines, the next manager will not receive the task, and the process will move on to the revision stage. With parallel execution, the task will disappear from the list of current tasks for assignees who have not yet completed it. For more information on this setting, see the Connector use cases article.
конец примера
Form tab
On this tab, you can configure what the task form will look like.
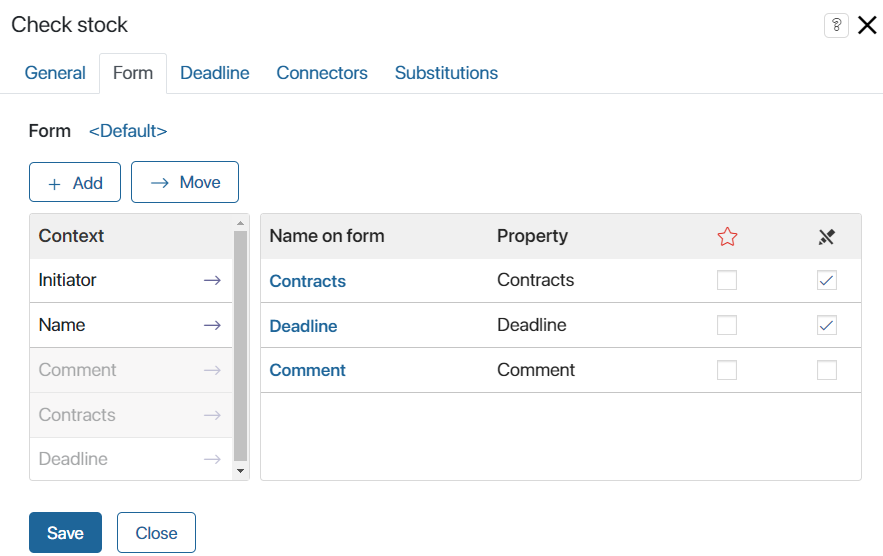
The Context column lists the fields added to the process context. To display them on the task page, drag them into the Name on Form column. Mark the required ![]() and read-only
and read-only ![]() fields.
fields.
To create a new property, click the +Add button. The property will appear in the Context column as well as in the process context.
Property display settings
To modify the settings of a field, click on it in the Name on Form column. You can edit the name and the tooltip text, make it required, and so on. Settings are the same as the ones when adding a field to the app creation form.
For the App‑type field, you can also customize the value to be entered in the field or set up the display of data from nested properties. For more information, see the App data type article.
You can modify the default task form and create a template in the Low‑code designer. For more information, see the Forms tab article.
Deadline tab
For some tasks, it is crucial to meet deadlines and stay on schedule. This is especially true for customer communications. Quickly handled requests and timely delivered goods provide your competitive advantage.
On this tab, you can customize the deadlines for the task, as well as determine what happens if the task is not completed on time.
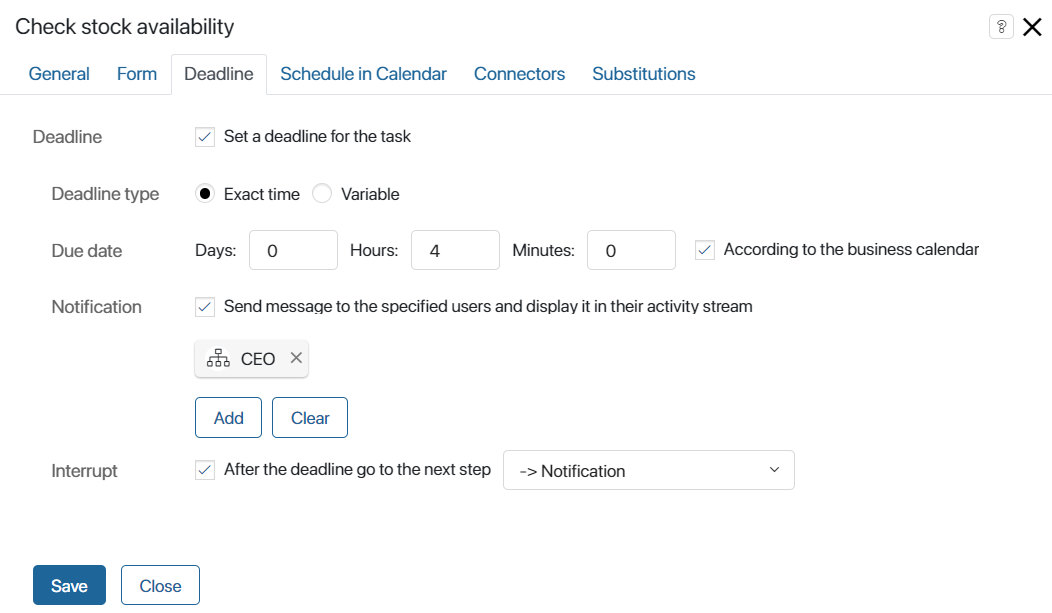
There are two ways to set the task deadline:
- Exact time. Specify how many minutes, hours, or days will be spent on the task. The deadline can be specified taking into account the settings of the current business calendar. In this case, non-working hours are not included in the calculation of the due date.
- Variable. Sometimes it is impossible to determine how much time it requires to complete the task, but it is important that the work is done by a specific date. For example, an employee specifies the leave start and end dates, and the accountant must calculate the vacation pay and give the money 3 days before the employee takes their vacation. In this case, determine the task completion time as a context variable and specify it in the Deadline field.
- Change time. Use this option to add or subtract days, hours, or minutes from the time stored in the variable. Select Add or Subtract, and enter the number of days, hours, or minutes. The deadline will be changed accordingly. You can also limit the execution time considering the current business calendar in the same way as you do when setting an exact time for the task deadline.
When specifying the deadline for a task, you can activate the following options:
- According to the business calendar. The deadline is calculated according to the business calendar and does not include non-working hours of the employee.
- Calculate the duration of the work day using a constant. This option is available when the business calendar is taken into account. It allows calculating the task deadline based on the number of working hours per day. The time specified in the business calendar settings in the Standard work schedule field is used for calculation.
начало внимание
If the calendar settings are edited, the process should be published again to apply the new work schedule to the due dates of the tasks.
конец внимание
Examples of calculating the deadline for tasks
When setting the due date without additional options, only the specified days, hours and minutes will be taken into account. A task can become overdue during the employee’s non-working hours. For example, a user works Monday through Friday from 9 AM to 6 PM. He is assigned a task for two days on Friday at 5 PM. This means that it will be considered overdue tomorrow at 12 AM. If you set a deadline of six hours, the task will be overdue today at 10 PM. A task is assigned to them with a two-day deadline at 5:00 PM on Friday. This means the task will be considered overdue at 12:00 AM on Sunday. If you set a deadline of six hours, the task will be overdue at 10:00 PM on the same day.
Suppose you have assigned a task to the same user, also with a deadline of two days, at 5 PM on Friday, but taking into account their working calendar. In this case, the first day to work on the task will be Friday, and the deadline will be Monday at 6 PM. Saturday and Sunday are excluded from the calculation as weekends. If you set the deadline in hours, the task will be overdue on Monday at 3 PM. One work hour on Friday and five hours on Monday will be counted. The time between 1 PM and 2 PM is lunchtime.
When using the business calendar, you can also take into account the number of working hours per day by using the Calculate the duration of the work day using a constant option. Then, in our example, if the task duration is measured in days, it will be overdue on Tuesday at 5 PM. The standard number of working hours for the user is eight. On Friday they only have one hour to work on the task, Saturday and Sunday are days off, on Monday they have a full day of eight hours, and the missing seven hours are transferred to an extra day. The calculation of the task completion time in hours is not affected by using this option, because by default the employee’s working hours are taken into account.
If a user is assigned a calendar with a different number of working hours each day, the Calculate the duration of the work day using a constant option will take into account the time specified in the calendar settings in the Standard work schedule field. In this case a situation may occur when a task will be overdue during the employee’s non-working hours. Or its actual due date will be delayed by several days. When taking into account the working calendar with irregular working hours, we recommend setting the due date in hours and minutes without using the Calculate the duration of the work day using a constant option. |
Sometimes tasks are not completed on time despite the deadlines. In this case, control tools are needed to timely respond to the situation and take necessary measures.
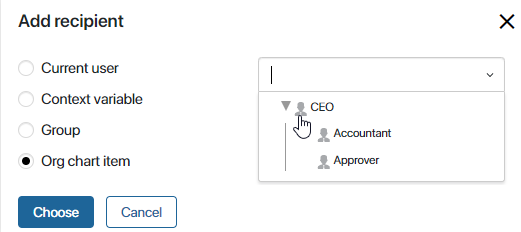
In the Notification field, you can specify the employees who will receive a notification if the executor does not meet the deadline. You can add a current user, a context variable (for example, the Initiator), a user group, or an org chart item to determine the notification recipient.
In the Interrupt field, define the next process step in case the executor does not complete the task in time.
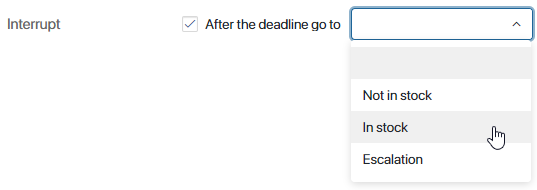
The process will automatically go down the selected connector if the task deadline is not met and the executor does not confirm that the task has been completed. In the process diagram, such connector has a clock icon.
начало внимание
The connector specified in the Interrupt field does not appear as a button on the task page.
конец внимание
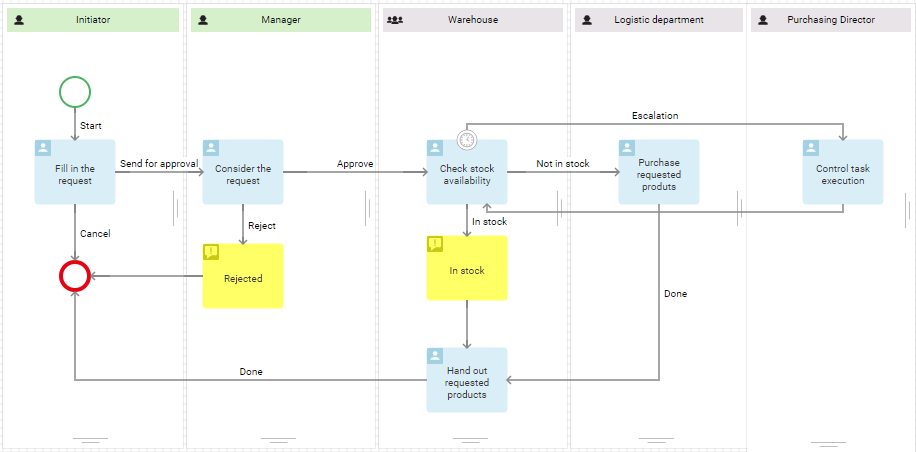
For example, it may be very important for your company to meet the order processing deadlines. Warehouse employees must timely check stock availability and, if necessary, purchase the missing goods. This task is limited in time. If the employee doesn’t meet the deadline, the task is automatically assigned to the purchasing manager to deal with the situation.
Schedule in Calendar tab
This tab appears if a deadline is set for the task. On this tab, you can enable the task to appear in the executor’s calendar.
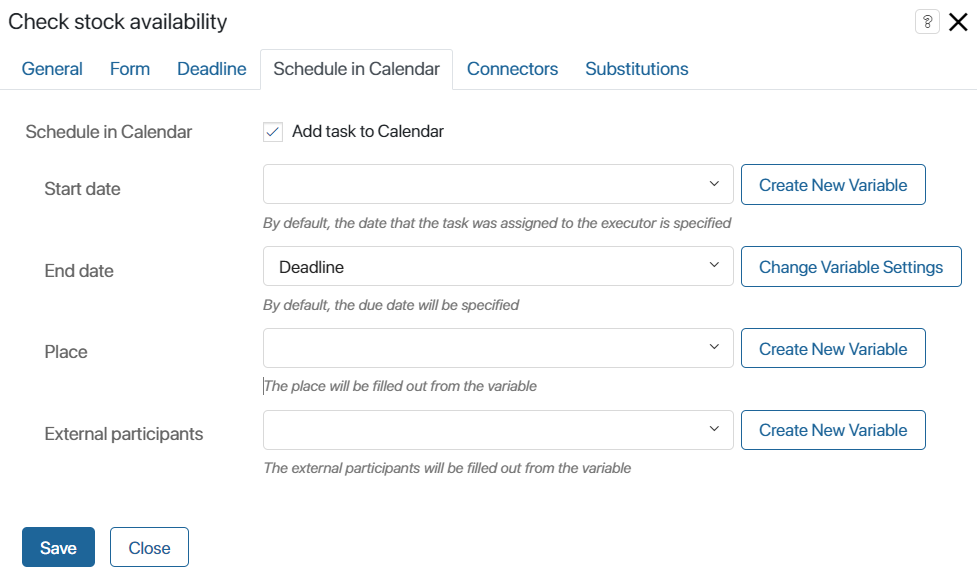
- Start date, End date. Specify the variables of the Date/Time type that store the start and end dates of the task from the process context. These variables determine the period during which the event will be displayed in the user’s calendar. Variable values can be assigned within a script written in TypeScript. For example, you can place the Script activity before the task in the process diagram.
To avoid overloading the calendar, you can schedule a task in it only for specific days. For example, if the task’s duration is one week, you can display it in the calendar only for the last three days of that period. To do this:
- Add Date/Time type variables to the process context, where the values for the task deadlines in the calendar will be recorded.
- On the process diagram, place a script that calculates the values of these variables before the Task item.
- On the current tab, link the Start date and End date fields with these variables.
- Place. Choose a String type variable where the event location is stored.
- External participants. Specify which clients from the Contacts app will participate in the task. For this, select an App type variable that stores the Contacts app of the CRM workspace and can store Many values. You can choose an existing variable from the dropdown list or create a new one.
Connectors tab
On this tab, you can define the process flow after a task is completed. To do this, configure all outgoing transitions. You can edit the title, add confirmation text, choose the button color, and more.
If you selected Parallel or Sequential execution, specify conditions in the transition settings. These conditions determine which path the process will take if the specified task types have more than one outgoing transition.
Additionally, for tasks with multiple assignees, the following settings are available on the Connectors tab:
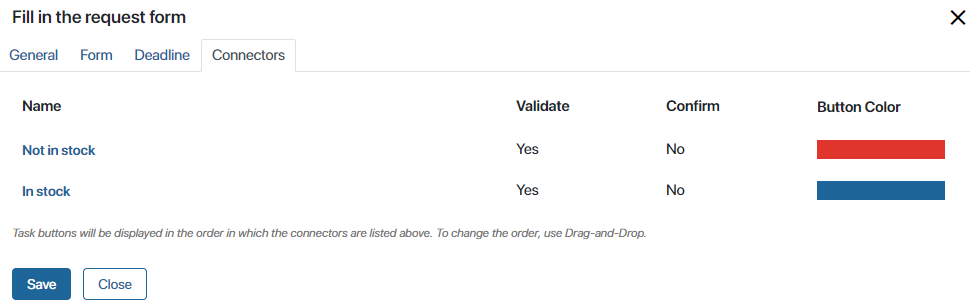
- Interrupt. Enable the option so that when a user selects the connector, the task is canceled for the rest of the employees.
- By Default. Specify the connector by which the process will continue if none of the conditions of other task transitions are met.
To learn more about settings of connectors and their conditions, see the Connectors article.
Substitutions tab
On this tab, you can specify a variable that controls the reassignment of a task to an employee who substitutes the primary executor.
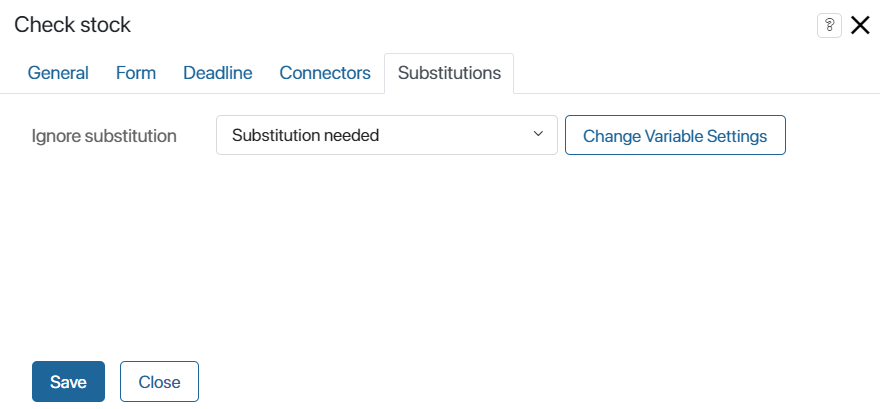
In the Ignore substitution field, specify a Yes/No switch variable from the business process context.
If the variable is set to Yes, the task will go to the originally specified executor, and if set to No, it will go to the substituting employee. The value of the variable can be changed during the business process, for example, by presenting the variable on the form of another task or using scripts.
For instance, ignoring substitution can be useful if the task contains confidential data that should not be shared with third parties.
Start Process and Inputs and Outputs tabs
On these tabs, you can configure the child process to launch simultaneously when the task is assigned in the parent process. For more information, see the article on launching a subprocess from the current task.
Description tab
The tab is available in system versions 2025.10 and higher.
Specify service information about the Task block's execution result or the specific settings specified for it. System administrators and employees modeling the process will be able to open this tab and review these explanations.