Connectors connect activities in the process diagram and define the order in which actions are performed. Connector labels make the diagram easier to understand and also serve as button names on task forms.
This article covers:
- Types of connectors by their purpose.
- How to add a connector to the process diagram and configure its basic settings.
- The specifics of connectors from a task.
- The specifics of connectors from gateways and multiple instance tasks.
- The specifics of escalation connectors.
Connector types by purpose
Some activities can have multiple outgoing connectors. Depending on their purpose in the process, connectors can be divided into the following types:
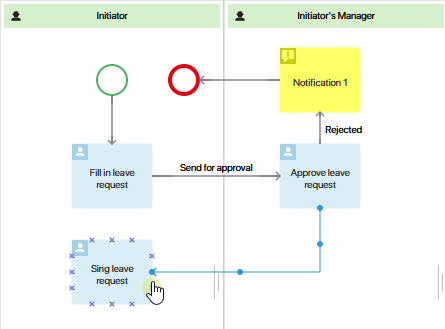
- Main connector. Most activities need one outgoing connector that connects the activity to the next element on the diagram. When the action in the activity is completed, the process continues automatically. You do not need to configure this connector after adding it. For example, you need to add such a connector for Script, Assign Value, Register Document and so on.
- Connectors requiring user action. For the Task activity, connectors serve as buttons that the user clicks to complete the task. Depending on the selected button, the process can follow different branches.
- Conditional connectors. Configured when the process should continue along different branches depending on whether certain conditions are met. For example, after approval, the next process step is automatically determined based on the percentage of rejections. In this case:
- Select a default connector.
- Set conditions for the other connectors.
- Escalation connectors. You can add additional connectors that are activated when the activity needs to be interrupted:
- When an action deadline is missed: Used when the activity requires user action, for example, when a user does not have time to register a document manually.
- When an error occurs in the activity: Determines which branch the process follows if the action in the activity fails. For example, this can happen if the activity contains an automatic operation, such as a script, or if the process context does not contain the data required for the activity to work.
Create and set up a connector
To connect items, hover over one of them, and then, holding down the left mouse button, draw a connection line from one of the points located on its edges.
To open the settings of a connector, double-click on it in the process diagram.
On the General tab in the settings, you can rename the connector and add its description. Additional settings depend on what element the connector is going out of:
- For a task you can set the name and color of the transition button, configure data validation, specify the transition type, and enable signing of the app item. You can also set the button name and color for the Create App Item and Edit App Item.
- A gateway or task with parallel or sequential execution. You can set the conditions of the process transition to a particular path.
Let’s consider all the settings in detail below.
General tab
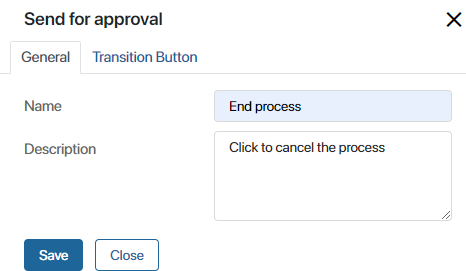
- Name. Specify the name to be displayed on the connector button in the task.
- Transition tooltip text. Enter the text of the tooltip that will be shown above the button on the task form.
Connector going out of a Task activity
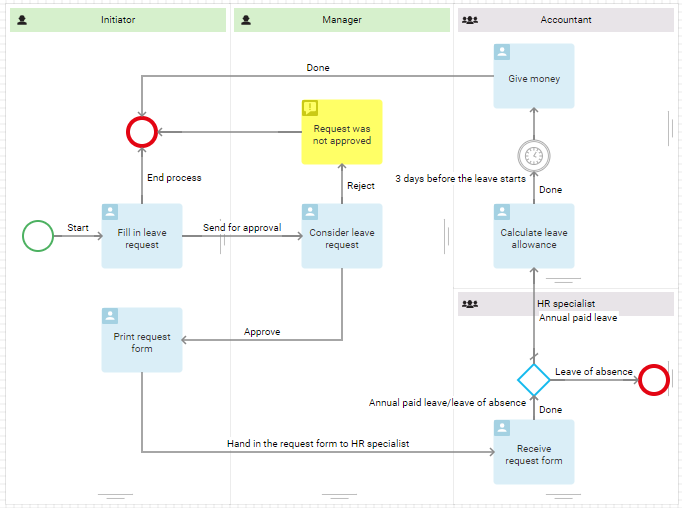
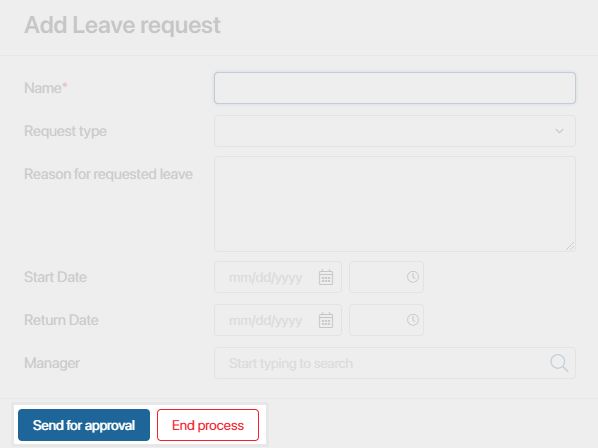
Outgoing connectors, except escalation connectors, are displayed to the user as buttons in the task card. For example, the Fill in leave request task has two outgoing connectors: End process and Send for approval.
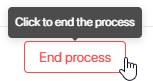
On the task form, these connectors look like this:
Let's take a closer look at task connector settings.
Transition Button tab
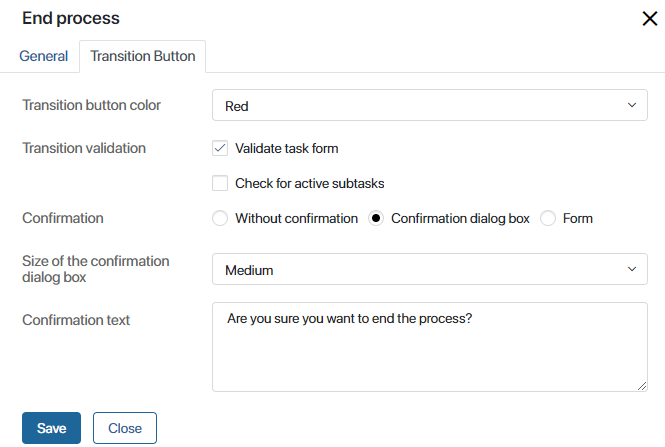
- Transition button color. Select the color of the button that will be displayed on the task form.

- Transition validation. Select a validation option. The task will be validated when the user clicks on the transition button.
- Validate task form. The user will not be able to finish the task without filling out all required fields on the task form.
- Check for active subtasks. The user will not be able to finish the task if there are unfinished subtasks associated with it.
You can select both options or entirely disable form validation.
- Confirmation. You can set up a confirmation dialog box that will appear when the user clicks on the transition button. Select one of the following options:
- Without confirmation. The task will be finished as soon as the user clicks on the transition button, without confirmation.
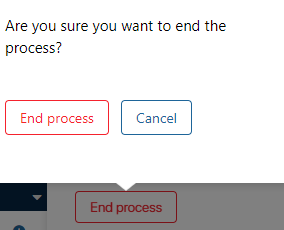
- Confirmation Dialog Box. Specify the window size and enter the confirmation text in the fields that appear below.
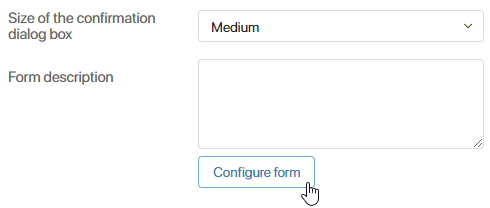
- Form. Set up a complex confirmation form and add process context variables to it. For example, you can ask a user to leave a comment before finishing the task. Select the dialog box, specify the confirmation text, and click the Configure Form button to add new fields to the form.
On the opened Form Settings tab, select a variable from the process context or add a new one. - Signature. Select this connector to customize the window for signing the app item with which the task has been associated. The Signature Settings tab will be added. On this tab, define the app item and its signing parameters.
- Form. Set up a complex confirmation form and add process context variables to it. For example, you can ask a user to leave a comment before finishing the task. Select the dialog box, specify the confirmation text, and click the Configure Form button to add new fields to the form.
Signing in a connector going out of a task. Signature Settings tab
You can enable signing in the settings of a connector going out of a task. Use this option when a task is assigned for an app item. In this case, the user will sign the item and complete the task in one action. At the same time, you can sign attributes and a document file, leave a comment, or change the provider.
Setting up signing in a connector going out of a task requires some preliminary steps:
- Create a context variable of the App type that will store the item to be signed. It is filled in by the user on the task form on which you are customizing the connector, or it can be filled in previous steps of the process.
- On the task form, add fields to select, create, or change the attributes of the app item to be signed. If the item is set before the process goes to the current task, display its value in the task.
For example, a user starts an application process and is assigned with a task in which the user creates the Application app item. Then on the form of the same task the user clicks the Sign Application button. In the signing window that opens, they select the certificate and click Sign. After that, the process moves to the next step and the signature information will be displayed in the application page.
Please note that you can also configure the app item signing using the Sign activity. Keep in mind the following differences between the two signing options:
- Only two resolutions are available in the Sign activity, sign or reject. You can add additional connectors in the task, for example, send for revision, sign with comments, delegate signing.
- In the Sign activity, toy can only the view the item. In a task, the user can create or select a document and sign it immediately. In this way, the path to the result is shortened, two actions are performed in one activity.
Important: the user must have an electronic signature certificate of one of the providers available in the system installed on their computer. Also enable the modules of providers whose certificates will be used by employees. Read more in the Set up digital signatures article.
The Signature Settings tab will appear if you select the Signature option when choosing the transition type. Then, fill in the following fields:
- Application*. Select the variable that specifies the app item to be signed.
- Default provider. Select the provider whose certificate will be applied for signing by default. When the field is empty, the system will use the default provider configured in the user's profile settings.
- Sign attributes. Set whether it is mandatory to sign the attributes of the app item:
- Do not use. When signing the app item, the attributes will not be signed.
- Optional. The user will be able to define the type of signing: with or without attributes. By default, attribute signing is disabled. To enable it, the Attributes option must be checked in the item signing window.
- Preferred. The user will be able to define the signing method. By default, attribute signing is enabled. In the signing window the user will be able to turn off the Attributes option.
- Required. When signing an app item, the user will automatically sign the attributes.
- Sign file. If an app item of the Document type is set for signing, the option to sign its file will be displayed in the signing window. The settings in this field are similar to those of the Sign attributes field.
- Comment. Configure the option to leave a comment on the signature. Select an option from the list: Do not use, Optional, Preferred, or Required. You can also save the user's comment to a context variable of the String type. To do this, select or create it in the field below.
- Available providers. You can limit the list of available providers. Enable the option and in the appeared Providers field, select values.
Description tab
The tab is available in system versions 2025.10 and higher.
Add service information for system administrators and employees modeling the process. For example, describe the rules for fulfilling the specified conditions. Users can view these by opening this tab in the transition settings.
Connector going out of a gateway or a multiple instance task
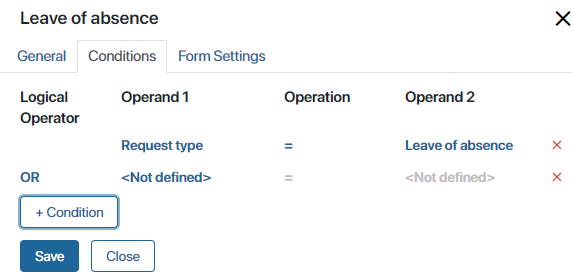
For connectors that go out of gateways or tasks with parallel or sequential execution, the Conditions tab becomes available. The process will go down one path or another depending on the connector conditions.
Also, in the task or gateway settings, specify a default connector that is activated if none of the other connectors’ conditions are met.
Conditions tab
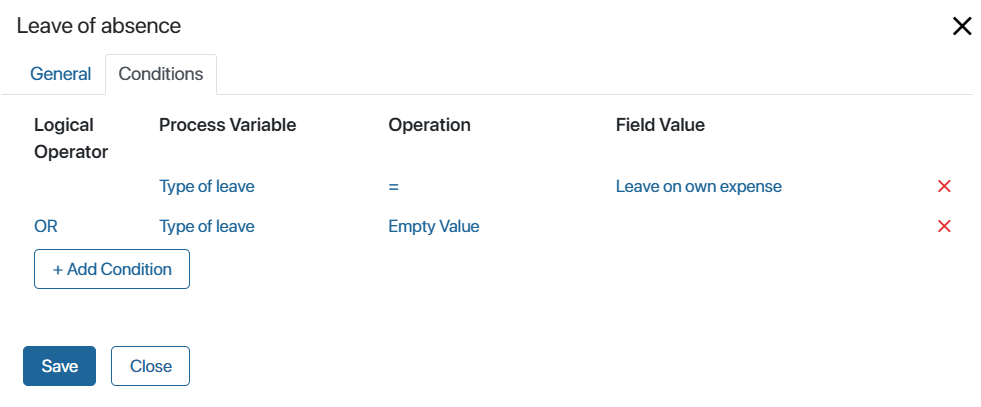
- Process Variable. Specify a variable from the process context. Certain values are available for connectors going out of certain tasks, for example, for the Approval activity you can specify the percentage of approval or rejection. For the connector going out of the Task activity with the sequential or parallel execution, you can use the Transition Percentage variable.
- Operation. Specify a comparison operator to check a specific condition.
- Field Value. Enter the value at which the condition will be executed.
- Logical Operator is used to determine how several conditions are checked. If the result evaluates to True, the process continues down this connector:
- OR. The result is True if at least one of the conditions that this operator connects is met.
- AND. The result is True if both conditions that this operator connects are met.
- OR NOT. The result is True if the first condition is met or the second one is not met.
- AND NOT. The result is True if one condition is met and the other one is not met.
Please note that the conditions are checked in the order they are listed in the connector settings.
If you don’t specify conditions for the connectors going out of a gateway or a multiple instance task, you will see a warning at the bottom of the page when validating the process.
How connectors from multiple instance tasks work
If you've added more than one outgoing connector to a task with parallel or sequential execution:
- Define a default connector. Note that it cannot also be used for escalation.
- Set conditions for the remaining connectors except escalation connectors.
In this case:
- The conditions are checked each time one of the executors completes the task.
- If the conditions are met, the process moves to the next step, and the remaining executors are not assigned the task. For parallel execution, unfinished tasks are canceled.
- If none of the specified conditions are met, the process continues following the default connector.
For more information about using conditional connectors in processes, read Connector use cases.
Escalation connectors
You can configure an activity to be interrupted when a deadline is missed or an error occurs in an automatic action. For each such escalation, specify the connector on the process diagram that should be activated in this case.
Note that if activity interruption is enabled in its settings but no connector is specified:
- In system versions earlier than 2026.6, the process instance is suspended with an error when an interruption is attempted.
- In version 2026.6 and later, the interruption setting is considered disabled.
Specifics of escalation connectors in version 2026.6 and later
In system versions earlier than 2026.6, the same connector can be used for both deadline and error escalations and can also serve as the default connector.
Starting with version 2026.6, the following specifics apply to ensure that each possible event has a separate connector:
- Deadline and error escalations must have separate outgoing connectors on the process diagram. You cannot use the same connector for both cases.
- For the Task activity, you must add at least one outgoing connector that will be displayed to the user as a button. You cannot add only an escalation connector.
- An escalation connector cannot serve as the default connector. If you select such a connector as the default connector, it will be removed from the escalation settings.