The Contracts app is the primary tool used to manage the cost of services.
A contract defines the cost of a service and the associated work required to deliver it. It also regulates the terms and timing of service delivery for the client.
When a client wants to submit a request, the sales rep must first create a contract. It includes:
- The selected service and its price list.
- Types of work and their cost and deadlines.
- The contract validity period.
This way, the total cost of delivering a specific service to the client is calculated, and the period during which the client can request service is defined.
All of the client's requests are processed under the terms of the contract and displayed in the contract page. This is considered the main contract.
If the client needs additional services, a new contract is created. If this new contract covers a longer period or more extensive services, the sales rep can designate it as the new main contract. The client's service period will then extend accordingly.
Before you begin make sure the following data is filled out in the system:
- Services and pricing. Enter this information in the Service Catalogs, Services, Price List Types, and Price Lists apps within the ServiceDesk workspace.
- Client database. Fill this in under CRM > Companies.
- Company work schedule. Including holidays and weekends, configured in System Apps > Service Schedule.
Create a contract
To create a contract:
- Open the Contracts app. Click + Contract in the top-right corner.
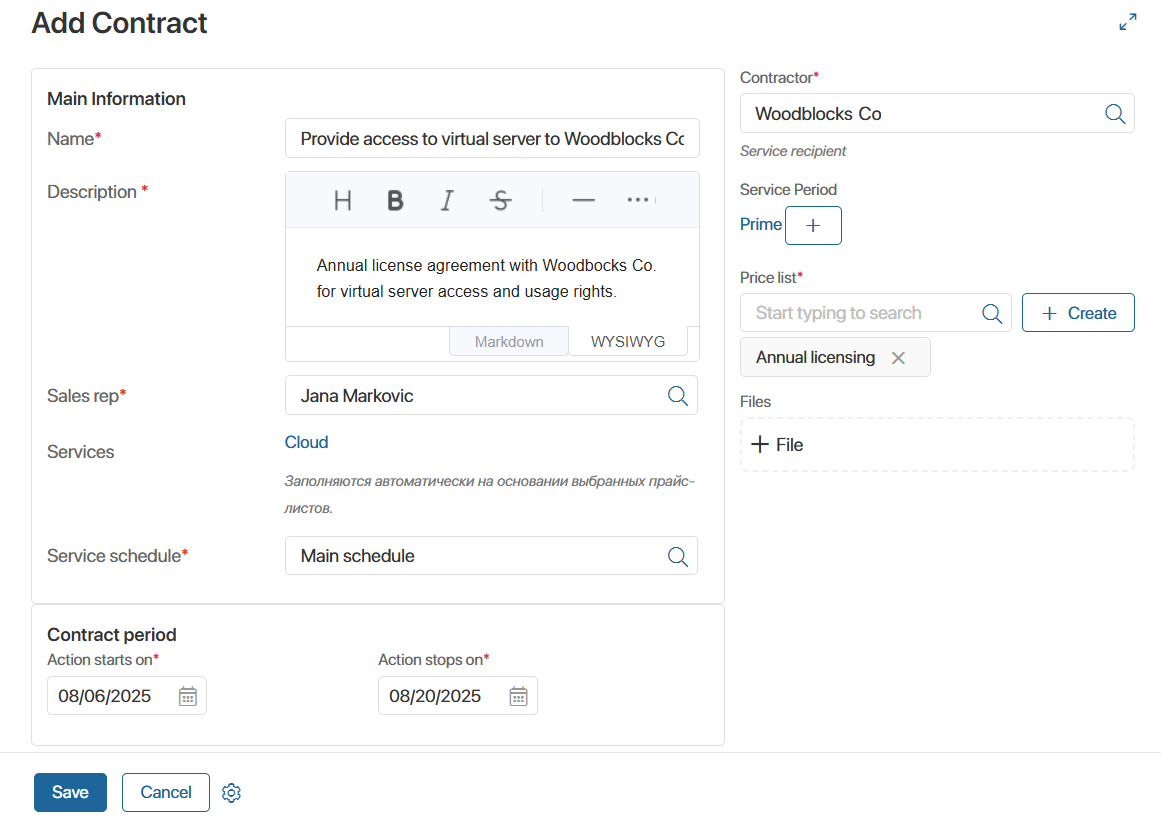
- Fill in the form:

- Name*. Enter a name for the contract.
- Description. Add any details about the service terms. If this field is missing, contact your system administrator to enable the Markdown editor module for ServiceDesk.
- Sales rep*. Automatically filled with the name of the employee creating the contract. You can select a different employee from the list.
- Service catalog. Select the catalog that includes the service provided under this contract.
- Services*. Choose one or more services to include in the contract.
- Service schedule*. Select the company work schedule from System Apps that defines when requests under this contract will be processed.
- Contract period*. Set the start and end dates for the contract’s validity.
- Contractor*. Select the client from CRM > Companies.
- Service period. Each stage of work under the contract is recorded here with a name, timeframe, and cost. For example, for Internet Access Setup, service periods might include Install Internet and Connection Check.
These pages are stored in the Service Period directory, which is only accessible to administrators. To create a service period, click the + Service Period button and fill out the form
- Price list*. Select or create a price list for the service. It defines the cost of delivering that service.
- Files. Attach any documents needed for signing or executing the contract. You can upload from your computer or select from the Files workspace.
- Click Save.
The new contract will appear on the main page of the app.
Contract page
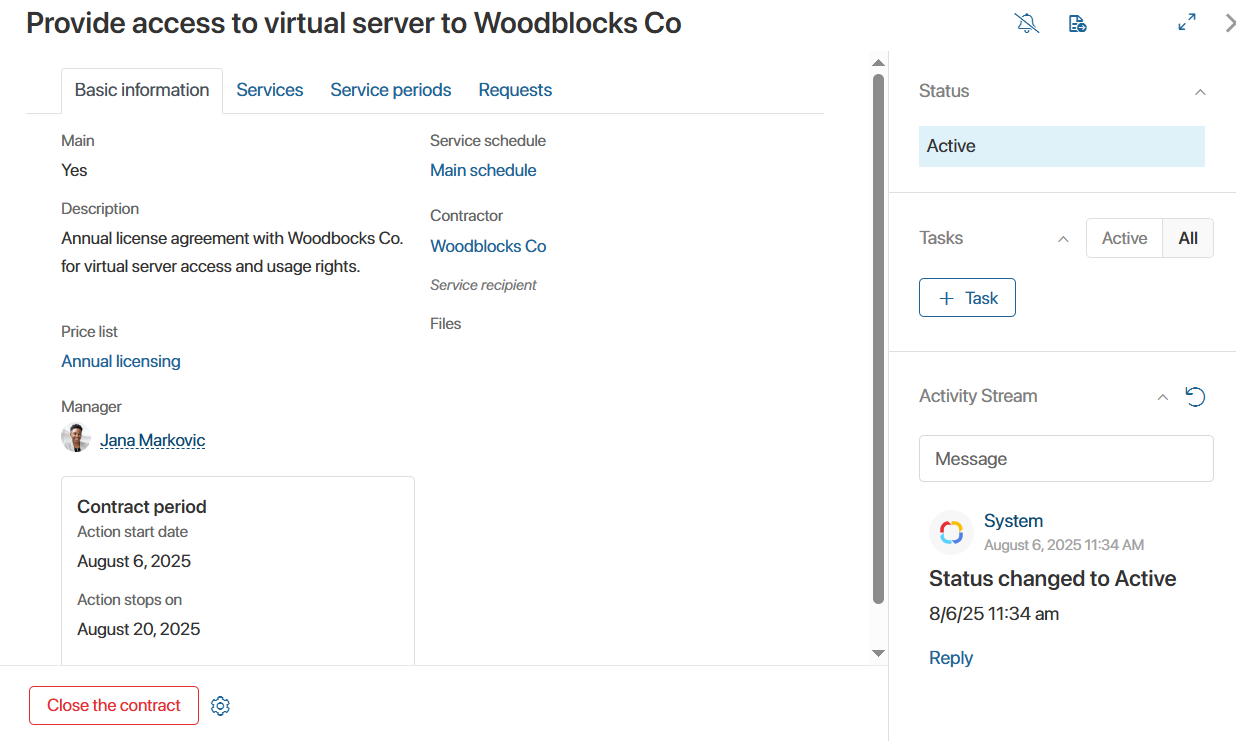
Click on a contract to open its page. It contains multiple tabs with all relevant information:
- Main. Displays everything filled out during creation: description, price list, manager, contract period, service schedule, client, and attached files. You can also see whether the contract is the main one. If not, you can make it the main contract by clicking the corresponding button at the top.

- Services. Shows information about the services provided under the contract: name, description, responsible employee, and SLA standard.
- Service periods. Lists all stages, deadlines, and costs of the work to be done under this contract in table format.
- Requests. Shows the number of requests created under this contract.
If several requests are related to the same issue, you can group them into a problem.
To do this, select the requests; click With selected... > Merge into problem. Fill out the form that appears.
On the sidebar, you can communicate with colleagues and assign tasks related to the contract.
You can also send the contract for review or approval to a company executive or responsible person.
To do this, click the ![]() button, select the action, and fill out the form.
button, select the action, and fill out the form.
You can only edit contracts that are in the New status. Click Edit in the card to make changes.
Contract status
A contract goes through several statuses during its lifecycle:
- New. The default status for newly created contracts that haven’t started yet. You can’t use this contract for requests until it becomes active.
- Active. The contract is currently valid (start date has passed, and end date hasn’t). You can link this contract to requests.
- Closed. The contract has expired or was terminated early. To close a contract manually, click Close Contract in its page. The end date will update to today’s date.
Contract display options
By default, contracts are shown as tiles. You can switch the view to table. To track contract status change, switch to Kanban view.
You can also import or export contract data for document exchange or archiving.
To quickly find a contract, use the search bar at the top of the app to filter by specific parameters.
Found a typo? Select it and press Ctrl+Enter to send us feedback