Here you can:
- Schedule automatic process start on a timer.
- Add a name template.
- Edit the instance summary page.
- Select the activity stream that will be displayed on the task and process instance page.
- Check API methods functionality.
- Restore the previous version of the process.
- Set the form to process debugging start.
- Configure rules for interrupting a parent and child process.
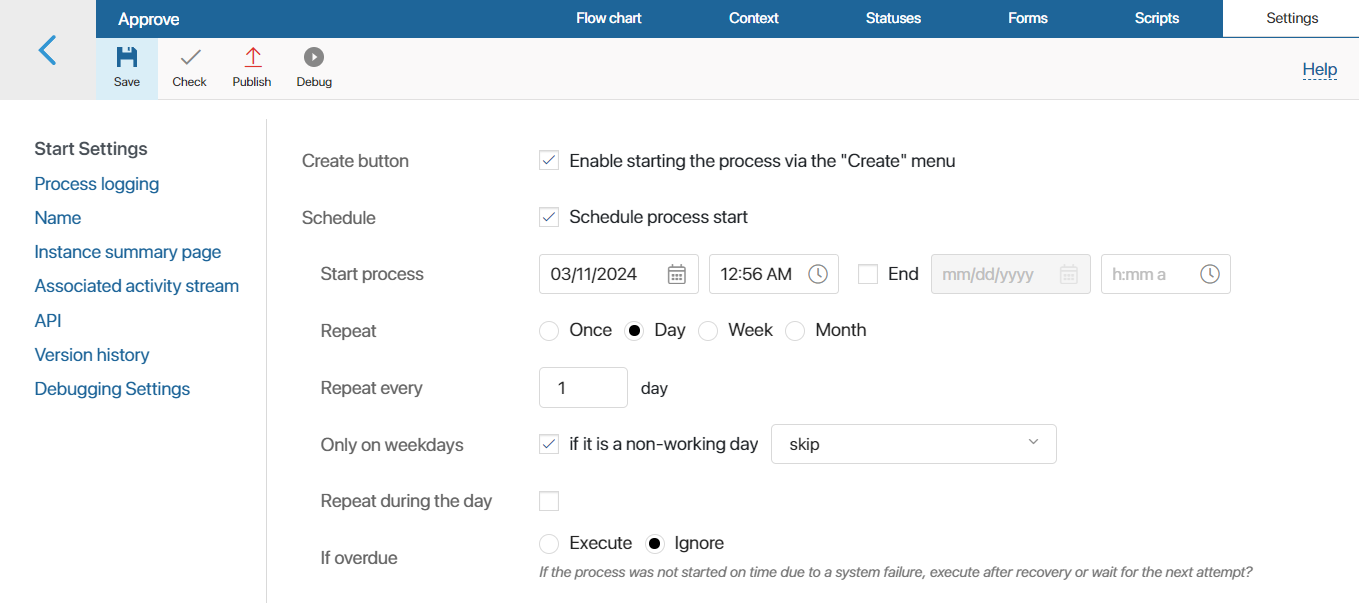
Start settings
You can determine how the business process can be started.
- Create button. This option adds the process to the Create button’s context menu. The user will be able to start the process by clicking its name in the list. By default, the button can be found on the main page of the system, but it can also be added to forms and pages. Read more in the Create button article.
- Schedule. You can set a schedule to automatically start the process on specific days, weeks, or months. The time is determined according to the time zone of the company. You can also enable consideration of the current business calendar. This will exclude non-working hours and days when calculating the process start date. The settings are the same as for the start event.
Process logging
Configure notifications and data storage about starting business process instances:
- Show in Assigned by Me. Check the option to show process instances in the Task workspace on the Assigned by Me page. Click an instance name to view its details: the process history, its context, and map. To learn more, see Business process instance.
- Notify about start. The option is enabled by default. You can see a pop-up whenever the process is started. A notification will also be posted to your #Activity stream.
Name
This tab displays general information about the process:
- Instance name. If a template was not specified in settings of the Start event, enable this option.
- Template. Enter a name for the process instance. You can also add:
- A context variable. For example, the initiator's full name. Click the {+} icon in the right corner of the field and select the desired option.
- Conditions and functions. To generate a more descriptive name, click the f(x) icon and specify the function.
- Process description. You can provide service information for system administrators and employees modeling the process. By opening the process settings, users will be able to see the purpose of its launch and the result of its execution.
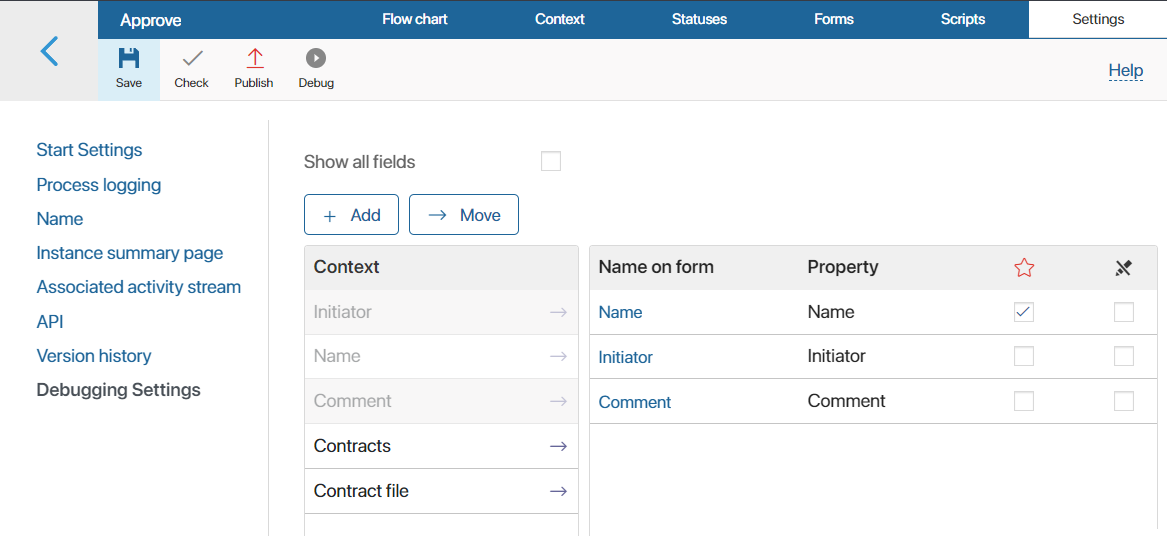
Instance summary page
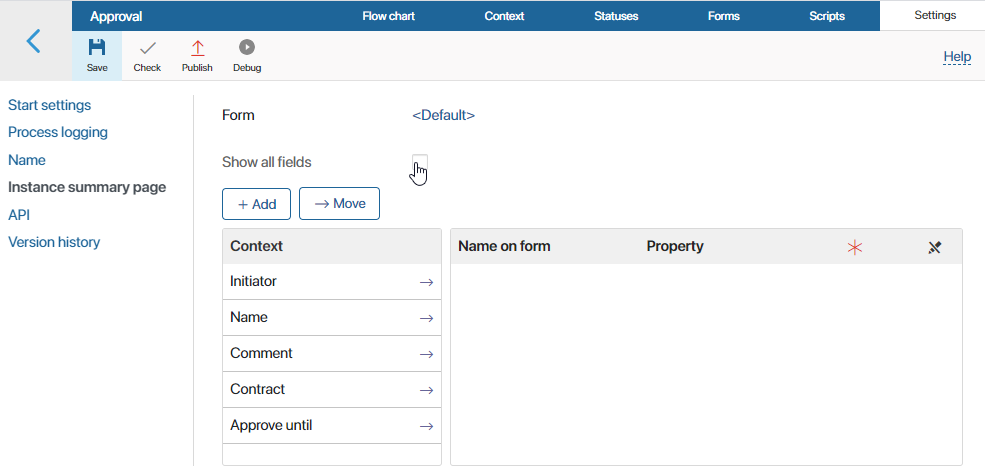
In this section, you can configure the layout of the instance summary page. By default, the page displays all the context variables of the process. To hide certain variables, uncheck the Show all fields option. Then drag the variables you need to see on the page from the Context column to the Name on form column.
If necessary, you can configure a custom form for the instance summary page, add or delete tabs, move fields, and change the content of the sidebar. To do this, use the form editor. Click the <Default> link in the upper left corner and select +Create Form. Read more about how to work with the form editor in Forms tab.
You can find the instance summary page in Tasks > Assigned by me.
Associated activity stream
Select which activity stream will be shown in process tasks and on the instance summary page:
- Associated activity stream of the business process. Messages sent to the task activity stream will be displayed on the process instance summary page.
- Associated activity stream of an app of file. In the field provided below, select a variable of the App of File type. Then, the activity stream of the app item or file stored in the variable will be displayed on the process task and process instance pages. So, if a variable of the App type is selected and a message is sent during a process in a task, you will see it on the item page of that app. In case the variable is empty, the message will be displayed only in the process instance activity stream.
Example of applying associated activity stream settings
|
API
API methods allow you to integrate BRIX with external systems. For example, after a client submits a request on your website, you can automatically launch its processing.
A full list of methods for working with processes can be found in the BRIX Public API.
The tab displays the main methods with the option to test the written request. Workflow is the same as on the API page in apps.
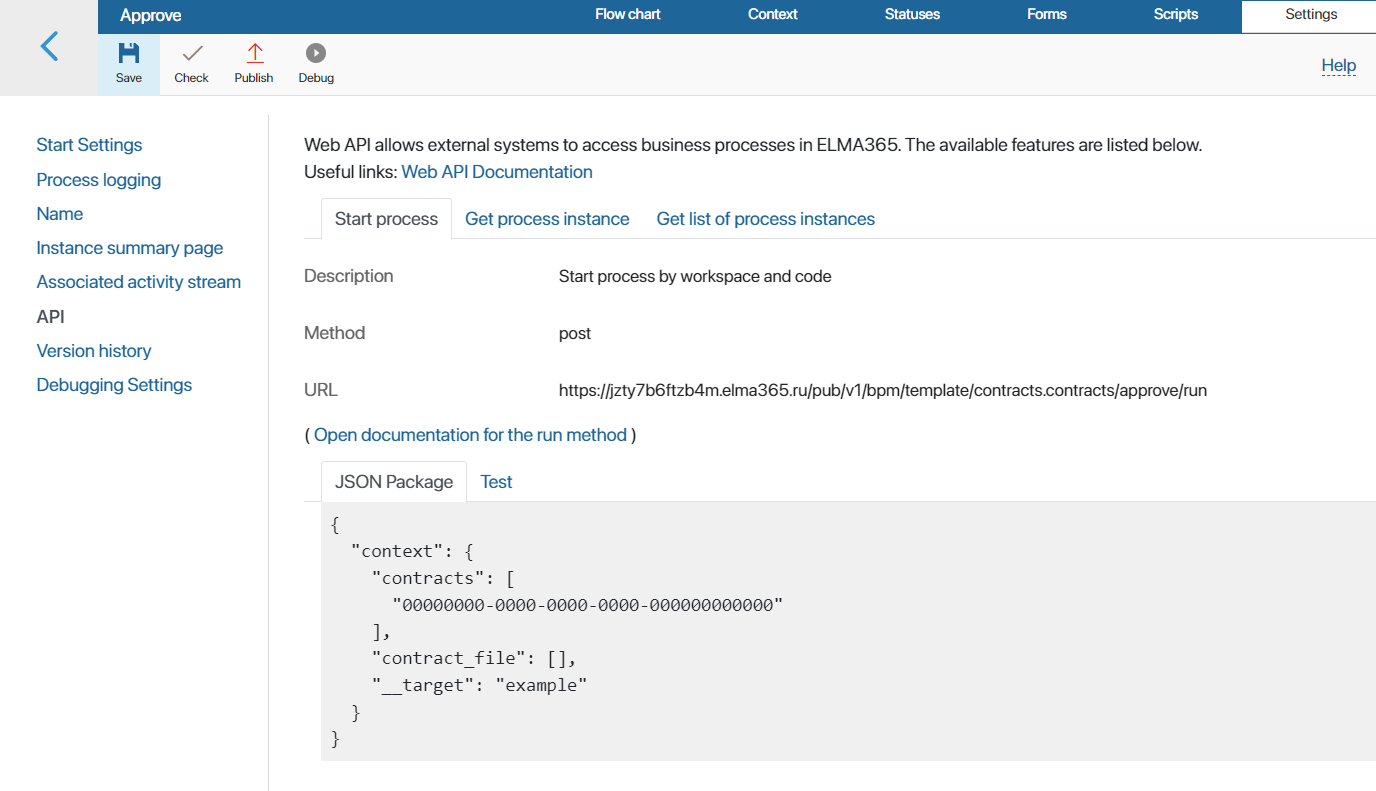
You can:
- Copy the method address for use in requests.
- Go to a detailed description of the method in the BRIX Public API.
- Discover the method parameters and possible server responses.
- Compose and test a request by receiving its full address and the server response.
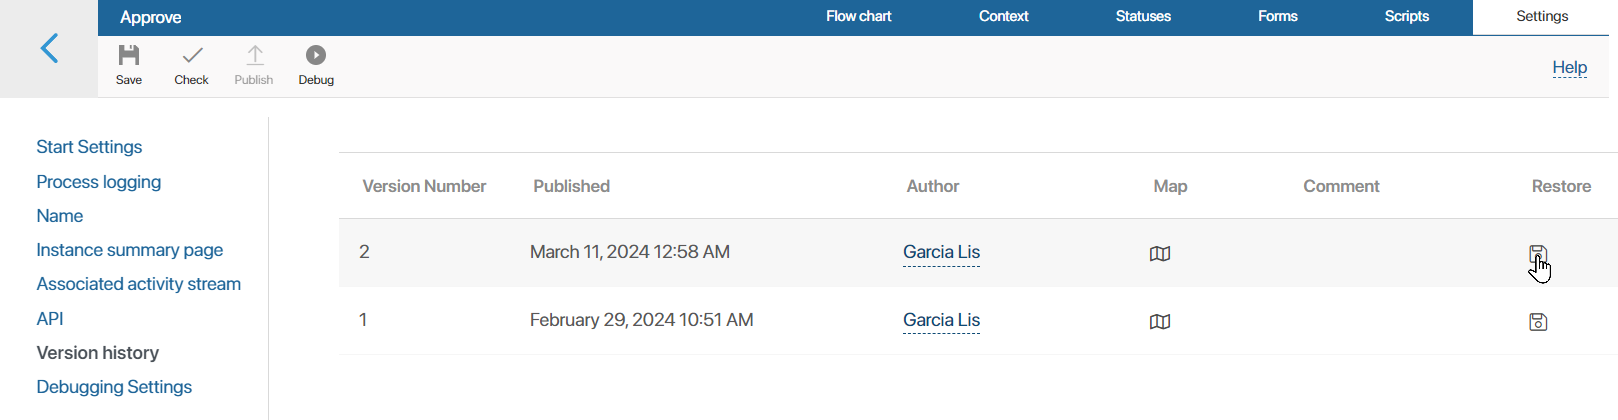
Version history
All published versions of the process are displayed on the Version History tab, indicating the author, time, and comment left during publication. The tab's appearance and available actions depend on whether structure versioning is enabled in the system:
- By default, versioning is disabled. In this case, you can:
- View the process version map by clicking the
 icon.
icon. - Restore a previous version of the process. To do this, select the name in the list, click the floppy disk icon, and confirm the action.
- If versioning is enabled, the current version in the list is indicated by the
 icon. To access the action menu, to the right of the version, click the three dots icon and select the desired version:
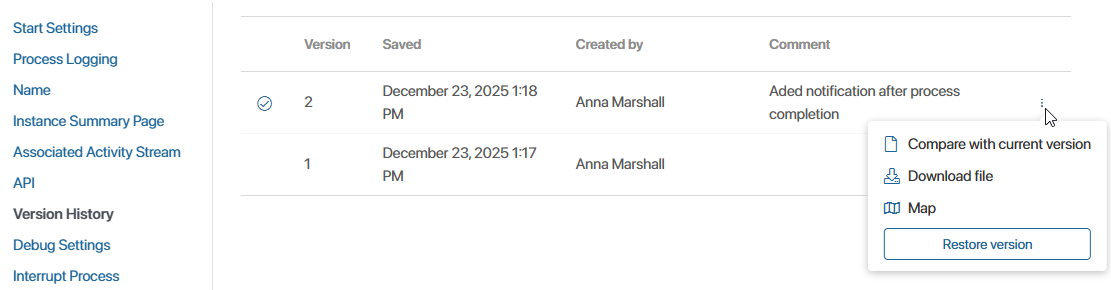
- Compare with current version. View previous and current versions in JSON format.
- Download file. Download the version as an .e365 file. These version files can be compared in an external text editor, such as Visual Studio Code.
- Restore version. Make one of the previous versions current.
Restore the previous process version
The configuration of the selected version will be applied to the process draft on the Flow chart tab. All saved but unpublished changes will be lost.
You can edit a restored process diagram, change the order of its activities and task forms. To apply the new version, click Save and Publish on the process designer top toolbar one more time.
Note that all process instances started before the new version is published will be run and completed without the recent changes. Read more in the Publish a business process article.
Debugging settings
By default, the process debugging start window only displays the Start Debugging and Cancel buttons. You can customize this window to enter process context variables. This way you will not need to manually fill out the fields in the start event and subsequent process tasks during debugging.
For example, into a context variable of the Files type, you can add an existing file.
To do this:
- Disable the Use the start form for debugging option. Settings for selecting context variables will appear.
- Drag the desired field from the Context column to the Name on Form column.
- If you want to display all process context fields on the form, enable the Show all fields option.
Process interruption
On the Interrupt Process tab, you can set rules for interrupting process instances during process modeling. To do this, enable one or both options:
- Abort current process when interrupting a subprocess. Stops the execution of the parent process instance if the child process instance is interrupted.
- Abort subprocesses when interrupting the current process. Stops the child process instance when the parent process instance is interrupted.
The configured rules apply to the parent process and all its child processes.
If the options are disabled, instances must be interrupted manually on their pages.
Key features of rule application:
- If you have multiple levels of subprocesses, you can interrupt their instances one by one in cascade, one after one. To do this, enable the options in the settings of each process.
- You can configure the interruption of a specific subprocess in the Start Process block settings. In this case, the rules do not apply to the parent process and only affect this subprocess and its child processes.
- If you enabled the options for a process on the Settings tab, you cannot activate them in the block settings for launching a subprocess.
- If you first enabled the options in the block settings and then in the main process settings, the subprocess will prioritize the rules from the block.
Use cases of process interruption rules
For the example, we’ll use:
Further, we’ll refer to them by number.
The interruption will occur as follows:
|