The list of actions displayed in the Activity Log widget is configured by the system administrator. Access the settings using one of the following methods:
- Navigate to Administration > Activity Log workspace.
- In the CRM workspace, open the Contacts app. Next to the app name, click the gear icon and select Activity Log.
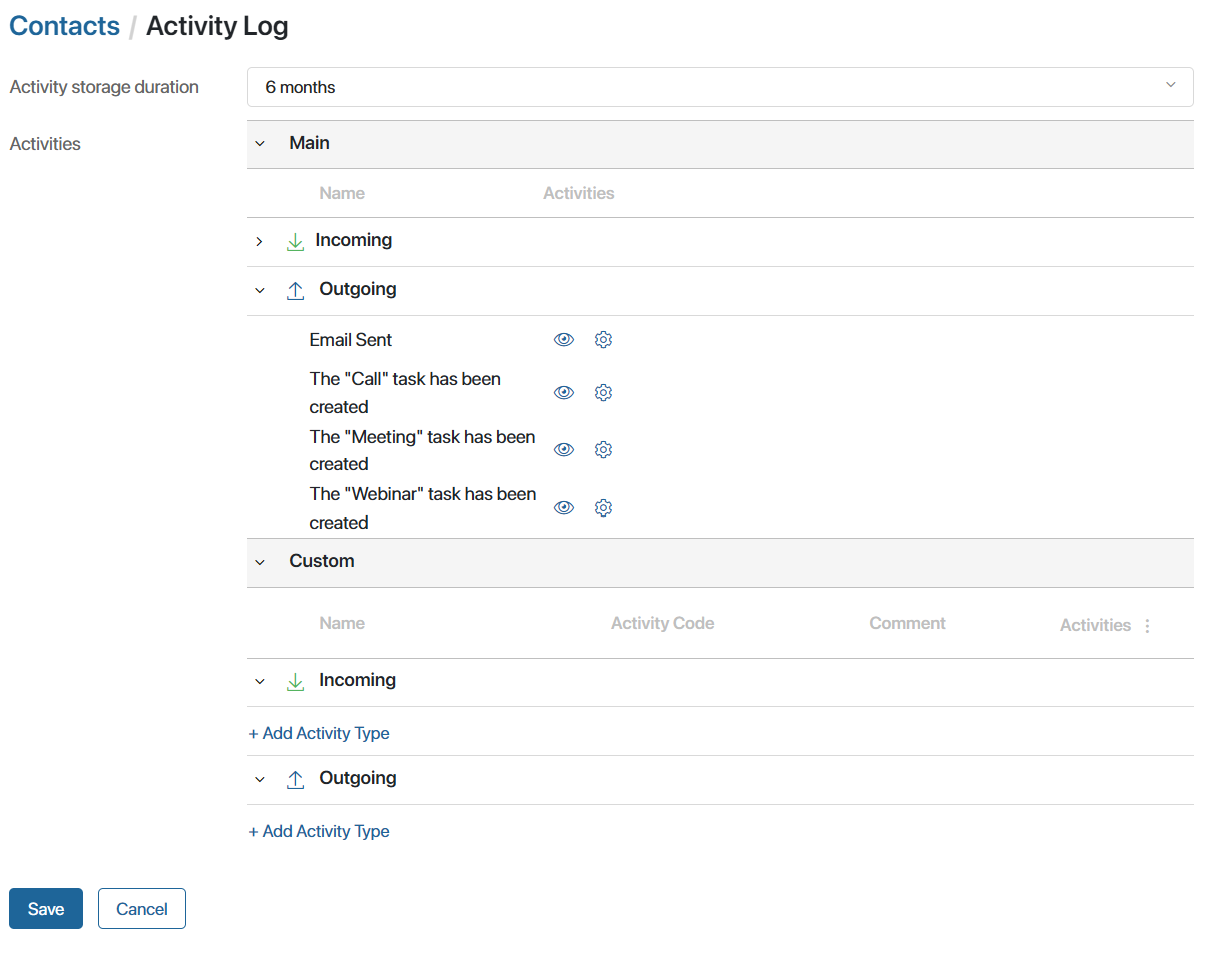
The page that opens will display a list of all actions for which data is stored in the system. These are grouped by activity type: Main and Custom.
Here you can:
Specify the period for which activity information is stored in the system and shown on item pages. The available options differ depending on the edition used:
- For SaaS, a period of six months is set.
- For On-Premises, you can store data for six months, a year, or for unlimited time.
- Add an activity type.
Add your own activity in the Custom section to track additional activities of managers and clients. To record data on an activity after its creation, you need to specify it in the custom business process in the Create Activity Entry graphic element.
This option allows you to prevent the activity from appearing in the Activity Log widget. For example, if a certain activity is performed frequently and a lot of uninformative records are accumulated on the pages. To do this, in front of the activity, click ![]() . The information on the hidden activity will continue to be saved and used for determining the client’s nurturing stage, but will not be displayed on the contact page.
. The information on the hidden activity will continue to be saved and used for determining the client’s nurturing stage, but will not be displayed on the contact page.
If you have hidden a custom activity, it cannot be specified in a business process when you configure the Create Activity Entry element. The previously configured processes will continue to work without errors.
- Configure field visibility for the activity.
Define which activity information is displayed in the Activity Log widget. For more information, refer to the Configure activity fields section.
- Configure activity creation.
If additional contacts are added as fields to a lead or deal page, or to a CRM task, you can configure activity creation for these contacts. For example, a Meeting task context may include a Client manager property that references the Contacts app. On that contact’s page, you can track the creation and completion of the Meeting task. For more details, see the Configure activity creation rules section.
- Delete a custom activity.
Delete a custom activity if it is no longer relevant for the company. To do this, click the trash bin icon next to the activity name.
Data on deleted activities are no longer saved in the system and are no longer considered when determining the client’s nurturing stage. The records are not displayed in the Activity Log widget. Also, after deletion, the activity is hidden from the settings.
Please note that if the deleted activity is specified in the business process in the Create Activity Entry activity, an error will occur during execution. The progress of the process is determined by the activity settings specified on the Error Handling tab.
- Restore a deleted activity.
If you need to resume data collection on a deleted activity, restore it. To do this, under the Activities column, click the three dots icon and select Show Deleted. Then click the ![]() icon next to the desired activity and confirm the action. Business processes in which the restored activity is involved will be executed without errors again.
icon next to the desired activity and confirm the action. Business processes in which the restored activity is involved will be executed without errors again.
Add a custom activity
To record client interactions that are not among the standard options, you can add custom activities. For example, in case it is important to record that a push notification or order receipt confirmation has been sent to the client.
When you export a CRM workspace, custom activities are downloaded along with it. They can be imported to another company with system version 2024.1 or higher.
Data recording on custom activity is configured in three steps: a new activity type is added in the settings, the activity is described in the business process using various activities, and after these activities, the record creation activity is added to the process diagram.
Let’s take a closer look at how to configure data recording.
Step 1: Create an activity
- In the activity log settings in the Custom section, click +Add Activity Type. If the activity describes a client’s action, create it in the Incoming section. If it is a company’s action, create it in the Outgoing section.
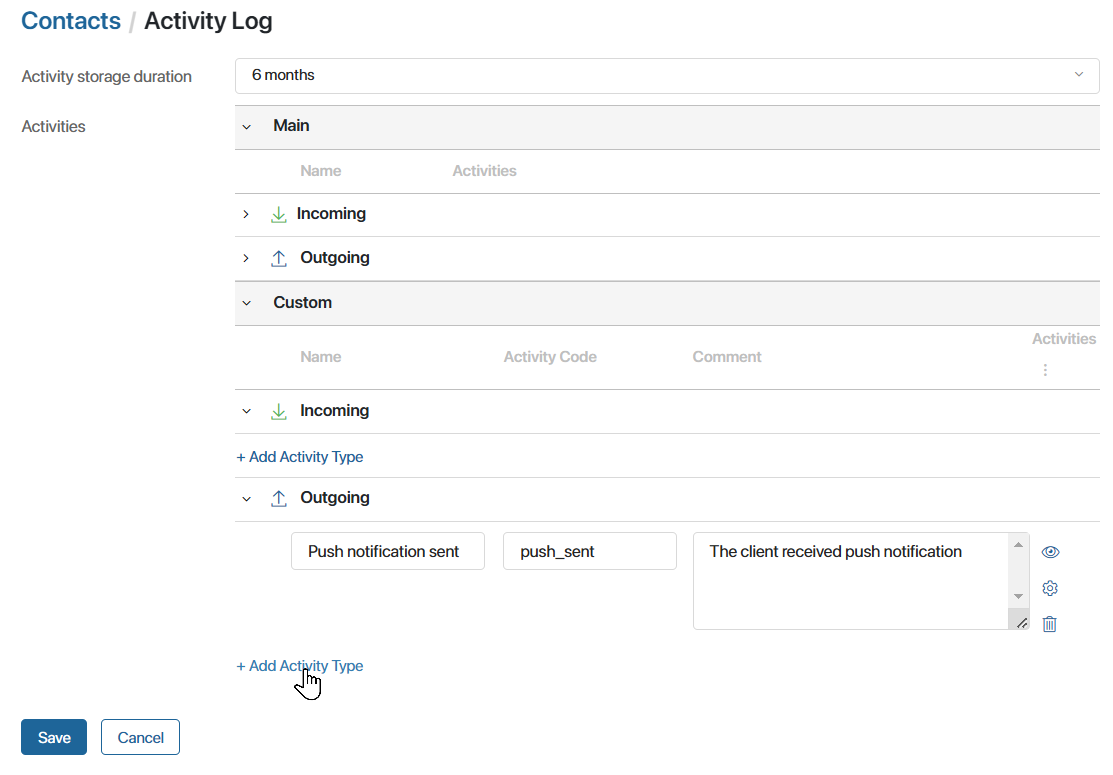
- Specify the name and the description. Define a unique code using Latin letters, numbers, and an underscore that will be used to identify the activity.
- Save the settings.
Step 2: Describe the action in the process
- Navigate to the business process in which the client interaction occurs.
- Make sure that in the context of the process, there is a variable of the App type referring to Contacts. During the process, a contact should be written in it, for which an activity record is added. For example, using the Assign Value activity or as part of a task.
- On the process diagram, describe the activity for which the entry is recorded. You can use any graphical elements for this purpose. For example, if you want to record sending a message about order readiness, use the Send Message activity.
Step 3: Record activity in the process
- After the activity that describes the content of the custom activity, add the Create Activity Entry activity to the diagram. Within this activity, only the record of the interaction with the client is saved. When the process reaches it, the activity should have already been executed.
- In the activity settings, specify the activity type created in step 1 and the variable to which the contact is written during the process. For more information about the settings, see Create Activity Entry.
- Complete the business process modeling. Click Save and Publish in the top panel.
During the process, first, the activity actions described by other graphic elements will be performed, and then in the Create Activity Entry activity, the information will be recorded in the system.
The activity record will be displayed on the contact page and will be considered when determining the client’s nurturing stage.
Configure activity fields
You can define what information to show in the Activity Log widget for each type of activity.
For custom activities, you can only display contact fields in the widget. For main activities, the fields of the associated object are also available. This object can be:
- A CRM task.
- A deal or a lead.
- An email.
- An item of the Calls app.
To configure the fields displayed:
- Click the gear icon next to the activity in the list.
- In the opened window, on the Display in Widget tab, drag the fields from the Context column to the list of displayed properties.
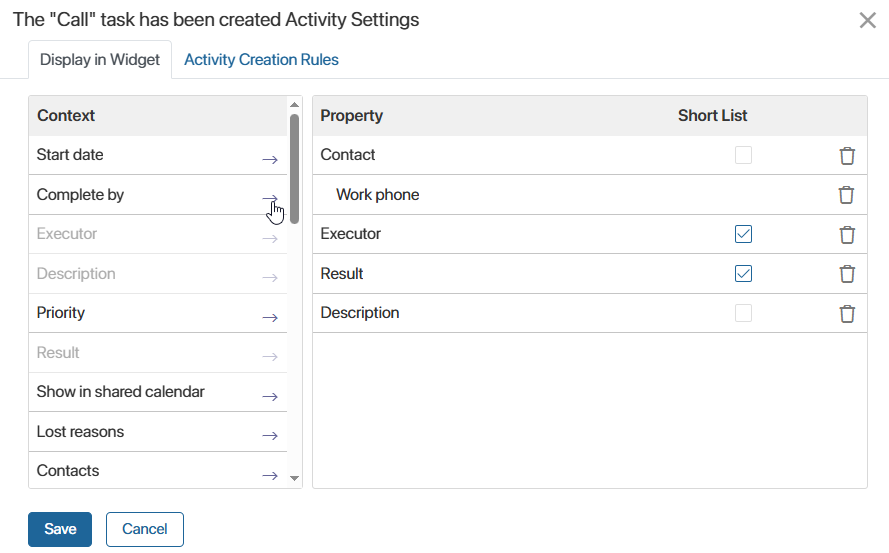
To remove a property from the list, click the recycle bin icon next to it.
- Specify which information will always be displayed in the widget. To do this, select the checkbox in the Short List column next to the field. The other fields will be displayed only if the user opens detailed information about the activity.
- Click Save in the window.
- Save the activity log settings.
The user will see the specified fields when viewing the activity log in the widget.
Configure activity creation rules
Custom properties that store additional contacts can be added to the context of a lead, deal, or CRM task. You can enable activity creation for these contacts.
For example, a custom property called Client manager is added to the context of a Meeting task. By default, no activity records are created for contacts specified in the Client manager field. You can enable activity creation in the settings for the The “Meeting” task has been created and The “Meeting” task is completed activities.
Activity creation can be enabled for the following activity types:
- Incoming. New lead, New deal, as well as system and custom activities of the type Task <Task Name> task is completed.
- Outgoing. System and custom activities of the type Task <Task Name> task has been created.
To enable creation:
- In the activity list, select the activity you want to configure and click the gear icon next to its name. For example, select the The “Meeting” task has been created activity.
- In the window that opens, go to the Activity Creation Rules tab.
- Select the lead, deal, or CRM task properties for which you want to save the activity log. Available options include custom fields and certain system fields of the App type that store contacts.
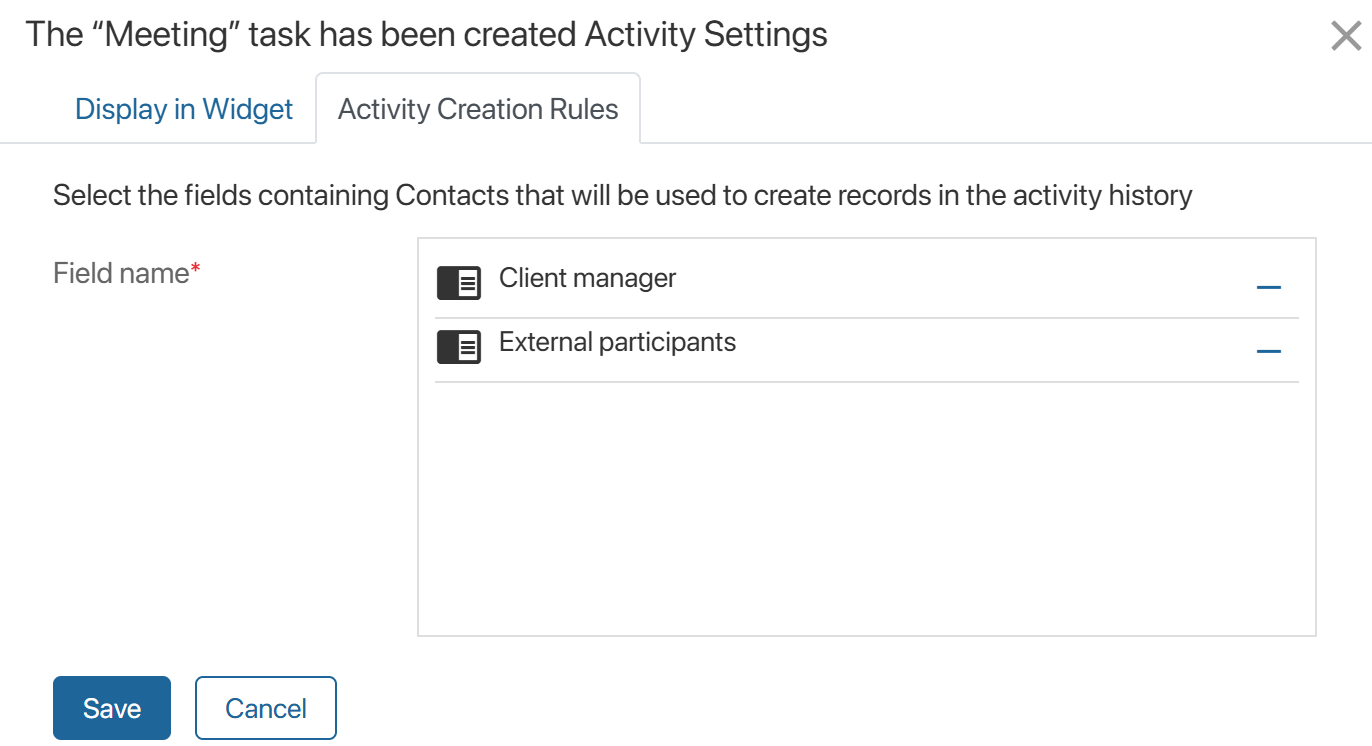
- Click Save.
- Repeat the steps above to configure the The “Meeting” task is completed activity.
- Save the Activity Log settings.
Now, for contacts specified in the Client manager custom field within a Meeting task, both the The “Meeting” task has been created and The “Meeting” task is completed activities will be recorded in the activity log.