The Field for linking option allows you to create a link between two apps to automatically synchronize related items.
Let's say you have the Requests and Clients apps. You want them to work as follows:
- An employee adds a request to the system and specifies the client who has sent the request. A link to this request is automatically added to the client's page.
- If the employee changes the client in the request, for example, to correct an error, the data about the related requests in the client pages is updated.
- The employee can attach the request to the client from their page. After this, the client is also automatically added to the request field.
To do this, it is required to add links in both apps using App-type properties. The Field for linking option is enabled by default for these apps. If field values must be filled in manually without automatic synchronization, you can cancel the link.
How the Field for linking option works:
- It doesn't matter in which app settings you enable the option: data is updated in both directions.
- You can configure or cancel a link between apps using the Field for linking option only when creating an App-type property. Once the property is saved, you can’t change the value selected in this option.
- Once created, a link cannot be edited or deleted, as it is added at the database level. To configure a link through a different field or to disable automatic updates, you must add a new pair of fields to the apps and configure different settings for them.
- Added links are validated when importing the exported app. If the field already exists in the target company and another link has been added for it, the app cannot be imported.
For more information on other available settings for the App-type field, see System data types.
Configure or cancel a link between apps
Let's look at how to configure automatic data synchronization for one field and cancel it for another.
Suppose we have two apps:
- Requests. Stores clients’ reports about problems and errors. Each client page has a Requests field that displays all their requests.
- Clients. Stores the supported companies.
In the Requests app, we'll create two different fields that link to the Clients app. However, these fields will interact with clients pages differently:
- Primary client. The author of the request.
To make sure all requests automatically appear on the client's page, we'll configure a link between the Requests and Clients apps. - All affected clients. An employee manually adds other companies affected by the issue described in the request to this field. This helps determine the priority of the issue.
Since these clients didn’t submit the request, it should not be available on their pages. To prevent this, we’ll cancel the link between the Requests and Clients apps.
Let's see how to do this.
Step 1. Configure an automatic link between fields
- Go to the form settings of the Clients app. Add an App-type field and select the Requests app. Select the Many subtype, as this field stores all of the client's requests.
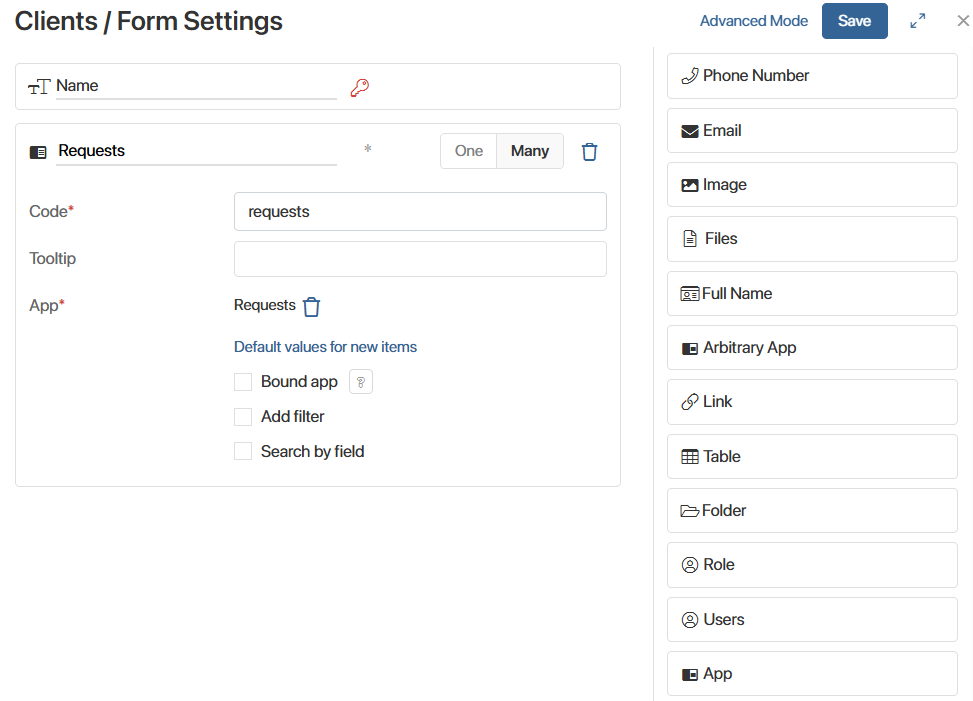
- Click Save.
- Open the Requests app and go to the form settings. Create an App-type field with a link to the Clients app and name it Primary client. Select the One subtype because each request has only one author.
When a client is specified as the primary one in a request, a link to that request should be automatically added to their page. To enable this, leave the Field for linking option in the Primary client property settings set to the Requests field you added earlier in the Clients app.
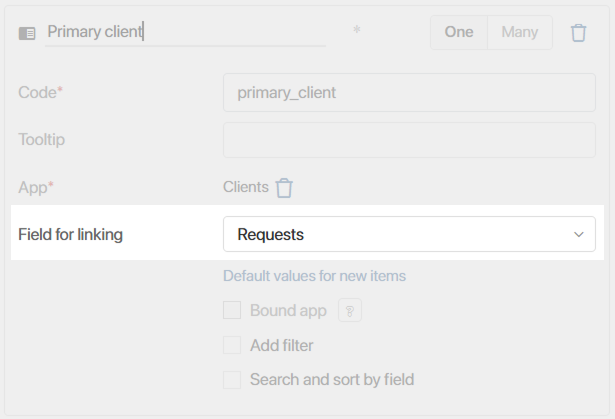
For the specified Requests field from the Clients app, the Field for linking option will be enabled automatically.
Step 2. Cancel an automatic link between fields
- Add another App-type field with a link to the Clients app and name it All affected clients. Select the Many subtype, as this field will contain links to additional companies affected by the same issue. However, these companies didn’t submit the request, so it should not be saved to their pages.
To do this, cancel synchronization of linked items. In the settings for the All affected clients property, select <New field> next to Field for linking.
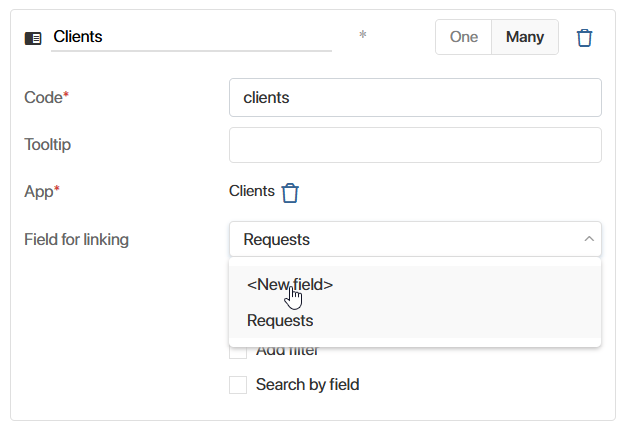
- Save the form.
How the link works when creating an app item
When an employee adds information about a request to the system, they specify the client who applied.
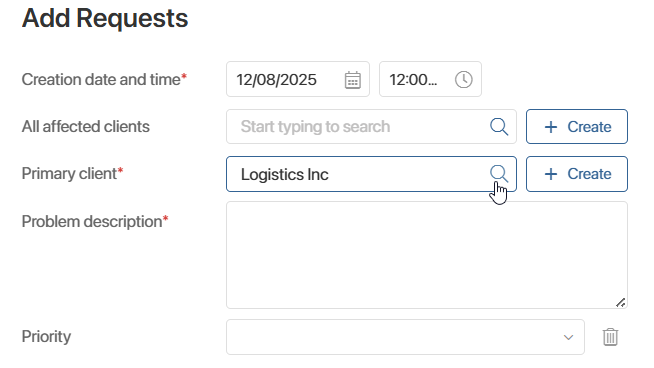
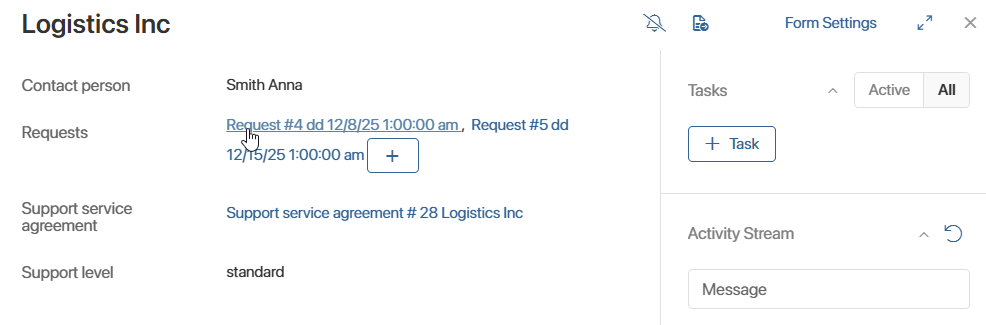
After saving, the link to the request is automatically added to the selected client's page in the Request field that was specified as the field for linking.
How the link works when changing a field value
When apps are linked, you can update the list of related items after editing data.
Suppose, when adding a request, in the Primary client field, an employee selected the wrong client with a similar name. The link to the request was added to their page. To correct the data, a user with permission to edit app items in the Requests app must:
- Open the request page.
- Click Edit.
- Replace the item in the Primary client field.
- Click Save.
There's no need to edit any items of the Clients app. The request will be automatically removed from the incorrect client's page and added to the new one's page.