The system administrator performs the initial configuration to enable users to work with table-based approval routes.
For example, when creating a contract, an employee configures a route and clicks the Send for Approval button. This launches the business process bound to the button. When the process reaches the Approval route activity, the approval stages specified by the employee on the contract page are executed sequentially. To track the progress of approval at each stage, open the contract and go to the Routes tab.
Let’s see each step of this setup:
- Configure app forms for working with table-based routes.
- Configure the business process and its trigger for approval via a table-based route.
Step 1: Configure app forms for working with table-based routes
For each app whose items will be sent via table-based routes, configure its forms. Place the following widgets on them:
- Approval routes. Can be used on any app form:
- On the creation or editing form to configure a table-based route for an app item.
- On the view form to view all stages of the created route. Place the widget on this form if it contains a button to launch the approval process via a route. This allows the user to review the route details before sending the item for approval.
- View approval routes. Used only on the view form. In this widget, you can track the execution of the route and view the history of the item approval via routes. For convenience, place this widget on a separate tab of the view form.
Read more about configuring widgets in the Approval routes and View approval routes articles.
Step 2: Configure the approval process with a table-based route and its trigger
To execute an approval route:
- To process an item, create a custom business process associated with the app. Add the Approval route activity to the process flow chart. When the process reaches this activity, the approval stages defined on the contract page in the Approval routes widget will be executed. Read more about configuring the activity in the Approval route article.
- Configure buttons on the app forms to start the process. To do this, first determine when the user should send the item via the route. Possible options:
- Immediately after creating or editing the item and the route. In this case, modify the settings of the Save button on the creation or editing form by linking the approval route process to it.
- Some time after creating and editing the item and the route. In this case, place an additional process start button on the view form and configure it.
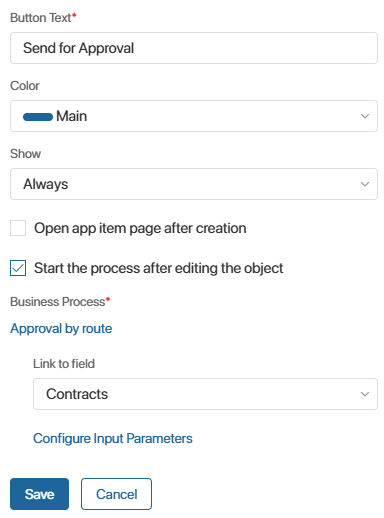
As an example, let’s modify the settings of the Save button on the creation form of the Contracts app. To do this:
- Change the button name. For example, enter the Send for Approval text.
- Enable the Start the process after editing the object option and select the approval process with a table-based route.
- For the Link to field option, specify the process variable that links with the Contracts app. The saved app item will be written into this variable.