Work on a release begins with planning update timelines and defining periods for implementing system component enhancement requests.
This article details the Plan and In progress release stages, as well as the corresponding sprint stages.
The product owner can review new tickets during the release planning stage. This ensures all data on planned tasks is collected before their execution begins, that is, before work on the release starts.
At the same time, during the release implementation, the development team may also receive new tickets, analyze them, process them immediately, and include them in the current release.
Schedule a release
To plan release timelines, go to the Release app and create a page with the release details. To do this, click the +Release button in the top-right corner of the app page and fill in the fields:
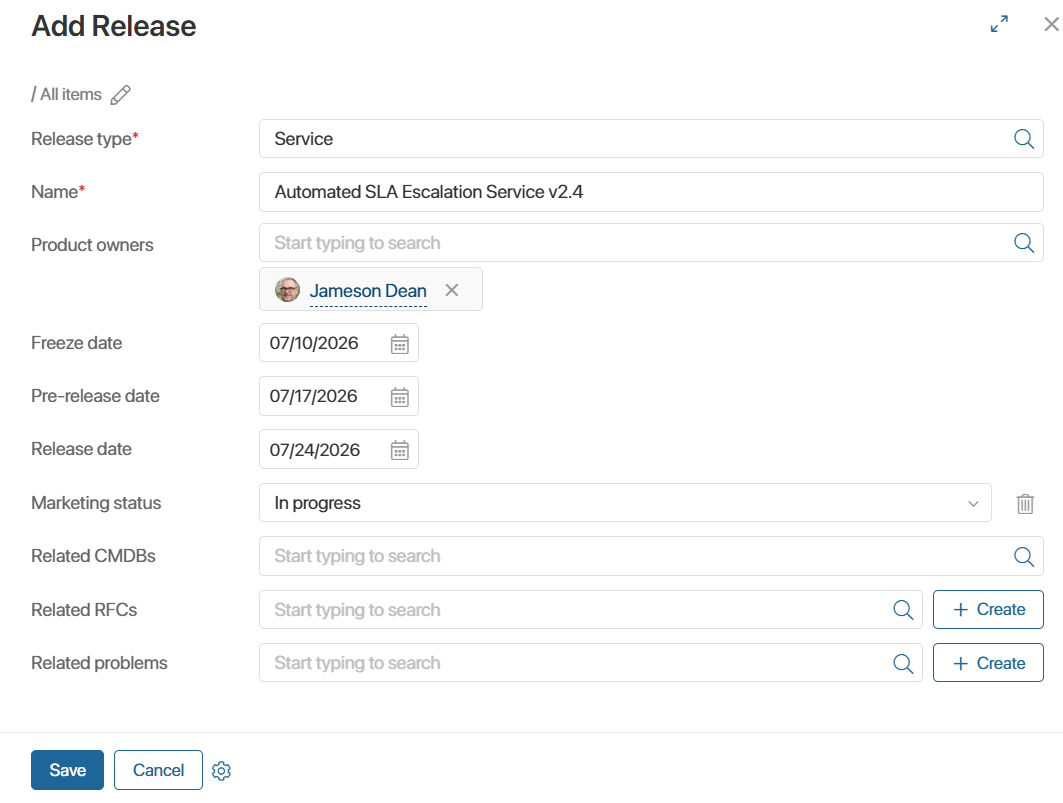
- Release type*. Select a category for the release.
- Name*. Enter the release designation. This could be, for example, the planned month of deployment for the updates.
- Product owners. Specify the product owners for all areas of responsibility, tasks for which will be ready for release.
- Freeze date. Set the date when development of new features stops and data collection for the release begins.
- Pre-release date. Set the date for the test release.
- Release date. Set the main release date for end users.
- Marketing status. If your company publishes release announcements for all users, select the current stage of marketing material preparation.
Available statuses: Initial, In progress, Publication, and Published. As the release progresses, the responsible manager updates the marketing status.
- Related CMDBs. Select the CIs that the release may affect.
- Related RFCs. Select the RFCs that are being resolved in the release.
Click Save.
The release page will appear in the app with the Plan status. To track status changes, display the page as a Kanban board.
Plan a sprint
If the release process spans an extended period, it may be convenient to divide it into multiple task-processing stages, i.e., sprints. For example, if releases occur monthly, product owners can plan to complete a certain number of tickets each week.
Scheduling, assigning, and executing sprints is managed in the Sprints app.
To create a sprint, click the +Sprint button in the upper right corner of the app page and specify its start and end dates. The sprint page will appear on the page in the New status.
As work progresses, the sprint status updates to Active and Completed. For more details, see below.
To track sprint status changes, display the page as a Kanban board.
Work on a release
Teams can begin active development of new features based on ready to go tickets once the responsible team member assigns the release In progress status.
At the same time, processing tickets in earlier statuses continues. Incoming requests can be analyzed by product owners and sent to development before the current release is completed. As a result, the number of tickets planned for completion by the release date may change.
For more details on ticket actions during system updates, see the Ticket lifecycle article.
To identify tickets suitable for the next release and sprint, as well as to monitor development team workload, use the Spint by team and Tickets: My Dashboard reports.
Release work is divided into sprints, during which a specific number of tickets are processed. The team prioritizes tickets marked with the current sprint number on their pages.
To do this, on the Sprints app page, enable the Kanban board view and manually move the item from the New status to the Active status.
When the sprint period ends, update its status:
- Open the Sprints app.
- Click Change Current Sprint and fill in the fields:
- Previous sprint. Enter the number of the active sprint.
- New sprint. Enter the number of the next planned sprint.
- Click Move Tickets in Sprint.
The current sprint will automatically move to Completed, and the planned sprint will change to Active. Any unfinished tickets from the previous sprint will be reassigned to the new sprint.
Changing the status for sprints helps to systematize the completion of tickets in the release.