A request is a query from an external customer that is registered in the Requests app. Its processing time is subject to the norms defined in the SLA directory during the initial setup of the solution.
Each request:
- Contains data about the customer and their company, the text of the request, and the history of interactions for previous requests.
- Allows the operator to correspond with the customer directly from the request page.
- Is linked to the service to which the request relates. It is automatically routed to the employee responsible for that service who currently has the least load.
- Is monitored against the SLA norms, which define the maximum time for reaction to the customer’s request and the time for its resolution.
A request is created automatically:
- From a configured bot scenario.
- If the customer submitted a request via the portal.
- If a request is sent to the live chat to which the Create request from a live chat business process is bound. In this case the customer data and their message are automatically added to the created request. The session operator can conveniently work and correspond with the customer directly from the request page without switching to the session area in the Live chats workspace.
You can also create a request manually, for example if the customer called by phone.
Work with requests is performed on the main page of the workspace and in the Requests app.
Main page
This is the primary workspace of the operator. It consists of two tabs: Requests and My Tasks.
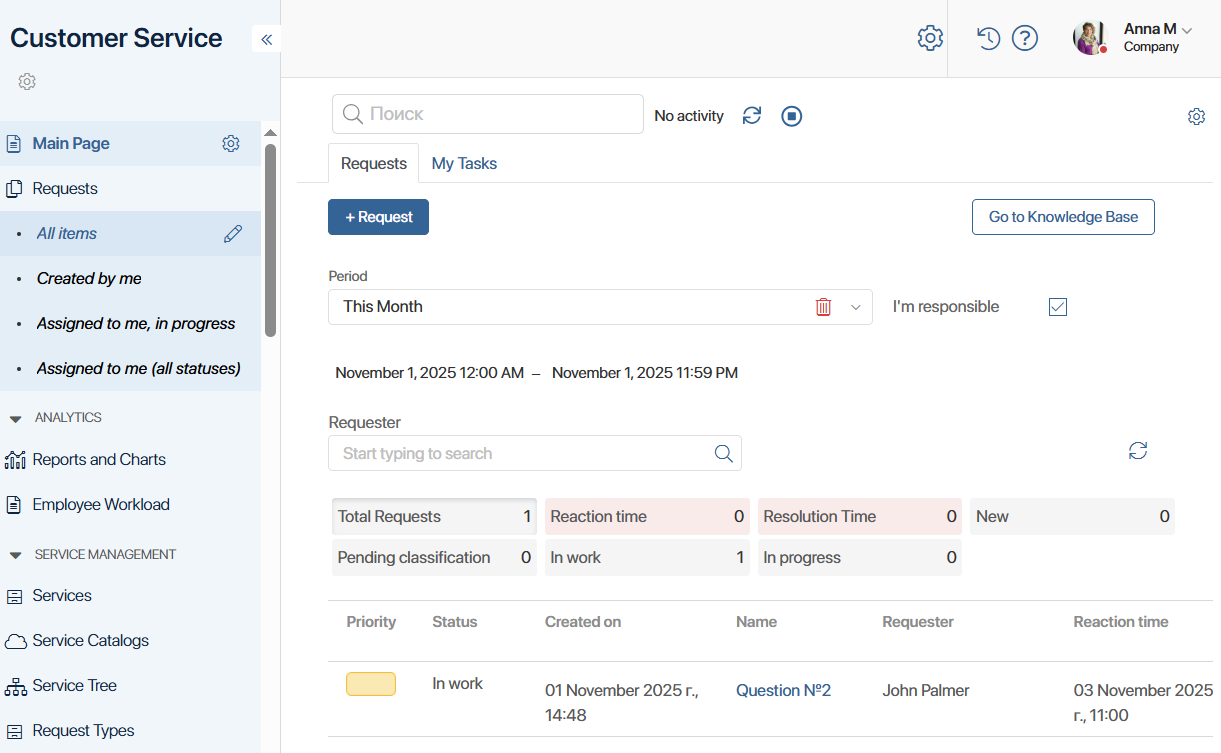
Requests tab
On this tab you can:
- Create a new request.
- Navigate to the Knowledge Base.
- Open a request page.
By default the list shows all requests for the current month where you are listed as the responsible person. You can define a list using criteria by specifying:
- Period. Choose one of the available options: Last hour, Today, Yesterday, This week, Previous week, Previous month. You can also set a custom period manually.
- Requester. Enter the customer’s name in the field or click the magnifier icon and select the author from the list.
- Responsible person. Uncheck I’m responsible and choose the required employee.
Once you have the list by the defined criteria, you can view stats: the number of requests by each status, and also the number of requests with overdue reaction time or resolution time. Such requests are additionally marked in red in the list.
My Tasks tab
Here you will see active tasks where you are specified as the executor or participant. You can work with them directly on the main page, without switching to the Tasks workspace.
Set current activity
Before you begin work, in the upper-right corner of the page click the ![]() icon and select an activity, for example Customer visit or In meeting. Change the activity during the day to track the time spent on each type of work.
icon and select an activity, for example Customer visit or In meeting. Change the activity during the day to track the time spent on each type of work.
At the end of the shift click the ![]() icon to pause the timer.
icon to pause the timer.
You can view total time per activity in the Employee activity app.
Requests app
All records in the Requests app, by default, are distributed into folders:
- High Priority.
- Assigned to me, in progress.
- Assigned to me (all statuses).
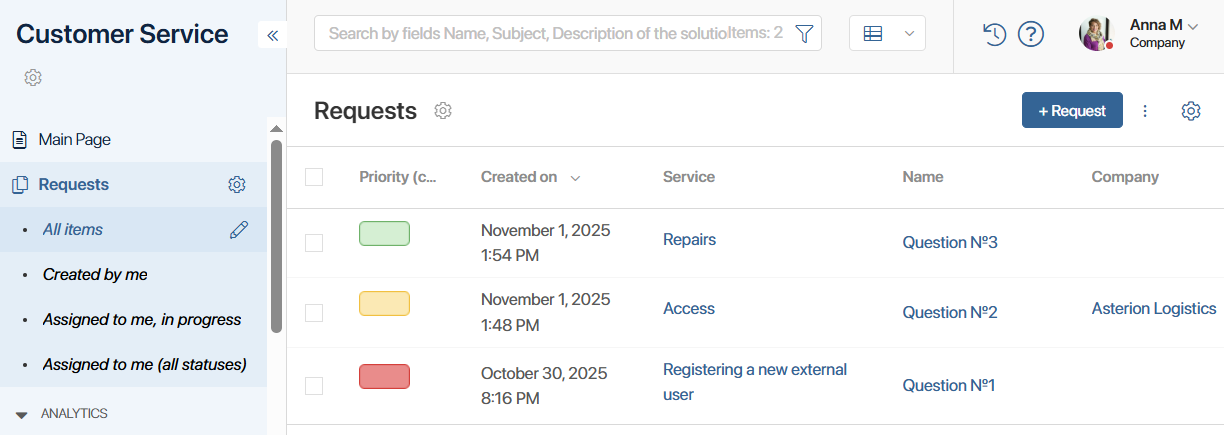
An administrator can configure a different set of folders, for example by priority.
By default records are displayed as a table. To change the view to a Kanban board, click ![]() at the top of the page.
at the top of the page.
You can filter requests using the search bar. To sort records in the table and change the set of displayed fields, click the gear icon in the upper-right corner and choose Table Settings. In the window that opens:
- Specify the request parameters you want to see in the list.
- Specify the parameter by which the records will be sorted.
- Choose the sort type: ascending or descending.
To open the request page, click its title.
Request statuses
Statuses help track work with requests. Their change is configured in the business processes associated with the Requests app, but the administrator can allow manual status changes.
The following statuses are set by default:
- New. Assigned immediately after creation of the request and used only in the business process logic. Immediately changes to Accepted or In Classification.
- Pending classification. Assigned to a request created automatically by the Create request from a live chat process. The operator must specify the service and request type in order to assign the responsible person and thus classify the request.
- In work. This status is assigned if the request is classified or created by an employee or via the portal. The responsible person receives a notification of the new request. From the moment this status is set, the reaction time and resolution time start counting.
- In progress. The responsible person has taken the request into work. The reaction time is recorded in the request page.
- On hold. Work on the request is suspended, the resolution-time timer is temporarily stopped.
- Completed. The request has been processed. The resolution time is recorded on the request page.
If the maximum reaction time or resolution time lapses, a reminder is sent to the responsible person. If configured, an escalation may trigger in the SLA app.
Create a request
A request is created automatically in the following cases:
- At the moment a query arrives into a live chat.
- If the customer created a request on the portal.
To create a request manually, for example if the customer called by phone, on the main page of the section or in the Requests app click the + Request button. In the window that opens:
- Select the request type. Priority will be determined automatically depending on the selected type.
- Select the service. The responsible person will be assigned automatically.
- You may select the subject of the request from the Products app in the CRM workspace.
- Specify the subject and text of the request.
- If necessary, attach a file.
- Specify the customer data.
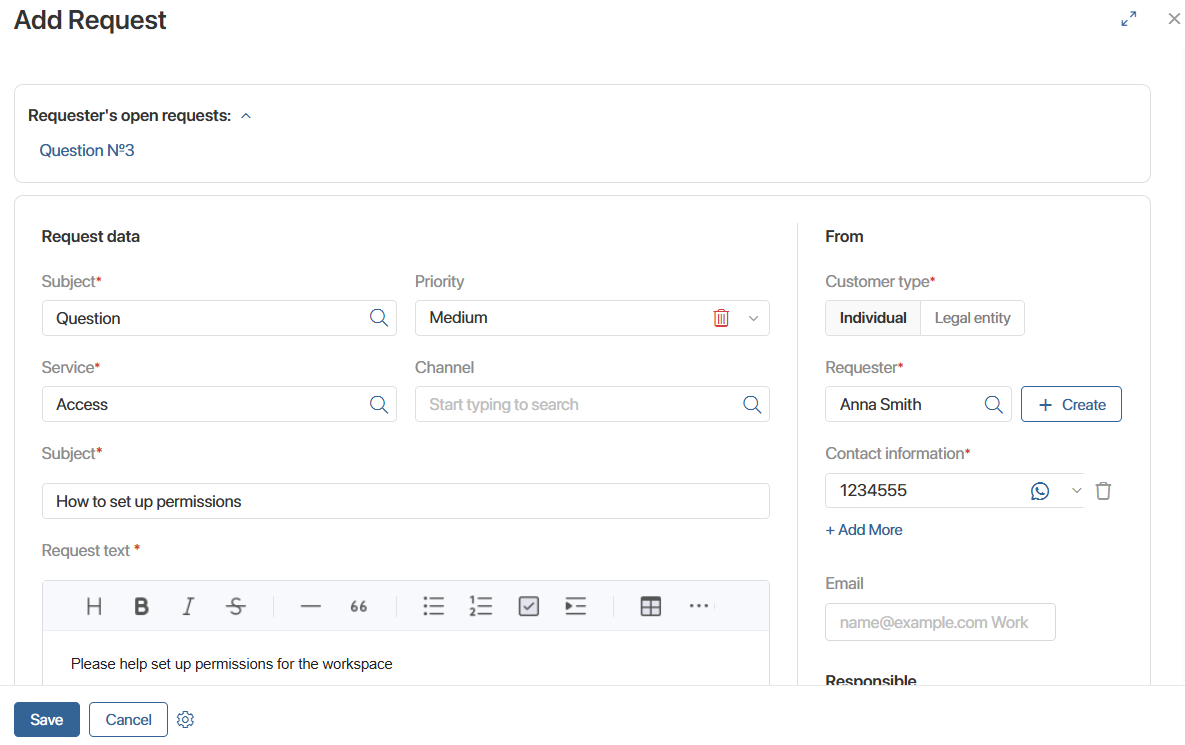
After creation, the request is assigned the In work status, and the responsible employee receives a notification via email and in the activity stream. The counting of reaction time and resolution time also begins.
Request page
The operator works with the request on its page.
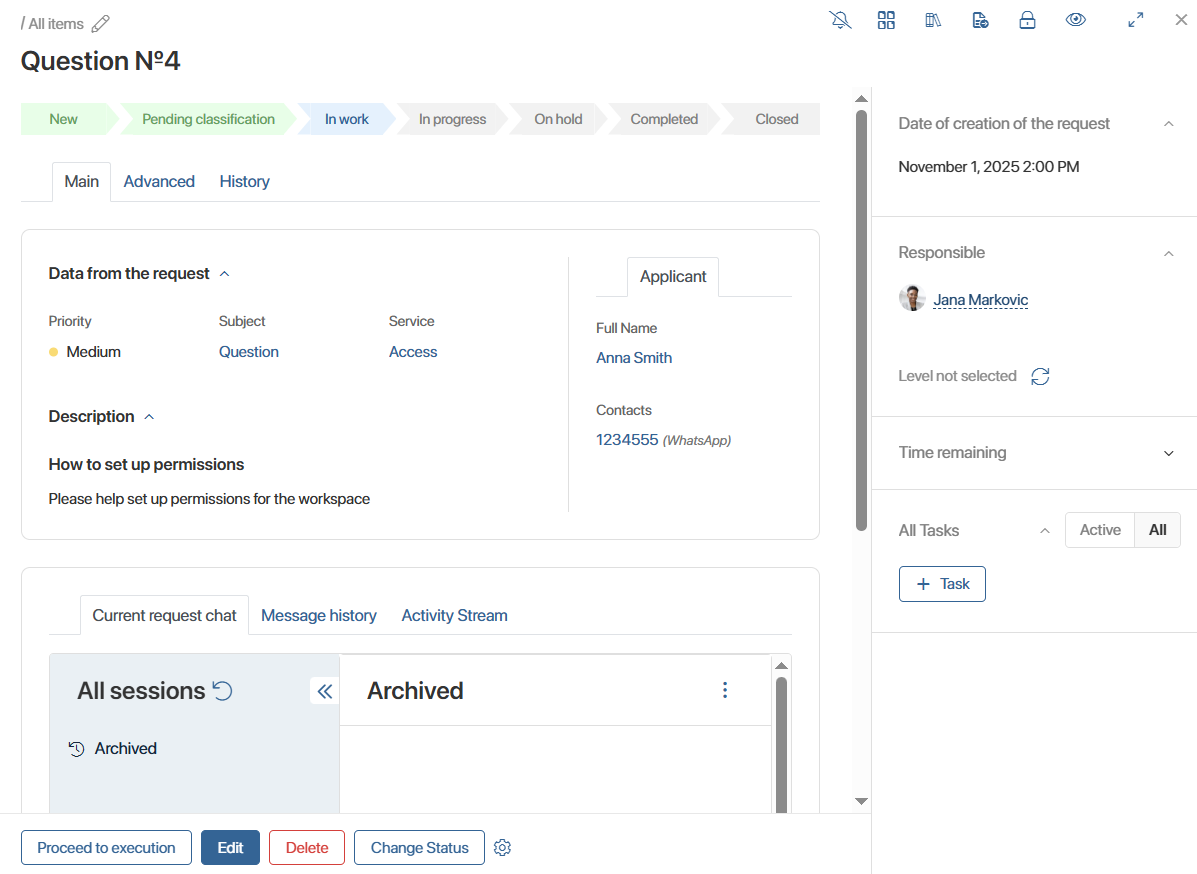
- In the top part of the page, you can view all the statuses of the request: those already passed, the current status, and future statuses.
- The request page contains three tabs: Main, Advanced, History.
- On the side panel, you can:
- View the creation date of the request, the responsible person, the timer of the normative time.
- Choose the support level.
- Put the request on hold.
- See how much time the request has spent in each status.
- Involve other employees in working on the request by assigning them tasks.
- At the bottom of the page are buttons for working with the request.
Main tab
On this tab you can view the request priority, customer data, request type and subject, its description. In the Communication with author widget, the session operator can correspond with the customer. This is convenient because it allows you not to switch to the Live chats workspace and to perform all work with the request in one place.
On this tab you can:
- Review the SLA norms and compare them with the actual performance indicators for the request.
- View messages in the request’s activity stream.
- Review the history of interactions with the customer for previously received requests.
History tab
Here the history of changes for the request is displayed. If needed you can check which specific parameters were changed and who authored the changes. For convenience you can:
 Filter the data by parameters and actions.
 Export the list of changes to an .xlsx or .pdf file.
 Reload the data on the tab.
Actions on a request
Within the request card you can perform the following actions:
- Classify. Available on the page of a request that was auto-created when a request was registered in the live chat. The operator may supplement the request data and specify the service so that the request is directed to the responsible person.
- Select support level. Assign the request to a specific operator group.
- Proceed to execution. Available on a new request card, including after its classification, and records the actual reaction time.
- Completed. Complete the work on the request. At this moment the resolution time is recorded. If you used an article from the Knowledge Base to resolve the request, specify it in the Knowledge Base article field.
- Change status. Change the request status manually.
- Put on hold. Available only for the person responsible for the request. Allows pausing the timer of the normative time for processing the query.
By default the standard Edit and Delete actions are available on the request page. A system administrator can modify the set of available buttons on the request page.
Classify a request
If a customer contacted via a live chat:
- A request is created with Pending classification status.
- An operator receives a notification about the classification of the request so as to supplement its parameters and thereby direct it to the responsible person.
Open the request page. Customer data and their message will be pre‑filled. Click the Classify button and in the opened window specify additional data, select the request type and the service.
After classification the request is routed to the responsible person attached to the specified service. The request status changes to In work.
Select support level
Each accepted request can be assigned to the appropriate support level. For example:
- First line – for general questions.
- Second line – for complex technical issues.
Then the request will go to the corresponding operator group.
Click the ![]() icon on the side panel and select the required level.
icon on the side panel and select the required level.
Put on hold
The person responsible for the request may suspend work on it, for example if the customer took time to gather data for their query. In this case the request is assigned status On Hold.
- On the right side panel of the request card click the
 button.
 - In the window that opens enter the reason for suspension and also the planned waiting time. After this time expires the request will automatically receive In Progress status, and the responsible person will get a notification.
- If you are corresponding with the customer via a live chat and wish to send them a message about suspending work on the request, click Yes.
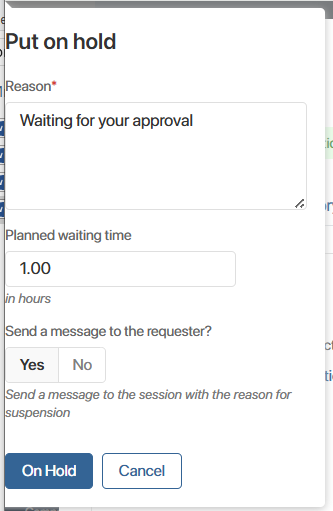
- Click the On Hold button.
After that on the side panel of the request page, the reason for suspension and the timer status will be displayed. To resume work on the request, click the ![]() button.
button.
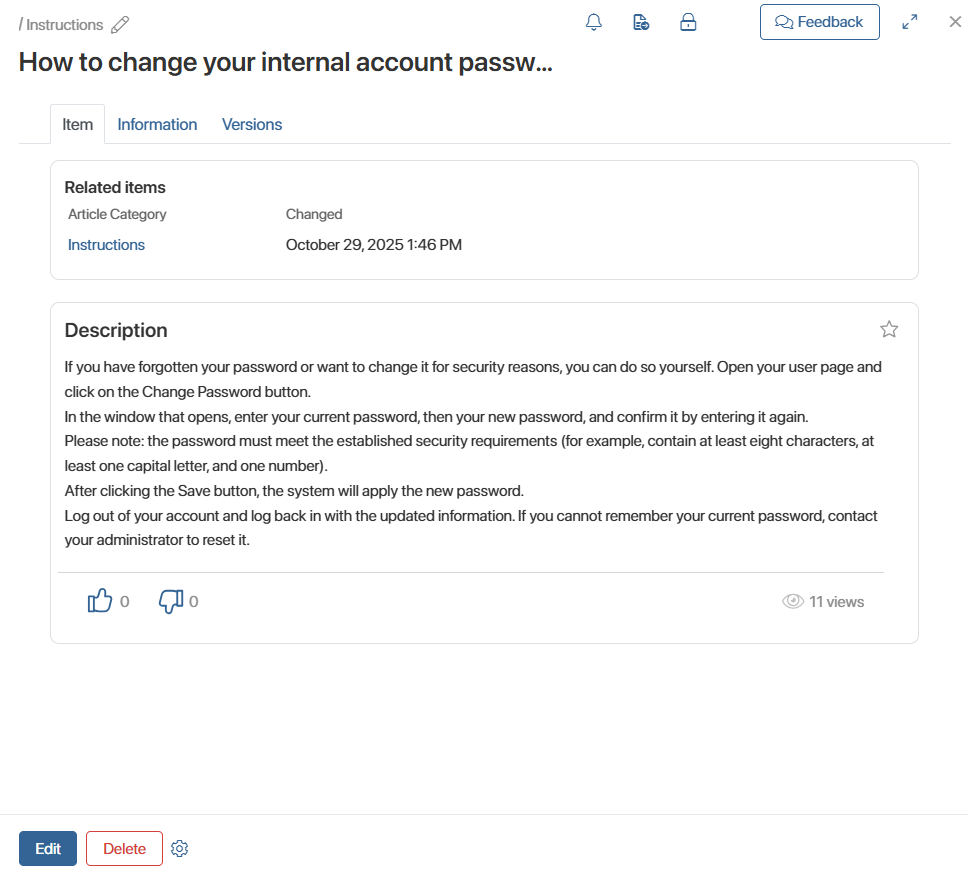
Knowledge base for working with requests
To speed up work with requests, employees can use articles from the Articles app. Here you can place information useful both to employees and to customers, for example answers to frequently asked questions. Published articles can be viewed by customers on the portal. Unpublished articles are available only in the Customer Service workspace for internal use.
To create an article, click + Article and in the window that appears:
- Enable the Public article option so that the information becomes available on the portal.
- Specify the service and product about which the article is written. This will help find the article more quickly in the knowledge base.
- Write the article text and, if necessary, add images, links or files.
A created article can be edited or deleted.
After publication customers will be able to search articles on the portal using filters by title or category. A list of all available articles can be opened by clicking Open Articles.