You can bind script execution to table events. It will run when the user interacts with specific rows and cells. For example, if an employee fills out a list of products and their quantities, the total sums for the products are calculated automatically by the script and added to the table cells.
This option is available in the interface designer if you add a Table-type variable to the form template. This variable will be added to the modeling field using the Field widget. The widget settings will contain the Table Events tab with the following options:
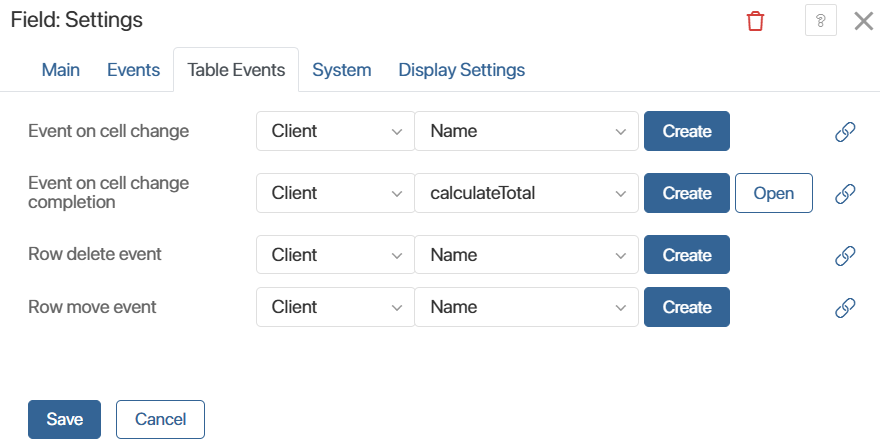
- Event on cell change. Triggered by each character entered in the cell that you track using the script. Available for Data columns, such as String, Number, Money, etc.
- Event on cell change completion. Occurs when the cell editing is complete, i.e., when the user selects Enter or moves the cursor outside the cell. Available for Data columns.
- Row delete event.
- Row move event.
Tracking of these events is implemented in client-side scripts. They provide information about the affected table data: row index, column code, previous and new cell values when they are changed. For more information on the structure of events and working with them in scripts, see the BRIX TS SDK help.
Please note that the Field widget settings also include an Events tab. For a Table variable, an event triggers on this tab whenever the data changes. Tracking changes to specific cells and rows is not available here. This is configured only on the Table Events tab.
Use case for adding a script to a table event
Let's look how to configure a script to run after changing specific data in a table.
Suppose the following discounts can be applied to goods:
- Promotional discounts — linked to a specific product and stored in the Goods app.
- Client — linked to a client and stored on their page in the Clients app.
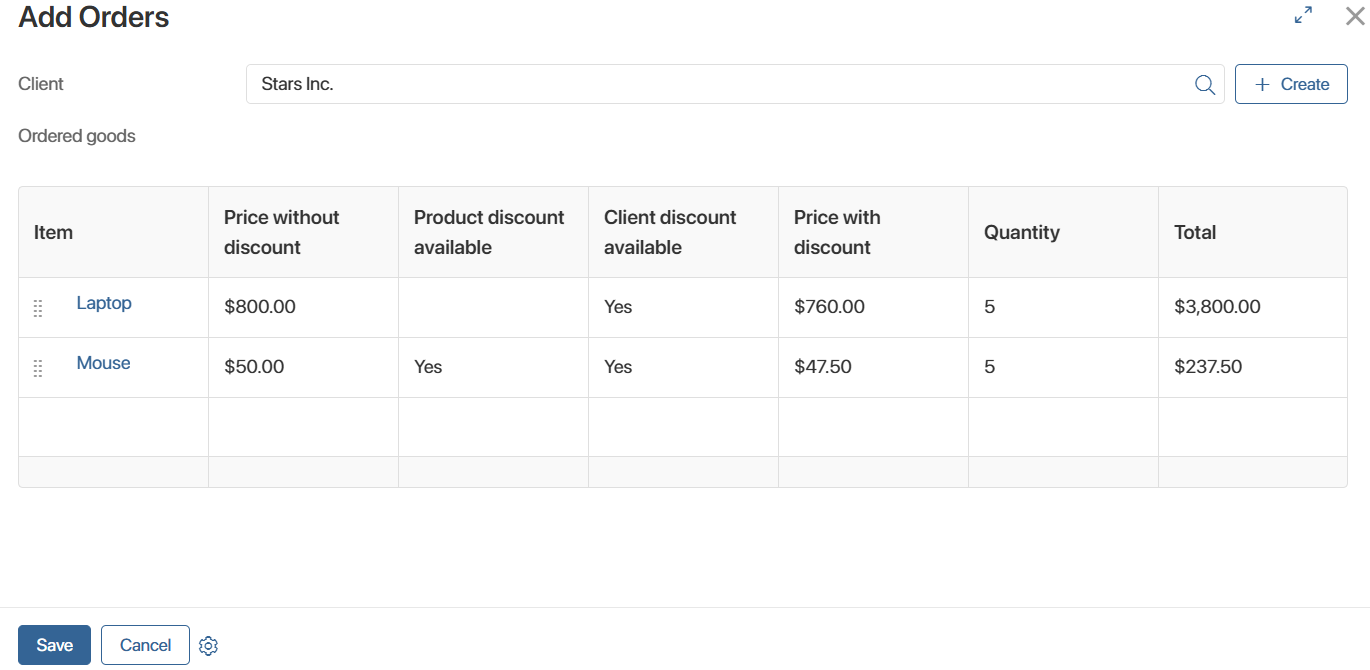
When creating an order, an employee specifies the client and selects the products and their quantity in the Ordered goods table. Based on this data, a script automatically adds the following values to other cells: the price, the applicable discount, the discounted price, and the total sums.
Preliminary settings
Let's look at the settings that are performed before creating a script and linking it to a table event.
In the Work with clients workspace, create three apps:
- Clients. The client page contains the Client discount, % (property code: client_discount) field — a Number‑type property.
- Goods. The product page contains the following fields:
- Price (property code: price) — a Money‑type property.
- Discount available (property code: discount_available) — a Yes/No‑Switch‑type property.
- Discount, % (property code: discount) — a Number-type property.
- Discounted price (property code: discounted_price) — a Money-type property.
- Orders. The order card contains two fields:
- Client (property code: client) — an App-type property. In its settings, specify the Clients app to calculate the cost of ordered goods using the client discount.
- Ordered goods (property code: ordered_goods) — a Table-type property.
This table consists of the following Data-type columns:
- Item (property code: item) — an App-type property. In its settings, specify the Goods app to obtain information about the presence of a promotional discount and the amount including the discount. The user fills in this field manually.
- Price without discount (property code: price_without_discount) — a Money-type property. Displays the original cost of the item from its Price field.
- Product discount available (property code: product_discount_available) — a Yes/No‑Switch‑type property. Indicates that the promotional discount from the product page has been applied to the total.
- Client discount available (property code: client_discount_available) — a Yes/No‑Switch‑type property. Indicates that the client discount from the client page has been applied to the total.
- Price with discount (property code: price_with_discount) — a Money-type. Displays the calculated unit price of the product, taking into account the applied discount.
- Quantity (property code: quantity) — a Number-type property. The user specifies the quantity of ordered items in this table cell. This number is taken into account in the automatic calculation of the final amount.
- Total (property code: total) — a Money-type. It is filled in automatically and displays the result of the calculations performed in the script.
Using data from the specified apps, you can customize the script and automatically fill in several table cells.
Configure the script and bind its execution to a table event
- Go to the Orders app settings, select Form Settings, and open the app form template in the interface designer.
- On the Template tab, go to the settings for the Table-type context variable by clicking the gear icon.
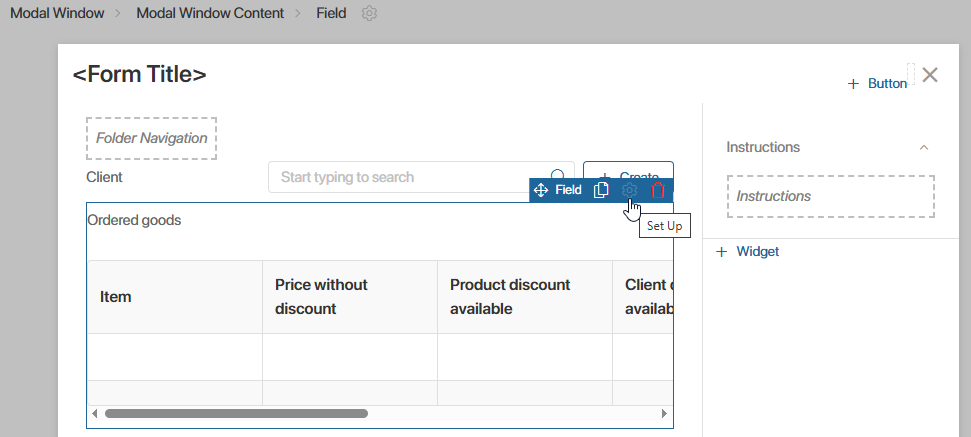
- To automatically fill out the product totals after selecting a customer and ordered items, bind the script to a table event. To do this, go to the Table Events tab and in the Event on cell change completion option, create the calculateTotal() function. In it, define the conditions for executing the script:
- Fill in the Client field (code: client).
- Enter values in the following cells of the Ordered goods table (code: order):
- Item (code: item). Select the items the client ordered.
- Quantity (code: quantity). Add the quantity of items ordered.
The script then automatically checks for discounts and calculates the total for each selected item based on the following principle:
- If the item has its own discount, it is used.
- If not, the client’s personal discount is applied.
Example script for automatic calculation of the total amount for a product
// Add a function that will be executed when table cell changes are completed |
- Save the script and publish the Orders app form.