
This article describes the deployment of a MinIO cluster as the S3 object storage for the BRIX software system.
начало внимание
We recommend using SeaweedFS as your S3 storage solution, as MinIO has been transitioned to limited support mode since December, 2025. For more information, please see the official MinIO information.
конец внимание
The recommended MinIO topology for BRIX is the Multi‑Node Multi‑Drive (MNMD) or Distributed configuration.
MNMD MinIO deployments support erasure coding configurations. They can serve read operations even when up to half the nodes or drives in the deployment are lost. We recommend you to use the MinIO Erasure Code Calculator when you plan and design your MinIO deployment.
The minimum MNMD configuration supporting erasure coding consists of four nodes (servers) with four drives in each. The deployment has to consist of a single server pool that comprises the four nodes. In MinIO, you need to:
- Use sequentially numbered hostnames.
- Use expansion notation
{x...y}to denote a sequential series of MinIO hosts when creating a server pool. - Use expansion notation
{x...y}to denote a sequential series of drives. - Make sure that the ordering of physical drives is constant across restarts, so that a mount point always points to the same formatted drive.
The configuration consists of several steps:
- Prepare the nodes (servers).
- Prepare the drives.
- Install MinIO.
- Install MinIO Client.
- Create a user and a group.
- Create the systemd service file.
- Create the environment file for MinIO.
- Start the MinIO service.
- Configure connection to MinIO.
- Create a bucket.
- Configure CORS.
- Configure HAProxy (in s3minio).
- Connect to BRIX.
Step 1. Prepare the nodes (servers)
Create four nodes (servers) with sequentially numbered hostnames:
- minio1.example.com.
- minio2.example.com.
- minio3.example.com.
- minio4.example.com.
Create the necessary DNS hostname mappings. If this is impossible, enter the mappings in the /etc/hosts file.
Step 2. Prepare the drives
- On each node, create four directories to mount four drives:
sudo mkdir -p /var/lib/minio/data1
sudo mkdir -p /var/lib/minio/data2
sudo mkdir -p /var/lib/minio/data3
sudo mkdir -p /var/lib/minio/data4
For optimal performance, we recommend using the XFS file system.
As MinIO does not distinguish drive types and doesn’t benefit from mixed storage types, all nodes in the deployment must use the same type of drive (NVMe, SSD, or HDD) with identical capacity (for example, N TB).
начало внимание
MinIO enforces a size limit per drive that matches the smallest drive in the deployment. For example, if the deployment has 15 drives for 10 TB and one 1 TB drive, the per-drive capacity will be limited to 1 TB.
конец внимание
- On each node, prepare the XFS file system on the drives:
sudo mkfs.xfs /dev/sdb -L DISK1
sudo mkfs.xfs /dev/sdc -L DISK2
sudo mkfs.xfs /dev/sdd -L DISK3
sudo mkfs.xfs /dev/sde -L DISK4
- On each node, add mount points for the four drives in the
/etc/fstabfile:
LABEL=DISK1 /var/lib/minio/data1 xfs defaults,noatime 0 2
LABEL=DISK2 /var/lib/minio/data2 xfs defaults,noatime 0 2
LABEL=DISK3 /var/lib/minio/data3 xfs defaults,noatime 0 2
LABEL=DISK4 /var/lib/minio/data4 xfs defaults,noatime 0 2
- Make sure the prepared drives have been mounted:
sudo mount -av
Step 3. Install MinIO
On each node, upload the latest stable MinIO binary file and install it to the system:
wget https://dl.min.io/server/minio/release/linux-amd64/minio
chmod +x minio
sudo mv minio /usr/local/bin/
Step 4. Install MinIO Client
On the minio1.example.com node, upload the latest stable MinIO Client binary file and install it to the system:
wget https://dl.min.io/client/mc/release/linux-amd64/mc
chmod +x mc
sudo mv mc /usr/local/bin/
Step 5. Create a user and a group
- On each node, create a user and a group named minio-user:
sudo groupadd -r minio-user
sudo useradd -M -r -g minio-user minio-user
- On each node, create directories to store TLS certificates by running the following command:
sudo mkdir -p /etc/minio/certs/CAs
- On each node, set permissions for directories used in MinIO:
sudo chown -R minio-user:minio-user /etc/minio
sudo chown -R minio-user:minio-user /var/lib/minio
Step 6. Create the systemd service file
- On each node, upload the official MinIO service file:
sudo curl -O https://raw.githubusercontent.com/minio/minio-service/master/linux-systemd/minio.service
- Check the contents of the
minio.servicefile before using it. Move it to thesystemdconfiguration directory:
sudo mv minio.service /etc/systemd/system
начало внимание
During this step, do not start minio.service.
конец внимание
Step 7. Create the environment file for MinIO
On each node, create an environment file at /etc/default/minio. This file will be the source of all environment variables used by MinIO and the minio.service file.
Example of an environment file at /etc/default/minio:
# Set the hosts and volumes MinIO uses at startup
# The command uses MinIO expansion notation {x...y} to denote a
# sequential series.
# The following example covers four MinIO hosts
# with4 drives each at the specified hostname and drive locations.
# The command includes the port that each MinIO server listens on
# (default 9000)
MINIO_VOLUMES="http://minio-server{1...4}.your_domain:9000/var/lib/minio/data{1...4}/minio"
# Set all MinIO server options
# The following explicitly sets the MinIO Console listen address to
# port 9001 on all network interfaces. The default behavior is dynamic
# port selection.
MINIO_OPTS="--certs-dir /etc/minio/certs --console-address :9001"
MINIO_REGION="eu-central-1"
# Set the root username. This user has unrestricted permissions to
# perform S3 and administrative API operations on any resource in the
# deployment.
# Defer to your organizations requirements for superadmin user name.
MINIO_ROOT_USER=brix365user
# Set the root password
# Use a long, random, unique string that meets your organizations
# requirements for passwords.
MINIO_ROOT_PASSWORD=SecretPassword
# Set to the URL of the load balancer for the MinIO deployment
# This value *must* match across all MinIO servers. If you do
# not have a load balancer, set this value to to any *one* of the
# MinIO hosts in the deployment as a temporary measure.
# MINIO_SERVER_URL="https://minio.example:9000"
MINIO_VOLUMES:
minio-server{1...4}.your_domain. Nodes united into a single pool with the{x...y}extension notation.9000. Connection port./var/lib/minio/data{1...4}/minio. Sequential series of drives with the{x...y}extension notation.
MINIO_ROOT_USER. The MinIO administrator username.
MINIO_ROOT_PASSWORD. MinIO password. We recommend using at least 16 characters in it.
How to enable TSL/SSL in MinIO
Read more about TLS/SSL in MinIO in the official MinIO documentation. |
Step 8. Start the MinIO service
- Run the following commands on each node to start the MinIO service:
sudo systemctl daemon-reload
sudo systemctl enable minio.service
sudo systemctl start minio.service
- Make sure that the MinIO service starts and works without errors:
sudo systemctl status minio.service
journalctl -f -u minio.service
Step 9. Configure connection to MinIO
Create an alias for minio on the minio-server1.your_domain node:
/usr/local/bin/mc alias set minio http://minio-server1.your_domain:9000 brix365user SecretPassword
Step 10. Create a bucket
Important: the bucket in S3 should have the following format: s3elma365*.
начало примера
Examples of bucket names
s3elma365s3elma365-devs3elma365-prod
конец примера
For BRIX to work, create a bucket named s3elma365 by running the following command on the minio-server1.your_domain node:
/usr/local/bin/mc mb -p minio/s3brix365 --region=eu-central-1
Step 11. Configure CORS
Cross-Origin Resource Sharing (CORS) is a tool to restrict access to web application resources from third-party domains. You can define a list of domains from which requests to the BRIX application are allowed, and specify the available HTTP headers and methods.
Configure CORS in one of the following ways:
- Using the CORS configuration file.
- Via the web interface of a data management service, e.g. Yandex Object Storage.
Set the CORS settings in the configuration file
- Create the cors.xml file with the CORS configuration, for example:
<?xml version=“1.0” encoding=“UTF-8” ?
<CORSConfiguration xmlns=“http://s3.amazonaws.com/doc/2006-03-01/”>
<CORSRule>
<AllowedHeader>*</AllowedHeader>
<AllowedMethod>GET</AllowedMethod>
<AllowedMethod>PUT</AllowedMethod>
<AllowedMethod>HEAD</AllowedMethod>
<AllowedMethod>POST</AllowedMethod>
<AllowedMethod>DELETE</AllowedMethod>
<AllowedOrigin>https://*.brix.eu</AllowedOrigin>
<MaxAgeSeconds>3000</MaxAgeSeconds>
</CORSRule>
</CORSConfiguration>
Where:
AllowedHeader. The headers that are available in the requests. To allow all headers, use the*symbol.AllowedMethod. Allowed HTTP methods, e.g.GET,POST,PUT,DELETE, andHEAD.AllowedOrigin. The sources from which the web application resources can be accessed. To allow access from any domains, use the*symbol. To increase security, it is recommended to specify specific domains, for example https://*.brix.eu.MaxAgeSeconds. To reduce the number of requests and improve performance, you can store in the browser cache the permission for requests from a certain source. It is checked in the preliminary request, which is executed before the main one. Specify the time in seconds during which the permission is stored in the cache and no new preliminary requests are sent.
You can also specify the ExposeHeader parameter in the CORS configuration. This parameter defines the headers that are displayed in responses to requests. Do not specify this parameter in the .xml file if you do not want the headers to be displayed in the responses.
- Apply the CORS settings to the bucket using the command:
/usr/local/bin/mc cors set minio/s3brix365 cors.xml
- Verify that the CORS settings are applied correctly by running the command:
/usr/local/bin/mc cors get minio/s3brix365 --json
Set the CORS configuration through a data management service
You can configure CORS through the web interface of a data management service.
Example of configuring CORS parameters in Yandex Object Storage:
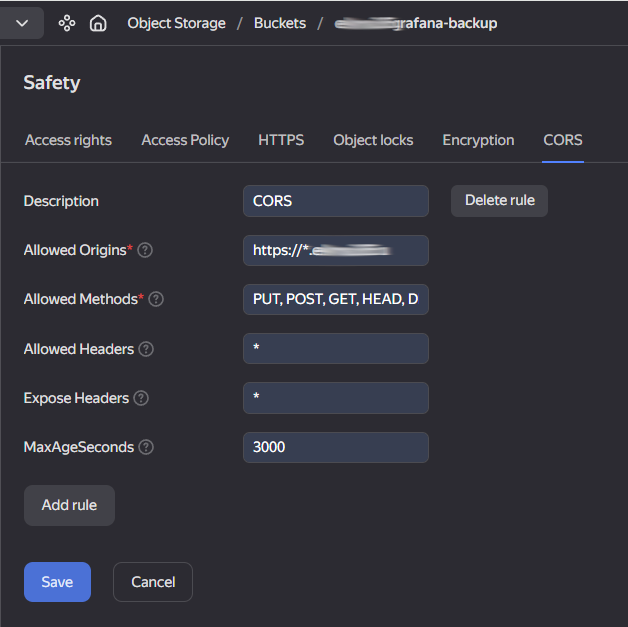
Read more about how to configure CORS in the official Yandex Cloud documentation.
Step 12. Configure HAProxy (in s3minio)
In the example provided in this article, user traffic is transferred to HAProxy using minio.your_domain:9000 and balanced across the cluster’s nodes.
Configure load balancing in the MinIO cluster using HAProxy as described in the Configure HAProxy for S3 MinIO article.
Step 13. Connect to BRIX
Here are the parameters used to establish a connection with MinIO:
- address:
minio-server.your_domain:9000. - bucket:
s3elma365. - region:
eu-central-1. - access key ID:
elma365user. - secret access key:
SecretPassword. - upload method:
PUT. - enable SSL?
No.
If TLS/SSL connection is used, set the enable SSL? parameter to Yes.
Found a typo? Select it and press Ctrl+Enter to send us feedback