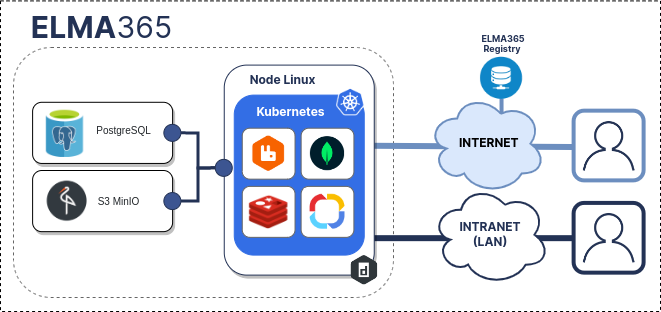
BRIX Standard edition can be installed on Kubernetes-in-Docker (KinD). This installation option is straightforward and allows you to run a local Kubernetes cluster using a Docker container node.
The installation consists of three steps:
- Prepare infrastructure.
- Install Docker for your operating system and check its operability.
- Download the installation script and fill in the configuration file.
- Run BRIX Standard installation script.
- Verify successful system installation within the infrastructure.
Before installing read the System requirements for BRIX On-Premises article.

Step 1: Prepare infrastructure
The infrastructure refers to the necessary components required for the operation of the BRIX On-Premises application:
- Docker.
- PostgreSQL.
- MongoDB.
- RabbitMQ.
- Redis.
- S3 (MinIO).
начало внимание
The dependent components must be deployed by the customer independently. All tasks related to organizing a fail-safe local architecture and setting up the resilience of dependent components also remain the responsibility of the customer.
конец внимание
Embedded data storage components are suitable for demonstration purposes and in special cases for organizing testing and development platforms. If no connection parameters to external databases and S3 storage are specified in the additional installation settings, the built-in data storage components (PostgreSQL, MongoDB, RabbitMQ, Redis, MinIO) will be used automatically.
Within this article, the PostgreSQL database and S3 object storage will be external. For more details on how to deploy the database and object storage, read the articles: PostgreSQL and MinIO (S3).
Standard connection strings and passwords are used to connect to PostgreSQL and MinIO (S3).
Step 2: Install Docker
- Install Docker for your operating system. Read more about it in the Docker official documentation.
начало внимание
KinD does not support creating a Kubernetes cluster with Cgroups v2. Refer to the documentation for possible errors.
конец внимание
- Check the list of Docker containers. To do this, execute the command:
sudo docker ps
If Docker is installed correctly, you will see an empty list.
- Launch a test container to check Docker functionality by executing the command:
sudo docker run hello-world
If the command is successful, an image will be loaded to host the hello-world test container. The container will then start up and a message will appear:
...
Hello from Docker!
This message shows that your installation appears to be working correctly.
To generate this message, Docker took the following steps:
1. The Docker client contacted the Docker daemon.
2. The Docker daemon pulled the "hello-world" image from the Docker Hub.
...
Please note that the hello-world test container will automatically terminate after execution and will not appear in the list of active containers.
Step 3: Download the installation script and fill in the configuration file
Upon the first run, the installation script will create a configuration file named config-elma365.txt in the directory from which it was executed.
- Download and run the BRIX installation script to create a configuration file by executing the following command:
sudo curl -fsSL -o elma365-docker.sh https://dl.elma365.com/onPremise/latest/elma365-docker-latest && \
sudo chmod +x elma365-docker.sh && \
sudo ./elma365-docker.sh
Download links for other BRIX versions are provided in Links for downloading BRIX On-Premises distribution packages.
начало внимание
To create a new default configuration file, rename the existing configuration file config-elma365.txt and run the installation script with the --new-config flag.
конец внимание
- Make changes to the configuration file
config-elma365.txtprepared with the installation script.
- For a quick start with BRIX Standard, uncomment and fill in the necessary variables.
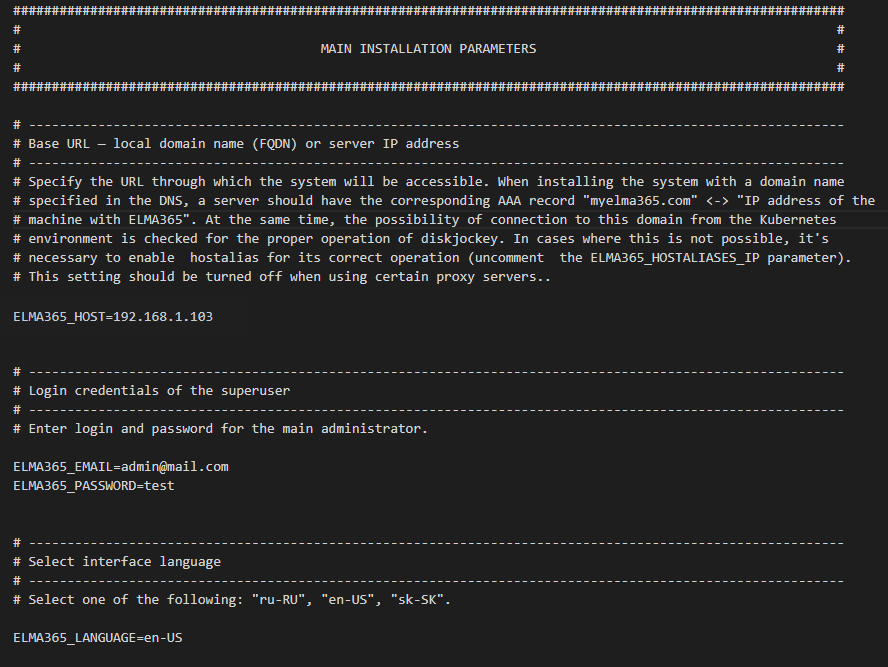
Filling in the main parameters in the configuration fileconfig-elma365.txtmay look like the following:

Where:
ELMA365_HOST=192.168.1.103is the IP address of the host machine through which the BRIX Standard application will be accessible. For details on creating a FQDN, refer to Modify BRIX Standard parameters.ELMA365_EMAIL=admin@mail.comis the administrator’s email address.ELMA365_PASSWORD=testis the administrator’s password.
начало примечание
Note
The following characters are acceptable for passwords:
- Uppercase Latin letters: A to Z.
- Lowercase Latin letters: a to z.
- Numbers: 0 to 9.
- Characters: -_.
Reserved (unacceptable) characters:
! * ' ( ) ; : @ & = + $ , / ? % # [ ] { }
конец примечание
ELMA365_LANGUAGE=en-USis the language of the installed system.
Important: if Docker is installed via Snap, you need to uncomment and change the paths to folders/directories for the parameters: ELMA365_INSTALL_DIR, ELMA365_BACKUP_DIR, for example:
ELMA365_INSTALL_DIR=/mnt/elma365/docker.ELMA365_BACKUP_DIR=/mnt/elma365/backup.
- Set up connection to external databases and S3 object storage.
Important: Embedded storage components are suitable for demonstration purposes and, in special cases, for organizing testing and development platforms. If no connection parameters to external databases and S3 storage are specified in the additional installation settings, the built-in data storage components (PostgreSQL, MongoDB, RabbitMQ, Redis, MinIO) will be used automatically.
To connect to the external PostgreSQL database, uncomment and fill in the ELMA365_DB_PSQL parameter by specifying the connection string obtained during the installation of PostgreSQL in step 6.
Uncomment and set the following parameters for connecting to S3:
ELMA365_DB_S3_ADDRESS,ELMA365_DB_S3_BUCKET,ELMA365_DB_S3_USER,ELMA365_DB_S3_PASSWORD,ELMA365_DB_S3_REGION,ELMA365_DB_S3_METHOD,ELMA365_DB_S3_SSL. Connection parameter values will be obtained during the installation of MinIO (S3) in step 10;- Set the
ELMA365_DB_S3_GATEWAYarameter totrueto enable proxying connections to S3 through BRIX.
Filling in connection variables to the proxy server
Example for # ------------------------------------------------------------- # -------------------------------------------------------------
Where:
Make sure that the |
For more information on config-elma365.txt configuration file parameters, refer to Modify BRIX Standard parameters.
Step 4: Run BRIX Standard installation script
The volume of downloaded files during BRIX Standard installation is approximately 4-5 GB, and the installation time is around 10-15 minute.
- Run the downloaded installation script:
sudo ./elma365-docker.sh
Once installation is complete, a message about the successful installation of the BRIX Standard application will be displayed in the script.

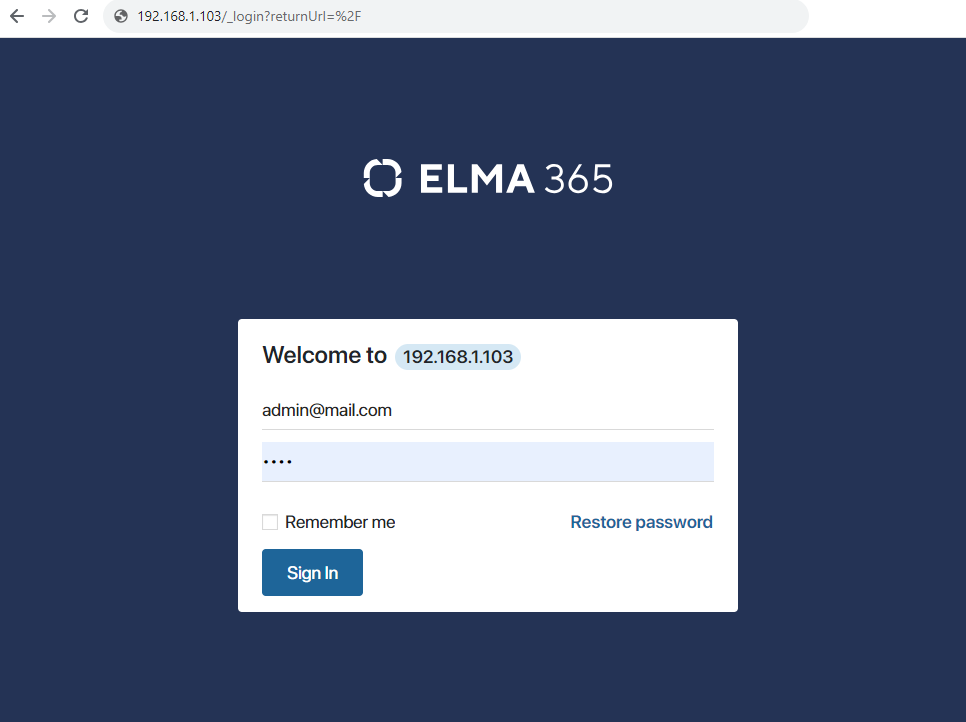
- Launch the browser and open the BRIX Standard application login page at
http://ELMA365_HOST. TheELMA365_HOSTparameter was specified in theconfig-elma365.txtfile on the Download the installation script and fill in the configuration file step.
In the provided example, the following application login page address is used: http://192.168.1.103.

- For login, use the administrator’s email address and the password that was used in the
config-elma365.txtconfiguration file under the parametersELMA365_EMAILandELMA365_PASSWORD.
In the provided example, they are:
- Login: admin@mail.com.
- Password: test.
- Click the Sign In button.
The BRIX system activation window will open. - Activate the system. For more details, see Activate BRIX On-Premises.
The installation of BRIX Standard has been successfully completed. Before starting work in the system, it is recommended to check the operability of the modules.
Начало внимание
Save the config-elma365.txt file for future updates.
Конец внимание
Step 5: Verify successful system installation at the infrastructure level
After the BRIX Standard installation is complete, check if the system modules are functional. To do this, run the command in the terminal where the system installation was performed:
sudo ./elma365-docker. docker exec elma365 kubectl get pods
The running modules of the product should be in Running status and on 1/1 availability. Modules whose life cycle does not require continuous activity and are finite can be in the Completed status.
Found a typo? Select it and press Ctrl+Enter to send us feedback