In Company Settings, the system administrator can configure the main BRIX settings for the organization, including the company name, the mobile app's start page, the system email template, and more.
Go to company settings
- On the home page, select Administration > Company Settings from the left menu.
- Configure the settings:
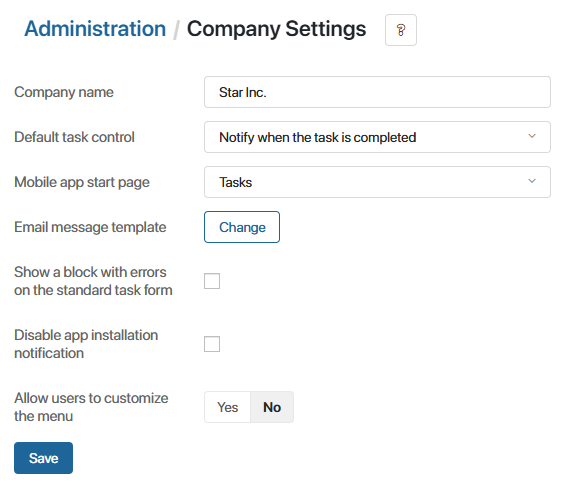
- Company name.
- Default task control option.
- Start page of the BRIX mobile application.
- Template for system emails.
- App installation notification.
- Widget with errors on the standard task form.
- Warning about unsaved changes.
- Personal settings for workspace menu.
- Hint for the login field on the sign-in page.
For details about each setting, see below.
- To apply your changes, click the Save button at the bottom of the page.
Company name
When you create a new company on the BRIX website, you specify its name. Later you can edit the name on this page. Users see the company name:
- In the email with an invitation to the company.
- When logging in to BRIX.
Default task control
You can set up a suitable task control. There are several options:
- Send for evaluation. A completed task is sent for evaluation to the author.
- Notify when the task is completed. The author receives a notification when the task is completed.
- Not required. Task control is not required, the task is completed without evaluation and notifications.
All the tasks created outside of business processes will have the selected control type, but you can change it manually when creating a new task.
Mobile app start page
You can select the workspace that will open as the start page in the BRIX mobile app. To specify the exact page or app, select the Custom option. Then, in the appeared field, specify the path that is displayed after the company’s main URL.
Email message template
When working with BRIX, users receive different emails to the address specified when registering in the system. For example, invitations to the company, password reset emails, confirmation codes for two-factor authentication, etc.
The same template is used for all system emails. You can edit it using HTML language or plain text.
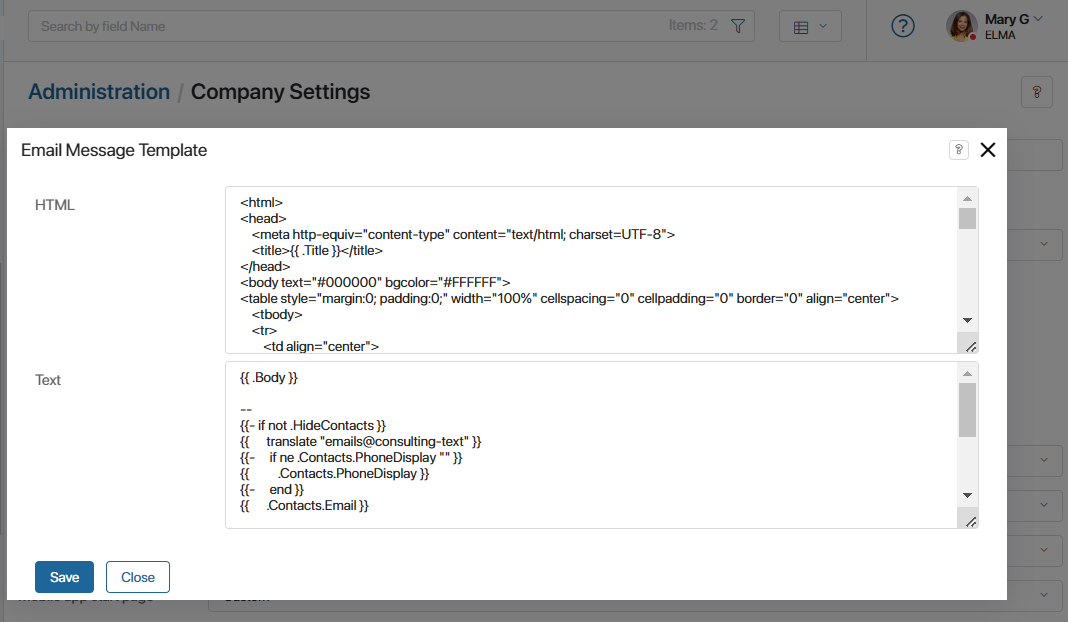
The text template is used in email clients that do not support HTML markup.
Make the necessary changes and save the settings.
Please note that the {{.Body}} value is filled by the service sending the email and contains the main information of the message. For example, a link with an invitation to the company or a two-factor authentication code.
Show a block with errors on the standard task form
When a user creates a task, the values of the form fields are validated. The errors are marked red.
To have a list of validation errors appear at the top of the form, enable the Show a block with errors on the standard task form option.
Disable brix BRIX application installation notification
The BRIX interface contains a banner with a recommendation to download the mobile version.
To hide it, switch on the Disable app installation notification option.
Enable the unsaved changes warning
To prevent the accidental loss of entered data when creating or editing a system component, you can enable a warning dialog. It will appear when a user attempts to close the form or cancel their action. To do this, activate the Request confirmation before closing the form when clicking the "X" or "Cancel" buttons option.
By default, this dialog only appears when the user clicks outside the form area or selects the Esc key on the keyboard.
Allow users to customize the workspace menu
To allow all users to customize the workspace display in the left menu, set the Allow users to customize the menu option to Yes.
Once this option is activated, all the employees will see the  icon in the left menu. By clicking on it, they can open the list of available workspaces and can reorder them or hide the ones that they do not use.
Customize the hint for the Login field
On the BRIX sign-in page, you can display a custom hint in the login field instead of the default text. This helps users understand the required format for their login credentials. For example, you can specify that users must include their domain when entering their login.
To add a hint, enter the desired text in the Hint for the Login field field.