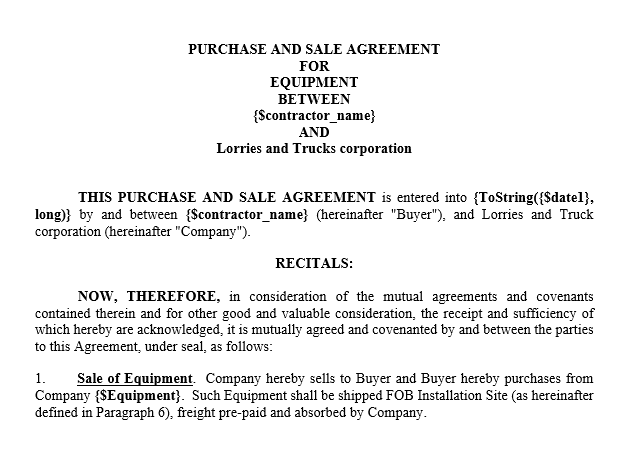
The first step in setting up document generation from a template is to prepare a file, which can be in one of the following formats: .doc, .docx, .rtf, .dot, .dotx, .xls, .xlsx, .xltx, .xlt.
The file uses a special syntax and can contain variables, functions, conditions, and loops. These let you insert data from BRIX, format text, numbers, and dates, inflect values, and generate lists and tables.
This article explains how to write variables and expressions in a template file.
After preparing the file, follow the remaining setup steps.
начало примера
Related articles:
- Add and set up a document template. Upload a template file to the system and map its variables.
- Generate from Template and Generate from File. Set up automatic document generation using dedicated activities in a business process.
конец примера
Choose the syntax for your task
Task |
Section to use |
Insert a field value |
|
Display a property of a file, user, or associated item |
|
Learn how to write arguments |
|
Change the case or extract part of a string |
|
Display a value of a specific type |
|
Format a number |
|
Format a date and time |
|
Count rows or items |
|
Display text based on a field value |
|
Display a list or generate a table |
|
Insert a barcode, image, or link, or add a custom function |
General syntax rules
Variable syntax
To insert a variable, enclose its code in braces and prefix it with a dollar sign: {$variable_code}.
Variable names must be unique and use Latin characters.
начало примера
Example
{$client}. Inserts the contractor name from the item page.
конец примера
Nested variable syntax
A template can access the attributes of fields in the app context using nested variables.
This is available for fields of types such as Files, Users, App, Arbitrary app, and others.
To display an attribute of a linked object, separate the main field code and the nested property code with a period: {$variable_code.nested_variable_code}.
начало примера
Example
The Orders app has the fields Contract (code: contract) and Client (code: client), which contain links to app items. Use the following syntax:
- {$contract.__name}. Displays the name of the file uploaded to the Contract field.
- {$client.phone}. Displays the phone number of the contractor specified in the Client field.
конец примера
Pass function arguments
Pass function arguments in parentheses, separated by commas:
- Write variables and numbers without quotation marks, for example, {$sum}, 100.
- Enclose string values, such as formats, locales, masks, and text, in quotation marks, for example, "en-US", "short".
Although the system recognizes simple values without quotation marks, we recommend quoting all string arguments for consistency. This prevents errors when processing spaces and special characters.
The following types of quotation marks are supported: " ", « », “ “, ” ”, ' '.
- In syntax descriptions, optional arguments are enclosed in square brackets []. Do not include these brackets in function calls in your template.
Specify a locale
Some functions, such as ToString(), DateTime(), Now(), accept a locale argument to display a date, number, or amount in the format used in a specific country.
Available locales:
- "en-US". English (United States).
- "en-GB". English (United Kingdom).
- "de-DE". German.
- "fr-FR". French.
- "es-ES". Spanish.
You can also use a short language code, such as "es" or "en".
начало примера
Example
The date value in the variable {$__createdAt} is 25.08.2000:
{DateTime("DD MMMM YYYY", {$__createdAt}, "en-GB")} —> 25 August 2000.
конец примера
Work with text
String functions let you change text case and display part of a value.
In these examples, the variable {$string} contains the value John Dean.
Convert to uppercase with UpperCase()
Syntax:
{UpperCase({$variable_code}: string)}.
начало примера
Example
{UpperCase({$string})} —> JOHN DEAN.
конец примера
Convert to lowercase with LowerCase()
Syntax:
{LowerCase({$variable_code}: string)}.
начало примера
Example
{LowerCase({$string})} —> john dead.
конец примера
Capitalize the first letter with Capitalize()
This function converts the first letter of the first word to uppercase.
Syntax:
{Capitalize({$variable_code}: string)}.
начало примера
Example
{Capitalize({$string})} —> John dean.
конец примера
Extract part of a string with Substr()
This function extracts a substring of a specified length, starting at the specified position.
Syntax:
{Substr({$variable_code}: string, position: number, [length: number])},
Where:
- position. The character position where the substring starts.
- length. The number of characters to display. If omitted, the function returns the rest of the string from the specified position.
начало примера
Examples
- {Substr({$string}, 0, 3)} —> Joh.
- {Substr({$string}, 3)} —> n Dean.
конец примера
Display a variable value with ToString()
The function ToString() displays values of the following data types in a document:
For more information about data types, see System data types.
The available arguments depend on the variable type.
String
The function ToString() displays the value of a text variable.
Syntax:
{ToString({$variable_code}: string)}
For the String type, this function is optional. The value also appears in the template using the standard syntax for a variable code in braces.
начало примера
Examples
The variable {$string} contains the value Sent for approval.
- {ToString({$string})} —> Sent for approval.
- {$string} —> Sent for approval.
конец примера
Number
By default, numbers are displayed as digits.
Syntax:
{ToString({$variable_code}: number, ["format": string], ["locale": string])},
Where:
- format. Use the format value "astext" to spell out an integer.
- locale. The language used to spell out the number, for example, "en". For the available options, see Specify a locale.
начало внимание
To spell out decimal numbers, instead of ToString() use NumberToString().
конец внимание
начало примера
Examples
The variable {$number} contains the integer 546.
- {ToString({$number})} —> 546.
- {ToString({$number}, "astext")} —> five hundred forty six.
- {ToString({$number}, "astext", "es-ES")} —> quinientos cuarenta y seis.
конец примера
For more control over number formatting, use NumberFormat(). It lets you round the fractional part, convert a number to a percentage or hexadecimal notation, and more.
Category
The Category data type lets you select one value from a predefined list. For example, a payment method can be card or cash.
When configuring this field, specify the variable name and code, and the name and code of each option.
Syntax:
ToString({$variable_code}: category).
You can also display the name of the selected option:
- Using the variable code: {$variable_code}.
- By accessing the option name with a period: {$variable_code.name}.
To display the code of the selected option instead of its name, use {$variable_code.code}.
начало примера
Example
The app contains a variable called Payment method (code: {$payment}). The selected option is by card (code: card).
- Payment is made {ToString({$payment})} —> Payment is made by card.
- Payment is made {$payment} —> Payment is made by card.
- Payment is made {$payment.name} —> Payment is made by card.
- Selected category code: {$payment.code} —> Selected category code: card.
конец примера
Yes/no switch
This data type has two options: Yes and No. You can rename them, for example, to Approved and Not approved.
Syntax:
{ToString({$variable_code}: yes/no switch})}.
начало примера
Example
For the variable Decision (code: resolution) the option Yes (code: true) is defined as Approved and selected as the field value:
Document decision: {ToString({$resolution})} —> Document decision: Approved.
конец примера
Money
A variable of type Money can be displayed in several formats.
Syntax:
{ToString({$variable_code}: money, ["format": string], ["locale": string])},
Where:
- format. Available format values:
- "short". Short numeric format. Symbols and separators follow the selected locale—> 1 005,56.
- "sign" . Amount with the currency code specified in the variable —> EUR 1 005,56;
- "full". Full format with the currency name —> 1 005 euros and 56 cents;
- "astext" . Amount in words —> One thousand and five euros and 56 cents.
- "wildcard" . Custom format. Replace the keyword with a quoted template using these symbols: "%i" for the integer part, "%f" for the fractional part.
|
- locale. Displays the value in a specific language, for example, "en" or "es". For the available options, see Specify a locale.
начало примера
Example
{ToString({$money}, "full", "en")} —> 1 005 euros 56 cents.
конец примера
Full name
Use ToString() to display a last name, first name, and patronymic in the required format and grammatical case.
Syntax:
{ToString({$variable_code}: full name, ["format": string], ["case": string])},
Where:
- format. Available values:
- "long". Displays the last name, first name, and patronymic in full.
- "short". Displays the last name and initials.
- case (for languages where grammatical case values are applied). Grammatical case names are not letter case-sensitive:
- "Nominative"
- "Genitive"
- "Dative"
- "Accusative"
- "Instrumental"
- "Prepositional"
For more control over full name formatting, use these dedicated functions:
- FormatFio(). Sets the order of name parts and automatically adds a preposition in the prepositional case.
- GetPartOfFullName(). Extracts only the first name, last name, or patronymic.
Phone number
This function sets a mask for displaying a phone number.
Syntax:
{ToString({$variable_code}: phone number, "mask: +7-XXX-XXX-XX-XX EEE")},
The Latin letters represent:
- X. Main number.
- E. Extension.
If the number has fewer digits than the number of X or E characters in the mask, extra characters are omitted from the generated document.
The digits are inserted from left to right.
начало примера
Examples
- {ToString({$phone}, "+4-XXX-XXX-XX-XX")} —> +4-999-345-67-89.
- {ToString({$phone}, "X-XXX-XXX-XX-XX EEE")} —> 0-912-345-67-89 159.
- {ToString({$phone}, "XX-XX-XX E")} —> 45-67-89 3.
конец примера
Date/time
Use ToString() to display a value of type Date/time, such as the equipment delivery date in a contract.
The data type Date/time has these subtypes: Date/time, Date, Time. The function result depends on the subtype selected for the variable.
Syntax:
{ToString({$variable_code}: date/time, ["format": string], ["locale": string])},
Where:
- format. Controls the level of detail and how date and time components are displayed, depending on the subtype:
- No format specified. Displays the date using the numeric mask DD.MM.YYYY and the time including seconds as hh:mm:ss.
- "short". Short format. Displays the date numerically and omits seconds from the time.
- "long". Long format. Spells out the month name and includes seconds in the time.
- locale. The date follows the conventions of the specified country, for example, "en" or "es". For all available options, see Specify a locale.
Important: the Date/time subtype displays the date and time using the company time zone. With the Date and Time subtypes, values are displayed as stored in the system, without time zone adjustments.
начало примера
Examples
The variable {$date} stores the value 09.04.2025 15:18:43.
- No format specified: {ToString({$date})}:
- Subtype Date/time —> 09.04.2025 15:18:43;
- Subtype Date —> 09.04.2025;
- Subtype Time —> 15:18:43.
- Short format without seconds: {ToString({$date}, "short")}:
- Subtype Date/time —> 09.04.2025 15:18;
- Subtype Date —> 09.04.2025;
- Subtype Time —> 15:18.
- Long format with the month name spelled out: {ToString({$date}, "long")}:
- Subtype Date/time —> 09.04.2025 15:18:43;
- Subtype Date —> 9 April 2025;
- Subtype Time —> 15:18:43.
- With a locale specified: {ToString({$date}, "short", "en-US")}:
- Subtype Date/time —> 4/9/25 3:18 pm;
- Subtype Date —> 4/9/25;
- Subtype Time —> 3:18 pm.
конец примера
For more control over date and time formatting, use DateTime(). It lets you define a custom display mask, for example, to reorder components or show the day of the week.
Format a number with NumberFormat()
The function NumberFormat() displays a variable of type Number in a specific format, for example, with a fixed number of decimal places or in hexadecimal notation.
Syntax:
{ToString({$variable_code}: number, ["format": string])}.
The format in NumberFormat() is a letter that specifies how the number is displayed. You can add a precision specifier, a number immediately after the letter. Depending on the format, it sets the number of decimal places or the minimum display length.
In these examples, the variable {$number} contains the decimal number 1125,34.
Decimal format
The argument "D" or "d" displays an integer without a fractional part and pads it with zeros to the specified length. The precision specifier sets the number of padding zeros.
начало примера
Example
{NumberFormat({$number}, "D5")} —> 01125.
конец примера
Exponential format
The argument "E" or "e" displays the number as a mantissa and exponent. The precision specifier sets the number of decimal places.
начало примера
Example
{NumberFormat({$number}, "E2")} —> 1.13E+03.
конец примера
Fixed-point format
The argument "F" or "f" displays a fixed number of decimal places.
начало примера
Example
{NumberFormat({$number}, "F2")} —> 1125.34.
This example specifies two decimal places.
конец примера
General format
The argument "G" or "g" converts the number to fixed-point or exponential notation, whichever is shorter. The precision specifier sets the number of digits without padding zeros.
начало примера
Example
{NumberFormat({$number}, "G4")} —> 1125.
конец примера
Numeric format with separators
The argument "N" or "n" displays the number with digit grouping separators. The precision specifier sets the number of decimal places.
начало примера
Example
{NumberFormat({$number}, "N3")} —> 1,125.340.
конец примера
Percentage format
The argument "P" or "p" multiplies the number by 100 and adds the percent sign %.
начало примера
Example
{NumberFormat({$number}, "P")} —> 112534.00 %.
конец примера
Round-trip format
The argument "R" or "r" displays an exact representation of the number without rounding. Precision specifiers are not supported.
начало примера
Example
{NumberFormat({$number}, "R")} —> 1125.34.
конец примера
Hexadecimal format
The argument "X" or "x" displays the number in hexadecimal notation without a fractional part.
начало примера
Example
{NumberFormat({$number}, "X")} —> 465.
конец примера
Format a date and time
The DateTime() function
The function DateTime() displays a date and time using the specified format and locale, for example, an item’s creation date.
Syntax:
{DateTime("format": string, {$variable_code}: date/time, ["locale": string])},
Where:
- format. A date and time display mask such as "DD MM YYYY hh:mm:ss".
Quotation marks delimit the format and individual date components within the mask.
Available day and time mask formats
For example, the date value is 02.01.2025 15:04:05 (Thursday):
|
- locale. The date follows the conventions of the specified country, for example, "ru" or "en". For all available options, see Specify a locale.
Начало примера
Examples
The variable {$__createdAt} contains the value 31.08.2024 08:30:56:
{DateTime("'DD' MMMM YYYY",{$__createdAt},"en_US")} —> '31' August 2024.
Конец примера
The Now() function
The function Now() inserts the current date and time into the template using the time zone and locale.
Syntax:
{Now(["format": string], ["locale": string], ["time_zone": string])},
Where:
- format. The date and time display format:
- "short". Date and time without seconds. Used by default if no format is specified.
- "date". Numeric date only.
- "datelong". Date with the month name spelled out.
- "time". Time in hours and minutes only.
- "timelong". Time including seconds.
- locale. Month names and the date format in the required language, for example, "en", "es". For all available options, see Specify a locale.
- time zone. The time zone name in the standard IANA, for example, "America/Toronto".
начало примера
Examples
Suppose the current date and time in your location is 13.04.2025 15:34:
- {Now()} —> 13.04.2025 15:34.
With no arguments, the function displays the date and time in the short format "short", using the locale and time zone configured in the system.
- {Now("date", "en")} —> 04/13/2025.
- {Now("datelong", "en-US")} —> April 13, 2025.
- {Now("timelong", "en", "America/Toronto")} —> 08:34:22. The result uses the Toronto time zone (EDT).
конец примера
Count items with Count()
The function Count() returns the number of items passed to a variable of the Table or App type.
Use this function to:
- Display the number of nested items in a linked app.
- Display the total number of table rows.
- Count items in nested tables.
Syntax:
{Count({$variable_code}: app or table)}.
Начало примера
Examples
- Count rows in a report table:
{Count({$report_table})} —> 12.
- Count items in a linked app:
{Count({$app})} —> 3.
Конец примера
Use Count() in {for} loops
The function Count() can be used inside a {for} loop to count items in nested tables or nested relationships.
Display the number of rows in a nested table
If a row in the main table contains another table, such as a list of completed tasks, use this syntax:
{for row in {$report_table}}
Subrow count: {Count({$row.execution})}
{end}
Where:
- {$report_table}. Main report table.
- {$row.execution}. A nested variable of type Table in a table row.
Display the number of rows in an associated app’s table
Use this expression:
{for row in {$app}}
Subrow count: {Count({$row.multi})}
{end}
Where:
- {$app}. A variable of type App that references the associated app.
- {$row.multi} . A variable of type Table in that app’s context.
The FormatFio() function
Function FormatFio() inflects a full name in the specified grammatical case and displays its parts in the specified order, for languages where it applies.
Syntax:
{FormatFio(value: "string" or {$variable_code}: full name, ["case": string], ["format": string])},
Where:
- value. Specify a quoted string or a variable of type Full name.
- case. Not letter case-sensitive.
- "Nominative" |
- "Genitive" |
- "Dative" |
- "Accusative"
- "Instrumental" .
- "Prepositional"
- format. A quoted mask for displaying a full name. It lets you reorder the parts and display them in full or as initials, with or without spaces. The mask is not case-sensitive; the result uses initial capitals:
- "Surname"
- "Name"
- "Middle name"
The GetPartOfFullName() function
The function GetPartOfFullName() or returns a full name or one of its parts.
Syntax:
{GetPartOfFullName("value": string or {$variable_code}: full name, "name part": string)},
Where:
- value. Specify a quoted string or a variable of type Full name.
- name part. The full or abbreviated name of the part to return:
- "Surname"
- "Name"
- "Middle name"
- "Full name"
начало примера
Examples
The value Jennifer Maria Garden is passed to the function as a string and using the variable {$fullname}:
{GetPartOfFullName("Jennifer Maria Garden", "")} —> Maria.
конец примера
Another way to access name parts
If the data is stored in a variable of type Full name, you can retrieve name parts without functions. Specify the variable code followed by a period and the required property:
- {$variable_code.lastname}. Last name.
- {$variable_code.firstname}. First name.
- {$variable_code.middlename}. Middle name.
начало примера
Example
A variable of type Full name with the code {$user} contains the value Jennifer Maria Garden.
{$user.lastname} —> Garden.
конец примера
Display text conditionally
Conditions display text in a document based on a variable value or whether a field contains data.
Syntax:
{if condition} text {else} alternative text {end},
Where:
- condition. A logical expression to evaluate, in the form {$variable_code} operator value:
- operator. A comparison operator: equal to, not equal to, greater than, less than, and so on.
- value. A quoted string or a number.
- text. The content displayed in the document if the condition is met.
- {else} alternative text. Optional. The content displayed if the condition is not met.
Available operations for evaluating conditions
You can use the following operators in conditions:
|
Check a single value
начало примера
Example
{if {$user_name} = "Daria Green"} Best regards, Daria Green {end}
If the field value matches the specified value, the document displays “Best regards, Daria Green”.
конец примера
Display one of two alternatives
начало примера
Example
{if {$week.day} = "Friday"}
Have a great weekend!
{else}
Goodbye!
{end}
The text displayed depends on the current day of the week.
конец примера
Check a Yes/no switch field
For variables of type Yes/no switch, use the values from the Options field in the condition. The defaults are Yes and No.
начало примера
Example
{if {$options} <> "No"} Payment completed {end}
The text is displayed if the selected option is Yes.
конец примера
Check whether a field has a value
A condition can check whether an app item property contains a value.
начало примера
Example
{if {$document}} {$document} {end}
If a document is uploaded to a field of type Files, its name appears in the generated file.
конец примера
Important: for properties of type App or Files, the condition applies when the One option is enabled. If multiple items are allowed, use The {for} loop.
Conditions in Excel
When writing conditions in .xlsx files, place the {if condition}, {else} and {end} operators in separate table rows containing no other data.
During document generation, the rows containing these operators are deleted entirely. Any text or values in adjacent cells in those rows are deleted as well.
начало примера
Example layout in Excel
Cell A1 |
Cell B1 |
{if {$status} = "Approved"} |
|
Contract details |
Amount: USD 100,000 |
{end} |
In the generated document, the rows containing {if} and {end} are deleted, while the data row stays in place.
конец примера
Complex conditions with OR and AND
Use logical operators to combine multiple checks in one expression:
- OR. The condition is met if at least one expression is true.
- AND. The condition is met only if all expressions are true.
Example using OR
начало примера
{if {$trip.location_type} = "Hotel" OR {$trip.location_type} = "Apartment"}
Accommodation expenses will be reimbursed after the business trip report is reviewed.
{end}
Depending on the accommodation type, the document displays a notice about reimbursement of additional expenses.
конец примера
Example using AND
начало примера
{if {$business_trip_request.isApproved} AND isPurchased}}
The business trip is scheduled for {$business_trip_request.date}.
{else}
The business trip has not been scheduled yet.
{end}
The business trip date appears if all conditions are met: the request is approved and the tickets are purchased. Otherwise, the document states that the trip has not been scheduled.
конец примера
Combine OR and AND
You can combine several operators in one expression. Use parentheses to set the order in which conditions are evaluated.
начало примера
{if {$business_trip_request.location_type} = "Hotel" OR {$business_trip_request.location_type} = "Apartment")
AND ($business_trip_request.price} < 5 000)
{$business_trip_request.city}
{end}
The city is displayed based on the accommodation type and the amount requested for accommodation.
конец примера
Display a list or generate a table with a {for} loop
The loop {for} displays a list in the document, for example, a list of app items or multiple files and images.
Syntax:
{for item in list}
actions on item
{end}
Where:
- item. A temporary container variable. Each iteration places the next object from the list in this variable. You can choose any name, such as item, row, position, and then use it inside the loop to access the current object or its properties.
- list. A system variable from the app or business process context containing an array of data, such as apps, files, or table rows, to display sequentially in the document.
- actions on item. The loop body, such as text, properties, functions, or table rows, repeated for every object in the list.
Начало примера
Example displaying multiple products
The app contains a variable called Product of type App (multiple) with the code item. To list the ordered products, use:
{for position in {$item}}
Product ordered: {$position}
{end}
конец примера
Display data as a list
The loop {for} can retrieve data from a linked app when the field is set to Multiple.
App item field codes can use the prefix data or omit it:
- {$data.appListField}
- {$appListField}
Create a {for} loop for a list in Word
In .doc or .docx files, data from a linked app can appear as a list or consecutive text blocks.
начало примера
Example
{for app in {$appListField}}
App: {$app}, named {$app.__name}, with an amount of {$app.money}
{end}
конец примера
Create a {for} loop for a list in Excel
In .xlsx files, the loop displays linked app data row by row.
начало примера
Example
{for app in {$appListField}}
{$app} |
{$app.__name} |
{$app.money} |
{end}
конец примера
Important: the operators {for} and {end} must be placed in separate table rows with no other data, as when writing {if} conditions. Otherwise, the entire row is deleted along with the operator. This does not apply to text in merged cells.
Display data in a table
A loop can display data in a table as well as a list.
When uploading the template to the system, set the data type of the loop variable to Table.
Create a {for} loop for a table in Word
To generate a table in a file of type .doc or .docx:
- Separate the first row of the table using the Split Table.
- In the blank line that appears, declare the loop {for}.
- In the table, enter variables with the prefix row.data or row, for example, from the business process context.
- Below the table, close the loop using {end}.
Example template:

Create a {for} loop for a table in Excel
To display data from a BRIX table, such as a product list with quantities and prices:
- Enter the {for} and {end} commands in the first column of the table.
- Enter app field codes with the prefix row.data or row. The prefix accesses an item inside the loop and creates as many rows in the document as there are filled rows in the BRIX table.
Rows containing the operators {for} and {end} must not contain other text, just as when writing {if} conditions. Otherwise, the entire row is deleted along with the operator. This does not apply to text in vertically merged cells.
Example template layout:

A {for} loop can include an {if} condition. For an example, see Configure approval and acknowledgment sheet templates.
Do not place multiple generated tables horizontally next to each other in a template: parallel {for} loops are not processed.
You can create a nested table and then combine several tables into one, for example, using the Script activity in a business process. The combined table is then used to generate a document from the template.
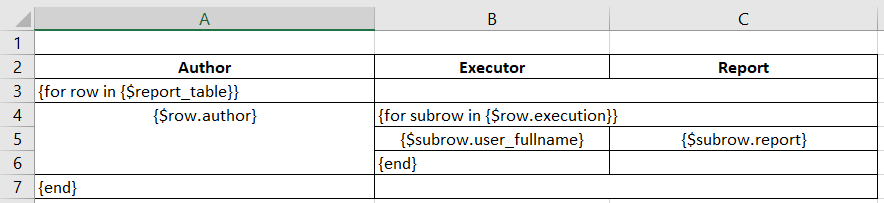
Nested tables
The loop {for} can create a nested table.
To access nested table columns, use a different prefix instead of row.data or row:
- subrow.data
- subrow
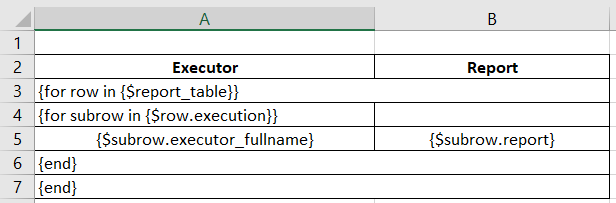
Rows containing the operators {for} and {end} must not contain other text, as it is deleted during generation. Vertically merged cells are an exception. For example, the value {$row.author} appears in the table when you use this template:
Display row numbers in a table
To display a row number in a table, use the prefix row.data or row and the system index property: {$row.__index}.
Example table template with row numbers, product names, and prices:

Special functions
Dedicated functions are available for specific tasks:
- GenerateBarcode(). Display a value as a barcode.
- JobPosition(). Insert a user’s job title.
- PasteImage(). Insert an image.
- Hyperlink(). Convert a value to a hyperlink.
- ExtText(). Create a custom function for advanced template operations.
For syntax and examples, see Special template syntax functions.
Example: configure a contract template
This example shows how to configure automatic generation of a supply contract:
- Create a template file and add variables and functions. Use the format .docx or .xlsx. To view the file used in this example, download it to your computer.
- Add the template to the app and map its variables to fields.
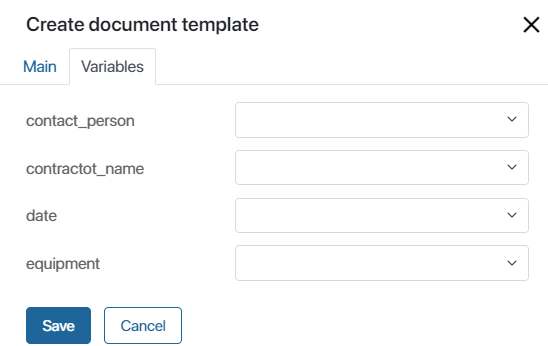
- Configure a business process. To generate the file automatically, add the Generate from template activity to the diagram and select the template you created in its settings.
- Once a user fills out the app item form and the process reaches the generation step, the final file is created.