When setting up a personal live chat, you can use features of standard live chats tailored for individual use. For example, personal live chats do not include session routing to operator groups, SLA monitoring, or chatbot integration.
To set up a personal live chat:
- Create a live chat in your profile settings.
- Add apps to link with sessions.
- Set up a session name template.
- Connect communication channels to reach customers.
Step 1. Create a personal live chat
- Open your profile settings. Click your name or profile picture in the top right corner of any page and select Settings.
- Go to the Personal Live Chat tab and click + Create Live Chat.
- In the window that opens, enter a name and confirm creating the live chat.
Step 2. Add apps for linking
Optionally, select system apps whose items can be linked to a session. Linking to a session allows you to:
- Navigate from the session page to an item page, for example, to view information about a customer or a contract under discussion.
- Display the customer chat directly on an app item page to communicate without leaving the page. This is available if an administrator has added the Live Chat Messages widget to the view form.
To do this, fill in the fields on the Settings tab. Please note that only apps containing a property of the Account type are available:
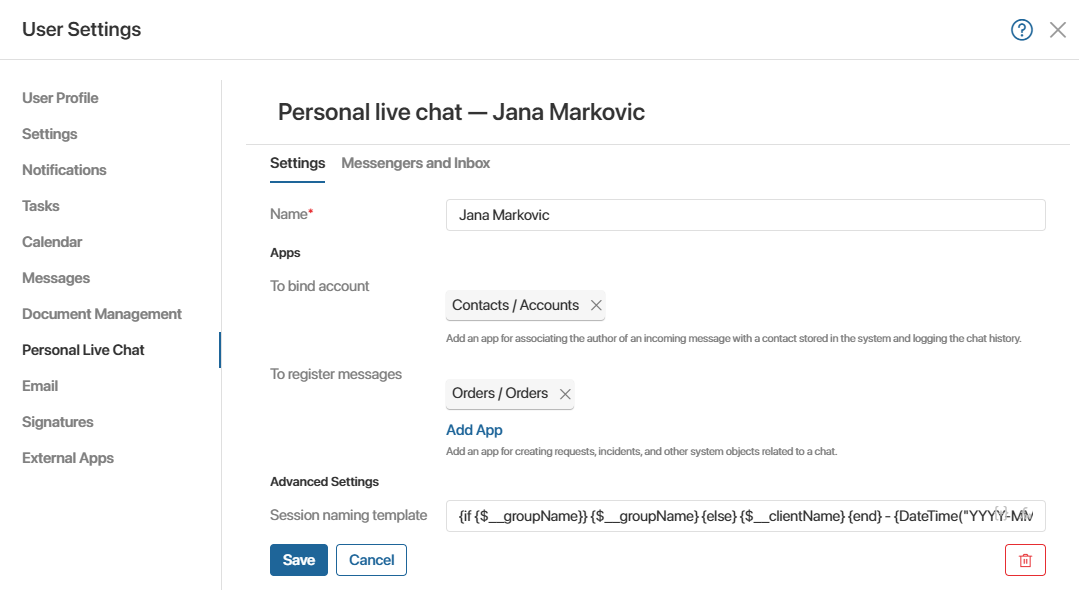
- To bind account. Add an app that stores customer account information, such as Contacts. This allows you to link a session to a specific contact during communication.
- To register messages. Add one or more apps, such as Deals or Orders, to link existing records to a session or create new items based on the conversation directly from the session page.
Step 3. Set up a session name template
On the Settings tab, in the Session naming template field, specify the template used to generate session names.
You can include context variables, such as customer name, session creation date, etc. To do this, click the {+} icon in the right corner of the field.
You can also add the DateTime() function to change the date format by clicking the f(x) icon. To learn more about setting up templates, see Template syntax.
Step 4. Connect communication channels to reach customers
On the Messengers and Inbox tab, add channels for communicating with customers. To learn more about setting up connections, see:
- Connect messengers to a live chat section.
- Connect email to a live chat article.
When you finish setup, click Save.
The Live Chats workspace will appear in the left menu, receiving incoming customer messages. To learn more, see Use personal live chat.
Manage a personal live chat
After creating a live chat, you can modify its settings, add channels, delete it, and more. Management options are available to:
- The employee who created it, on the Personal Live Chat tab in user profile settings.
- A system administrator, in Administration > Live Chats.
You can:
- Edit settings and add communication channels using the same steps as during creation.
- Reconnect messenger or email channels if connection is lost.
- Delete the live chat. To do this, go to the Personal Live Chat tab in your profile settings and click the trash icon in the bottom right corner.
Please note that a deleted live chat cannot be restored. You can only create a new personal live chat.
By default, sessions from a deleted live chat are kept in the system. You can view them in the Live Chats workspace, but you cannot continue working with them. If you do not need to save chat history, sessions can be permanently deleted along with the live chat. To learn more about viewing saved sessions, see Delete a live chat.