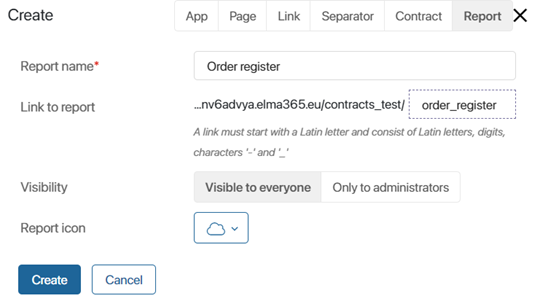
Reports are created within workspaces.
начало внимание
Only users included in the Administrators group can create and modify report settings.
конец внимание
You can add a new report in the same way as a standard BRIX app:
- Go to any workspace and click Add in the left menu.
- In the opened window, select Report.
- Fill in the app details.

- Report name*. Specify the name that will be displayed in the left menu of the workspace.
- Link to report. It is formed automatically from the name. The link text can be changed at the creation stage. Later the link is used for quick access to the report.
- Visibility. Select to which employee the report will be available in the left menu of the workspace:
- Visible to everyone. Visible to all users of the system. In the report settings, you will be able to specify certain groups of employees who should be granted access to the report.
- Only for administrators. Visible only to users included in the Administrators group.
- Report icon. Select the graphical image of the report in the left menu of the workspace.
- Click Create.
The report will be shown in the left menu of the workspace. You will be able to customize access to it and add sources that will be displayed on report pages.
Report settings
To access the report settings menu, click the gear icon next to the report name:
- Report Settings. Change the basic parameters specified when creating the report.
- Report’s Visibility. Define the groups of users who will be able to select the report in the left menu of the workspace and view the data on the page. Please note, that if a property of the App type from source context is added to the report as a column, users without access to items of this app will not see the data in the column. Read more about access rights in Access to an app.
- Document Templates. Add .xlsx file templates that can be used to export data from the report.
- Source settings. Specify the sources for the report, i.e. select the apps from which data will be displayed on the report page. Then customize the table: add properties from the sources and link the apps. Read more about this in Add sources and set up the report table.
- API. Use the API method to retrieve data from the created report with a single request. The work is done in the same way as with API in apps. For more details about API methods available in reports,see BRIX Public API.
- Copy Report. Create a new report by copying an existing component. The process is performed in the same way as when copying an app. It is also checked if the report sources are available in the system. If the source app is deleted, you cannot copy the report. The new report retains all settings of the original component: specified sources, added templates for export, and set columns.
- Delete Report. Move the report to the trash of the workspace to remove it from the left menu. If the report was used in charts, tables, or properties of the Report type, its data will no longer be displayed on pages and app forms. You can restore the report from the trash to reuse it.
Was this helpful?
Found a typo? Select it and press Ctrl+Enter to send us feedback