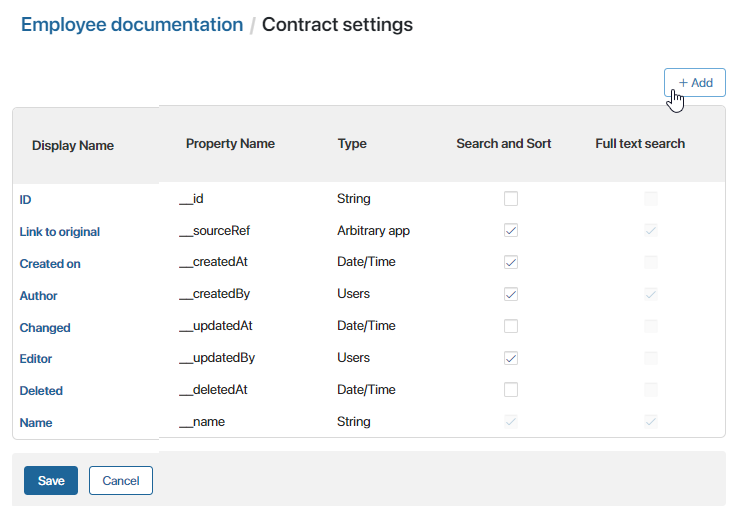
When you work with a contract, you work with items from source apps added to it. These can be BRIX apps from any workspaces or solutions. To add a new source and configure the way its fields are displayed on a contract’s page, you need to match the source app’s fields with the contract’s fields. After that, values of the app’s fields will be passed to the contract’s fields. You will be able to use them as variables in business processes and scripts.
There are two groups of fields used in contracts:
- System fields. These are properties added to each contract by default. Most of them correspond to fields that exist in each BRIX app: ID, Created on, Author, Changed, Editor, Deleted, and Name. There is also a special field added only to contracts: Link to original. This field helps to link the contract item with the original app item. This field is convenient when you need to access the original app item in business processes or scripts.
System fields cannot be deleted. When you add a new source to the contract, the app’s and the contract’s system fields are matched automatically.
- Custom fields. To let other app properties (apart from system fields) be passed to the contract, you need to add fields to link them to the contract’s context. Note that to let contract and source fields be properly matched and linked, their types need to be the same. Before you add a new source, make sure the app includes fields that can be matched with each field of the contract. Otherwise, it will be impossible to link the app to the contract.
Create contract fields
You can add custom fields to a contract while creating it, in the Form Settings window. If you skipped this step or if you need to change the contract’s properties, you can do it in contract settings by selecting the Contract Fields item.
When you add fields, keep in mind that each source app that is going to be linked with the contract needs to include a field of the same type for each field of the contract. Otherwise, it will be impossible to link them.
To open the contract settings:
- Click the gear icon to the right of the contract’s name.
- In the menu that opens, select Contract Fields.
- The Contract Settings page with a list of all added properties opens. Click +Add.

- In the window that opens, select the Type* property and specify the Display Name*. Specify other field settings that may vary depending on the property type.
- Click Create. If you need to add another field, click Create & Add New. The new field will be displayed in the list of properties.
- Enable the Search and sort by field option option for the property to search for items on the contract page by it. The quick search option is also available for fields of string type.
The new field will be displayed in the list of properties. To delete a property, select it in the list, click the Delete button above the list on the right, and confirm the operation. Note that you cannot delete system fields from a contract.
The property created in the contract is added to the source context. If it already contains a property with the same name and type, the contract and source fields will be automatically linked.
Please note, that if a property with the same name but a different type is added to the source context, the contract-source link will be lost. Go to the contract source settings and manually re-establish the link by matching fields of the same type.
To delete a property from a contract, select it in the list, click the Delete button above the list on the right, and confirm the operation. Note that you cannot delete system fields from a contract.
Example of mapping field
Let’s consider an example of how contract fields and source fields interact.
Let’s say you created the Contractor Documents contract, and you want to link it with two apps, Outgoing Contracts and Incoming Invoices.
A Contract is an empty interface that items from other apps are passed to. To link a contract with apps, you need to add custom properties to the contract’s context. Data from apps, such as contractor or amount information, will be passed to them. Please note, that an app cannot be properly linked with a contract if the contract doesn’t include fields of the same type.
Go to Contract Settings > Contract Fields as described above. Click +Add and create a property with the name Company and App type. In its settings, select the Companies app from the CRM workspace. Add the Amount property with the Money type in the same way.
Now you can go to Source Settings and add the Outgoing Contracts and Incoming Invoices apps to the contract. As you add these source apps, match the Company contract field with the Contractor field from both apps. Then link the Amount field with the Contract amount and Invoice amount fields.
Contract and source fields that match in name and type will be linked automatically.
You can create an additional property of App type in the contract to write the value of the Contract type field from the Outgoing Contracts app into it. However, in this case, the contract’s link with the Incoming Invoices app may be lost if this source has a field with the same name but a different type. On the Source Settings page, this source will be highlighted in red.
If there is no name match, a new field will be automatically created in the Incoming Invoices app.
Found a typo? Select it and press Ctrl+Enter to send us feedback