The Dynamic Table widget displays user-defined content as a standard table with columns, rows, and cells.
Use the widget when employees need to work with data directly from table rows, such as starting processes, changing values, or viewing information in a non-standard format.
In the settings for the Dynamic Table specify the source table and add the required number of columns to the widget template. In each column, configure the header, row cell content, and footer cell. Other widgets are used for this.
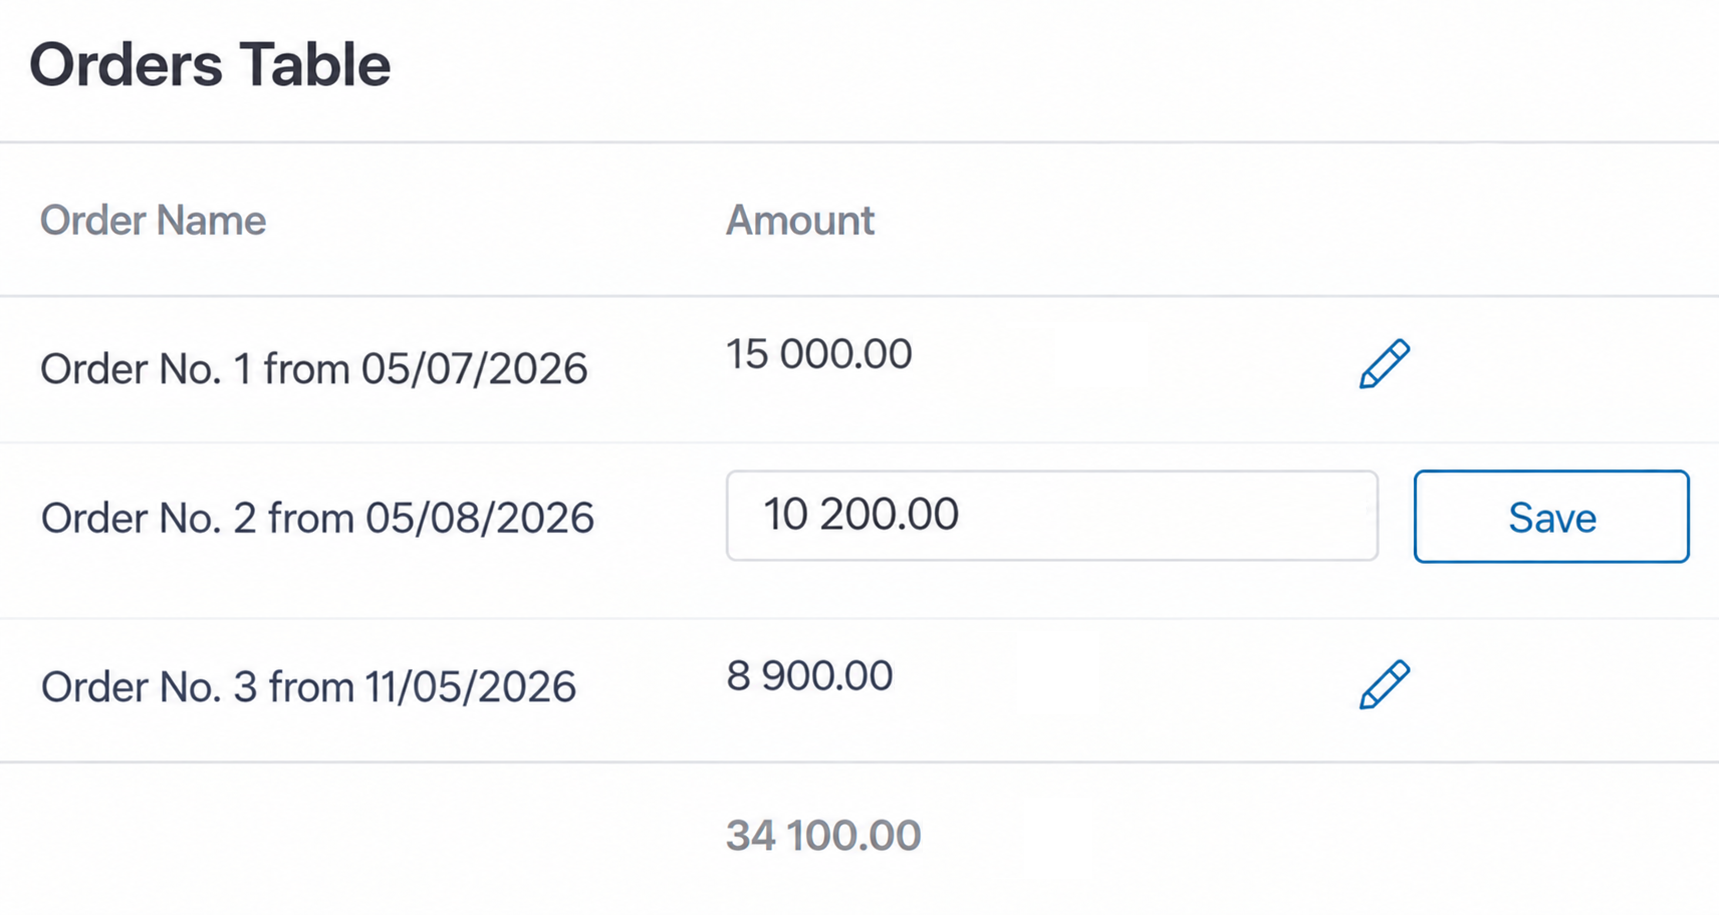
For example, you can start a process to handle an item by placing the Button widget. In the example below, a custom widget is used to let users change and save the order amount.
The Dynamic Table can be added to a page. To do this, open the page in the interface designer and follow these steps:
- On the Context tab, add a variable with the Table type, which will be the data source for the Dynamic Table. Set the variable value. For example, specify an app in its settings or generate the value using a script.
- Drag the widget from the side panel to the design area and configure its settings.
- Configure the table appearance in the widget template.
Widget settings
- On the Main tab, complete the fields.
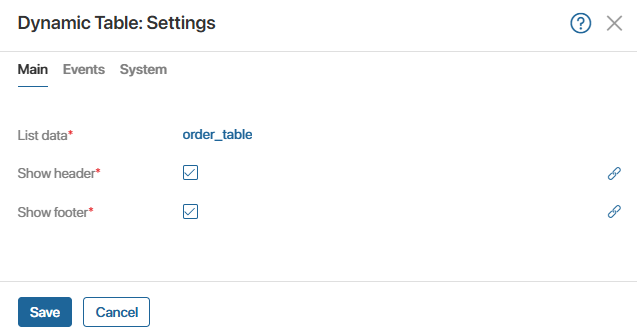
- List data*. Select a context variable of Table type, whose data will be used in the widget.
- Show header*. This option is enabled by default. It displays table column headers.
- Show footer*. This option is enabled by default. Use it to display the table's total row at the bottom, for example, the total amount for all orders.
- On the Events and System tabs, you can configure system settings, which are the same for all widgets. They let you control widget visibility and access, configure widget behavior when the pointer hovers over it, and more.
- Save the widget settings.
Configure the widget template
After the Dynamic Table settings are configured, an empty widget template appears in the design area. Configure the table appearance by adding columns and other widgets to the widget template. To do this:
- Add as many columns as you want to display in the table. Use the plus icon to add them. Note that columns and data from the source table are not added to the widget automatically.
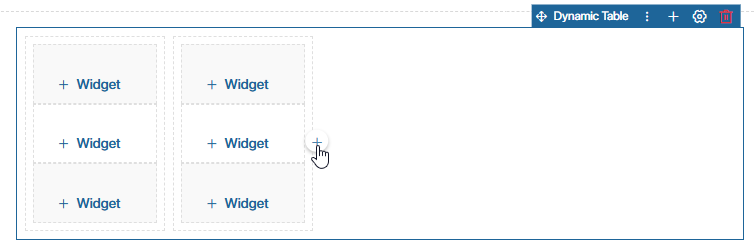
- When you add a column, you can configure its system settings.
- Each column contains three blocks where you can configure the column header, row cell, and footer cell content. To do this, use other widgets. In their settings, specify the source table data you want to display. Below is an example to illustrate how a widget template may look.
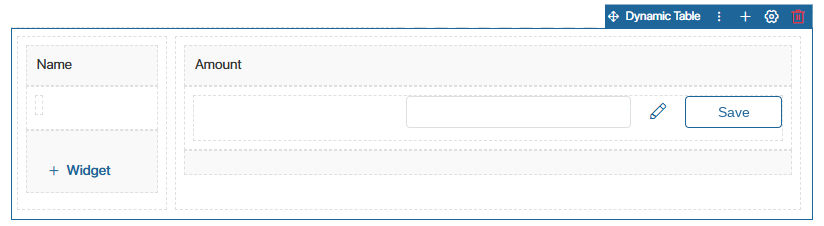
- When you finish configuring the template, click Save and then Publish.
Example using the Button widget
Let's configure a table with a list of orders on a separate page, with an option to start processing any order using a button.
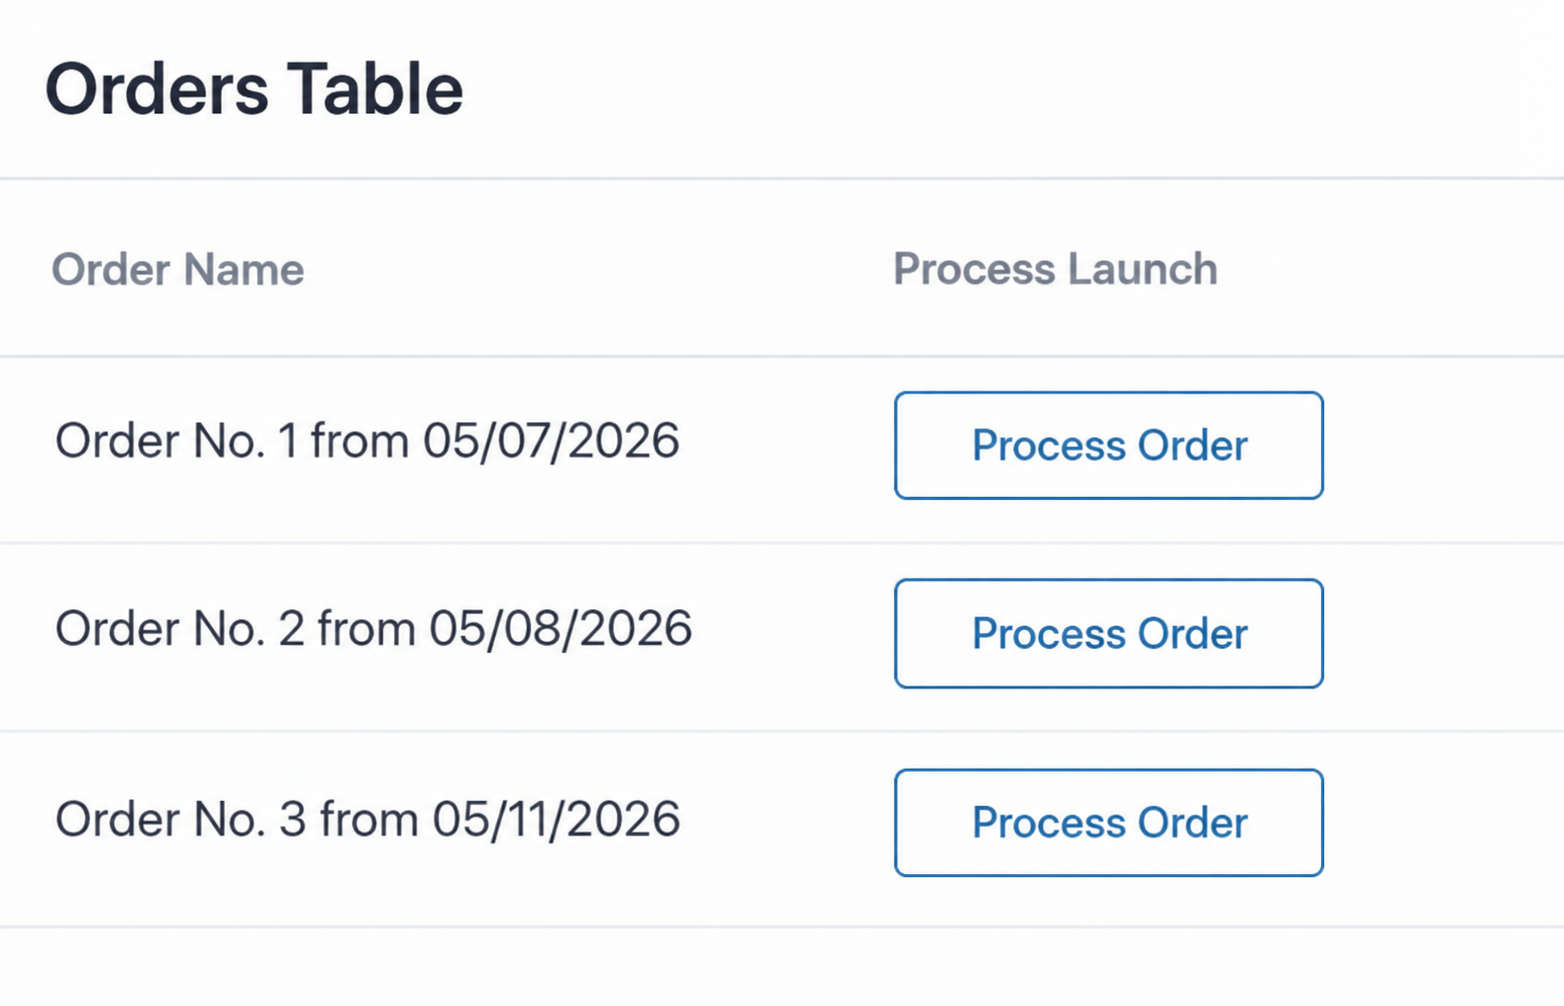
To do this:
- In the workspace where users work with the Orders app, create an Orders Table page and open it in the interface designer.
- On the Context tab, add an Orders (table) variable with the Table type. The order data is written to it when the user opens the page. The data is then passed from this variable to the Dynamic Table. Enable the Input and Output options.
- Give the widget access to the list of orders. To do this, go to the Settings > Available Items and enable Allow using all items in the workspace.
- In Settings > System Functions, specify the initialization function onInit(), which writes data from the app Orders to the variable Orders.
Example script for initializing the page
async function onInit () { |
- Go to the Orders Table page opened in the interface designer. On the Template tab, place the Dynamic Table widget. On it's Main settings tab, do the following.
- Specify the Orders context variable, to display items from the Orders app.
- Turn off the Show footer* option because in our example we do not need to display a total row at the bottom of the table.
- On the Template tab, add two columns using the plus icon.
- Place the following in the first column:
- For the header, the Text box widget. In its settings, enter the text Name.
- For the row cell, the Text box widget. In its settings, select Source row – Orders > Orders > Name.
- In the second column, add the following:
- For the header, the Text box widget. In its settings, enter the text Launch Process.
- For the row cell, the Button widget. In the Action type field, select process launch and specify the Process Order business process.
To start a process instance for a specific item in the table, link the process variable to the widget. To do this, in the button settings, click Configure input parameters. In the window that opens, specify the process variable that stores the app in the left column, and in the right column, specify Source row – Orders. Order.
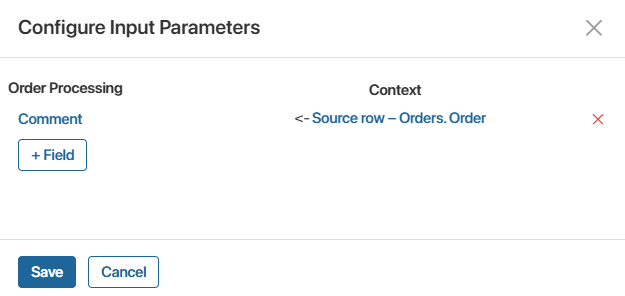
- Save the Button. The Dynamic Table will look like this.
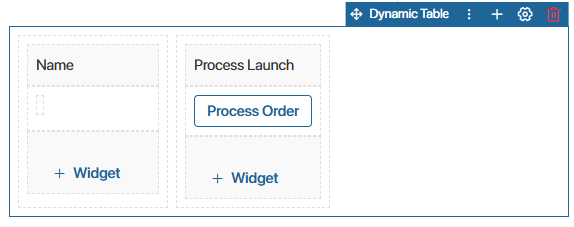
- When you finish configuring the widget template, click Save and then Publish.
After that, users will see a table of orders with the columns Name and Launch Process. In the row for the required order, they can click the button to start its processing. The order list is updated each time the user opens the page.
Example using a custom widget
Let's look at a more complex example of using the Dynamic Table. We'll configure a table with a list of orders where users can edit their amounts. If a user changes an order amount and clicks Save, the new value is written to the Orders app item. We'll also display the total amount of all orders in the table's total row at the bottom.
To do this, complete the following configuration steps:
- Preliminary page setup for where the table will be placed.
- Create the Editable order amount widget that will be used in the Amount column.
- Place it on the page and configure the Dynamic table widget.
Step 1. Preliminary page setup
- At the workspace level where users work with the Orders app, create an Orders Table page.
- Go to the page designer and on the Context tab, add the following variables.
- Orders (table) with the Table type: order data is written to it when the user opens the page. The data is then passed from this variable to the Dynamic Table.
- Total amount (total) with the Money type: its value is displayed in the total cell at the bottom of the Amount column.
For the created variables, enable the Input and Output.
- In the variable settings for Orders, in the On value change handler field, specify the function onChanged() to recalculate the total amount when changes are made to the table.
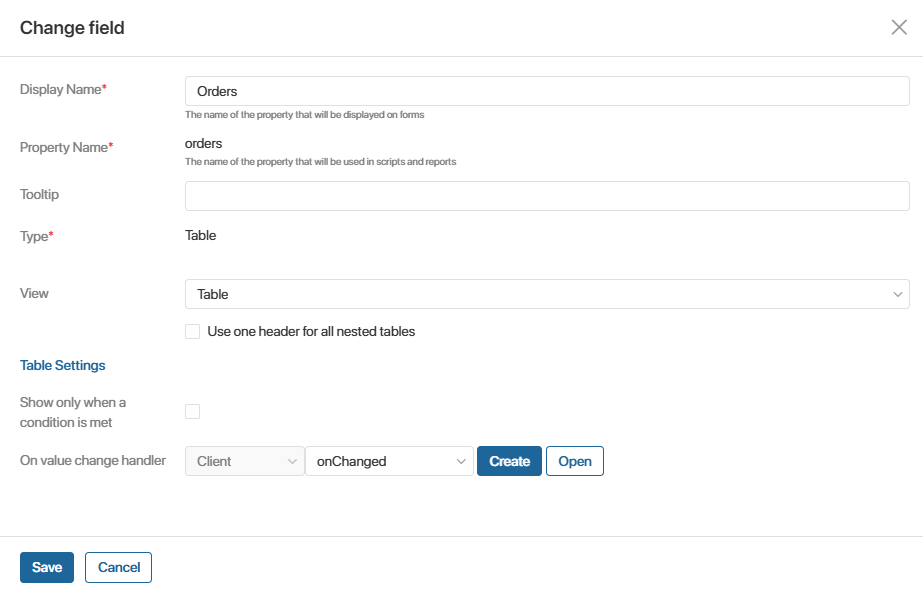
Example script for recalculating the table total
async function onChanged(): Promise<void> { |
- Give the widget access to the list of orders. To do this, go to the Settings > Available Items and enable Allow using all items of the workspace.
- In Settings > System Functions, specify the initialization function onInit(), which writes data from the Orders app to the Orders variable.
Example script for initializing the page
async function onInit () { |
Step 2. Create the Editable Order Amount” widget
- In the workspace where Orders Table page is created, add the Editable order amount custom widget. It will be used in the table in the Amount column and will allow users to change the order amount directly in the table.
- Go to the widget designer. On the Context tab, add variables that will be used in scripts and the widget settings window, as well as in other widgets added to the current template.
- Order (order) of the App (one) type. Link it to the Orders app, enable the Input option.
- Amount (amount) of the Money type. Enable Input and Output options for this variable.
- Read-only amount (isReadonly) of the Yes/No Switch type and value Yes by default.
- Save? (isSaving) of the Yes/No Switch type and value No by default.
- Editable amount (editableAmount) of the Money type.
- On the Template tab, add the Container widget. Inside it, place the created Editable amount property and two Button widgets.
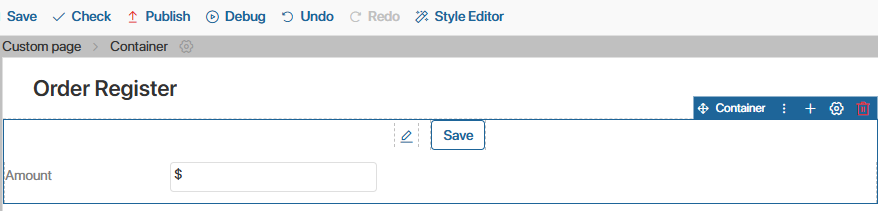
- Configure one Button to edit the order amount. To do this, in the widget settings, select the Script action type with the edit function to switch to edit mode.
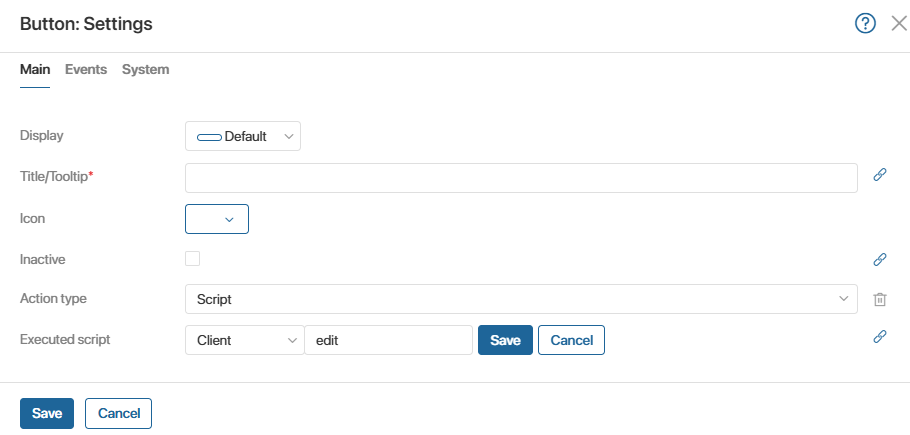
Example function for editing the amount:
async function edit(): Promise<void> {
Context.data.isReadonly = false; // switch to edit mode
}
- Configure the other Button to save the new order amount. In the widget settings.
- In the Inactive field, select the Save? variable. It is used in the widget script to prevent repeated button clicks.
- Set the Script action type with the save function.
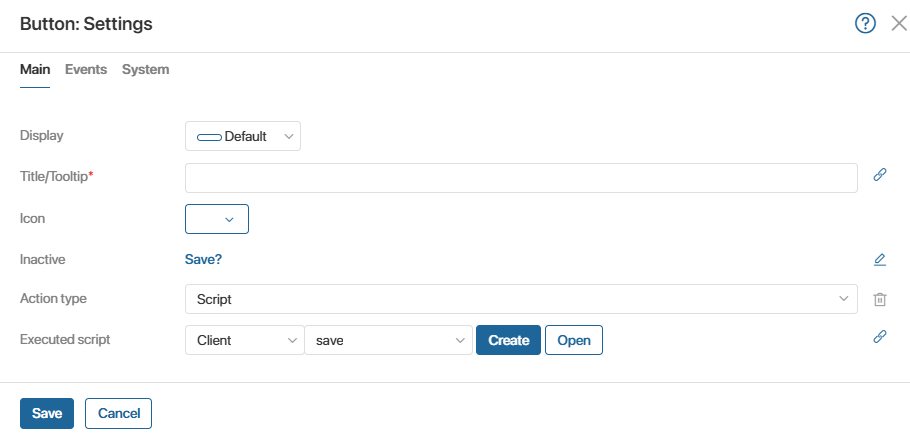
Example script for recalculating the table total
async function save(): Promise<void> {
Context.data.isSaving = true; // field for disabling the save button to prevent repeated clicks
try {
const order = await Context.data.order!.fetch(); // select the app item from the server
order.data.amount = Context.data.editableAmount; // set the new item value
await order.save(); // save the item
UI.notify('Amount changed', NotificationType.Success); // notify the user that the save was successful
Context.data.amount = Context.data.editableAmount; // copy the new value to the read-only field
Context.data.isReadonly = true; // switch to view mode
} finally {
Context.data.isSaving = false; // enable the save button
}
- On the Settings > Main tab, enable the Call initialization function in the builder option.
- Go to the Settings > System Functions tab and specify the onInit() initialization function, so that the specified order amount is displayed in the edit field by default.
async function onInit(): Promise<void> {
// Copy the value from the input data to the edit field for display in view mode
Context.data.editableAmount = Context.data.amount;
}
- Save and publish the Editable order amount widget.
Step 3. Configure the Dynamic Table widget
- Go to the designer for the Orders Table. On the Template tab, place the Dynamic Table widget, and on the Main tab, specify the Orders context variable, to display items from the Orders app.
- On the Template tab, add two columns using the plus icon.
- Place the following in the first column.
- For the header, the Text box widget. In its settings, enter the text Name.
- For the row cell, the Text box widget. In its settings, select Source row – Orders > Orders > Name.
- In the second column, add.
- For the header, the Text box widget. In its settings, enter the text Amount.
- For the row cell, the Editable order amount widget created in the previous step. Click the gear icon, open the widget settings, and fill in the input parameters.
- Orders: select Source row – Orders > Order.
- Amount: select Source row – Orders > Amount.
- In the total cell, the Total amount property.
- When you finish configuring the widget template, click Save and then Publish.
After that, users can work with the order list on the Orders Table page. By selecting an entry in the Name column, they can change and save the order amount in the Amount column. The total cost of all orders is displayed in the bottom row in the Amount row.