After you create an AI action and test its performance in a test chat, set up its usage in BRIX. You can trigger AI actions:
- In a business process using the AI Action block.
- In user interfaces using the Call AI Action widget, which you can place on forms, pages, and other widgets.
- In scripts using API calls.
The block and widget for calling AI actions become available after installing the BRIX AI integration solution.
Call an AI action in a business process
You can run an AI action automatically during a process. To do this, add the AI Action block to the process diagram.
For example, suppose a business process runs for every incoming email, assigning a task to an employee to respond. To make communication more effective, you can add an AI action that uses artificial intelligence to analyze email content before the agent sends a response.
The AI action receives the subject and body of the email as input data, then generates a summary and a suggested response. You can show this information in the employee's task.
To set this up:
- Add properties to the app and process context to pass input data and display results.
- Place the AI action block on the process diagram and configure it.
Let's look at these steps and the process setup in detail.
Step 1. Add properties for input and output data
- Make sure the context of the Incoming Emails app contains String (text) fields for storing the email subject and body: Name and Body.
The input properties must contain values before the process reaches the AI Action block. In our example, we use data from the app item that triggers the process, so these properties are populated beforehand. You also need to add properties to the process context to store the result of the AI action execution.
- Open the incoming email process in the process designer and go to the Context tab.
- To display the AI action result in the agent's task, add String (text) variables to the process context: Summary and Recommendations.
- Add the result fields to the user task form by double-clicking the task on the diagram and placing them on the Form tab.
Step 2. Configure the AI action block
To ensure the block works correctly, set up outgoing transitions and data mapping between the block and the process. Follow these steps:
- In process modeling mode, select the Integrations tab on the right panel and place the AI Action block on the diagram.
- To handle potential errors properly, add two outgoing transitions: one for standard process execution and another for errors.
In our example, both transitions lead to the Reply to Email user task, as it must be assigned in any case. If the AI action yields no result, the employee completes the task manually by reviewing the inquiry and drafting a reply.
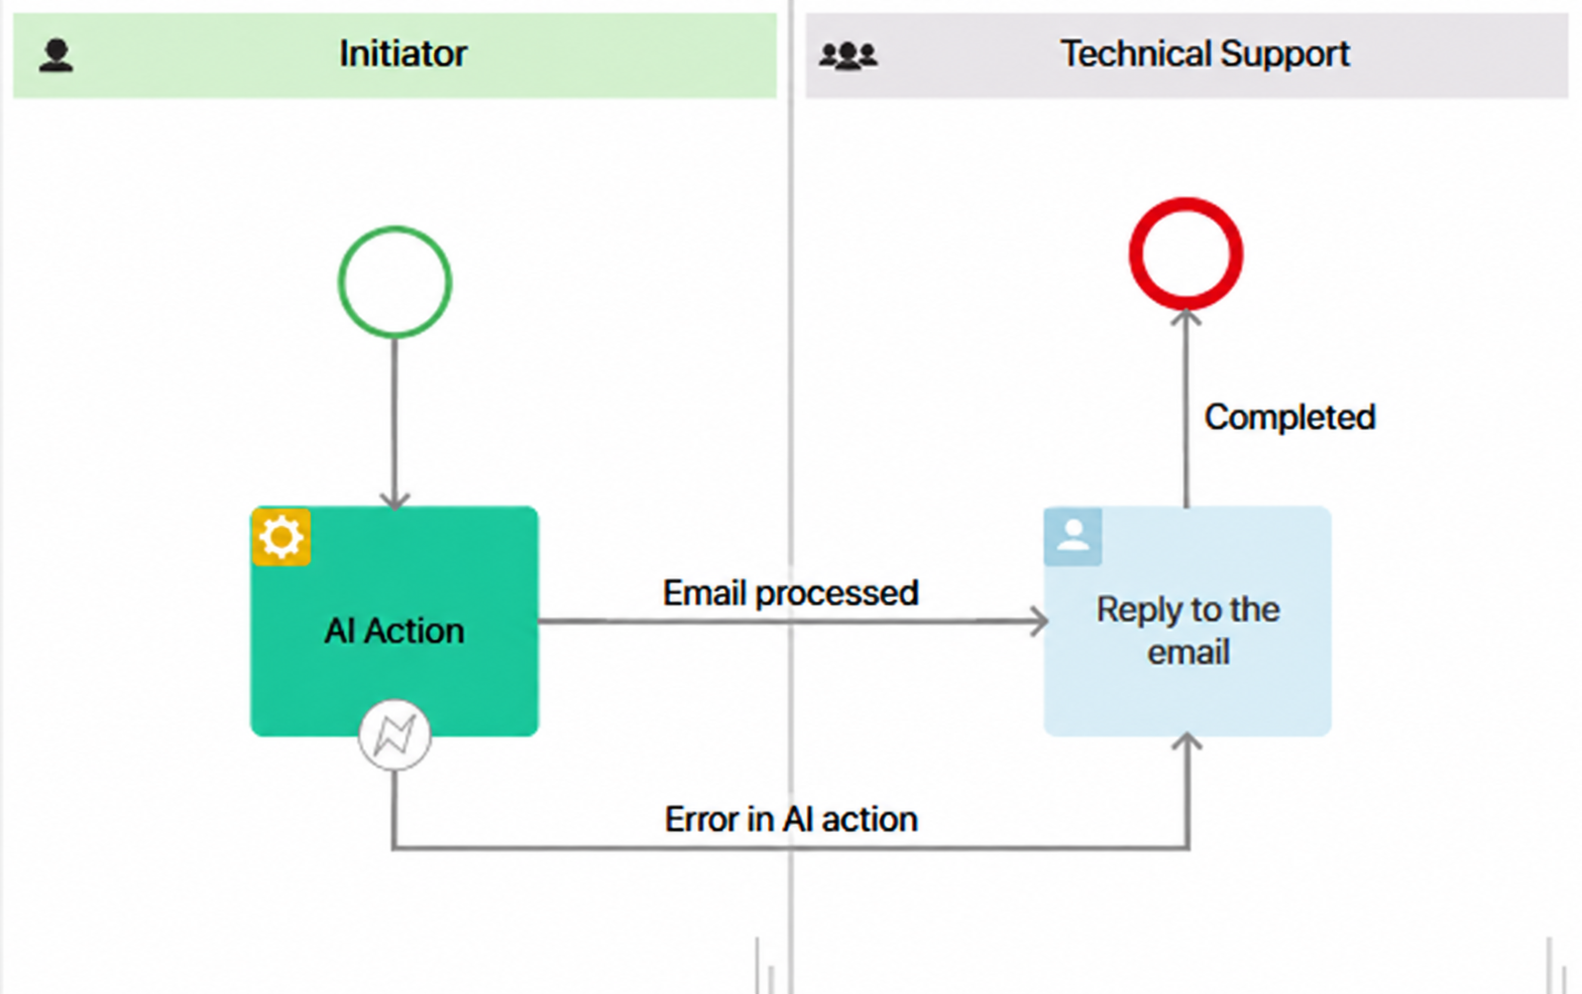
- Double-click the AI Action block to open its settings.
- Go to the Action Settings tab and select the required action from the list.
- Set up data mapping between the process and the AI action by matching properties in the displayed columns. Mapping details depend on the input format and response schema configured for the selected AI action in BRIX AI:
- Text. One AI action field is available for mapping: input_text for input data, and output_text for the response schema. Opposite it, select a String variable from the process context that contains the input text or receives the result.
- Arbitrary JSON. One AI action field is available for mapping: input_json for input data, and output_json for the response schema. Select a String variable from the process context that contains the JSON object or receives the result.
- Strict JSON Schema. Fields from the AI action's JSON schema appear. Map them to variables in the process context. Data types must match.
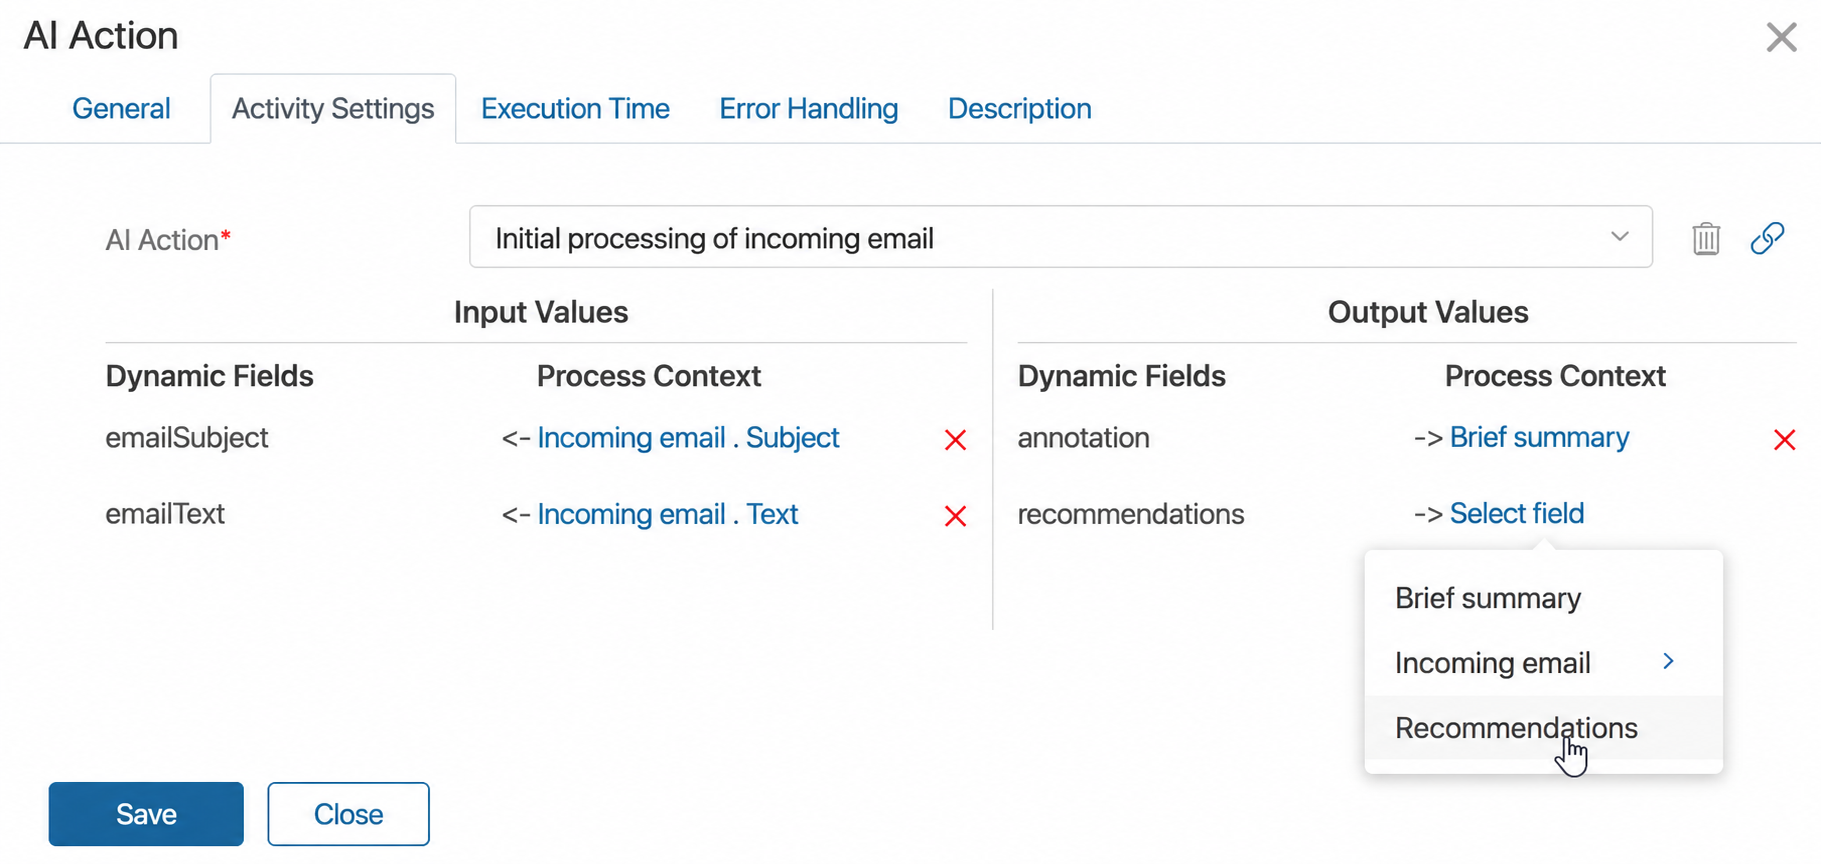
- On the Error Handling tab, enable the Interrupt option and select the transition added for error handling.
- Click Save.
- Save and publish the process.
Now, whenever the process runs, the AI action automatically executes using customer email data, and its result displays in the employee's task.
Call an AI action manually from the BRIX interface
To let users execute an AI action by clicking a button on a form or page, place the Call AI Action widget in the interface designer.
For example, an agent reading a customer inquiry on an inquiry page specifies response requirements, then clicks a button to trigger an AI action and generate an analysis. They might request a bulleted list or a ready-to-send reply. If no requirements are specified, the AI generates a brief summary by default.
To set up this AI action call from an inquiry page:
- Add properties to pass input data and show results in the app context and form settings in the interface designer.
- Place the widget on the form and configure it.
Let's look at these steps in detail.
Step 1. Add properties for input and output data
- Open form settings for the Inquiries app and ensure its context contains fields for inquiry data: Name and Text.
- Switch to advanced form settings mode and open the app's view form in Interface Designer.
- On the Context tab, add the String (text) properties required for the AI action: Additional Analysis Requirements and Analysis Result.
- On the Template tab, place the new properties onto the form.
- Set up the Analysis Result field so users can only view its content after running the AI action. To do this, select the field on the form template, click the gear icon, and enable Read-only and Hide if Empty.
Step 2. Configure the widget to call the AI action
- Place the Call AI Action widget on the form.
- In the widget settings window, select the required AI action from the list.
- Configure input and output data mapping by matching action and widget properties in the displayed columns.
Mapping details depend on the input format and response schema configured for the selected AI action in BRIX AI:
- Text. One AI action field is available for mapping: input_text for input data, and output_text for the response schema. Opposite it, select a String variable from the widget context that contains input text or receives the result.
- Arbitrary JSON. One AI action field is available for mapping: input_json for input data, and output_json for the response schema. Select a String variable from the widget context that contains the JSON object or receives the result.
- Strict JSON Schema. Fields from the AI action's JSON schema appear. Map them to variables in the widget context. Data types must match.
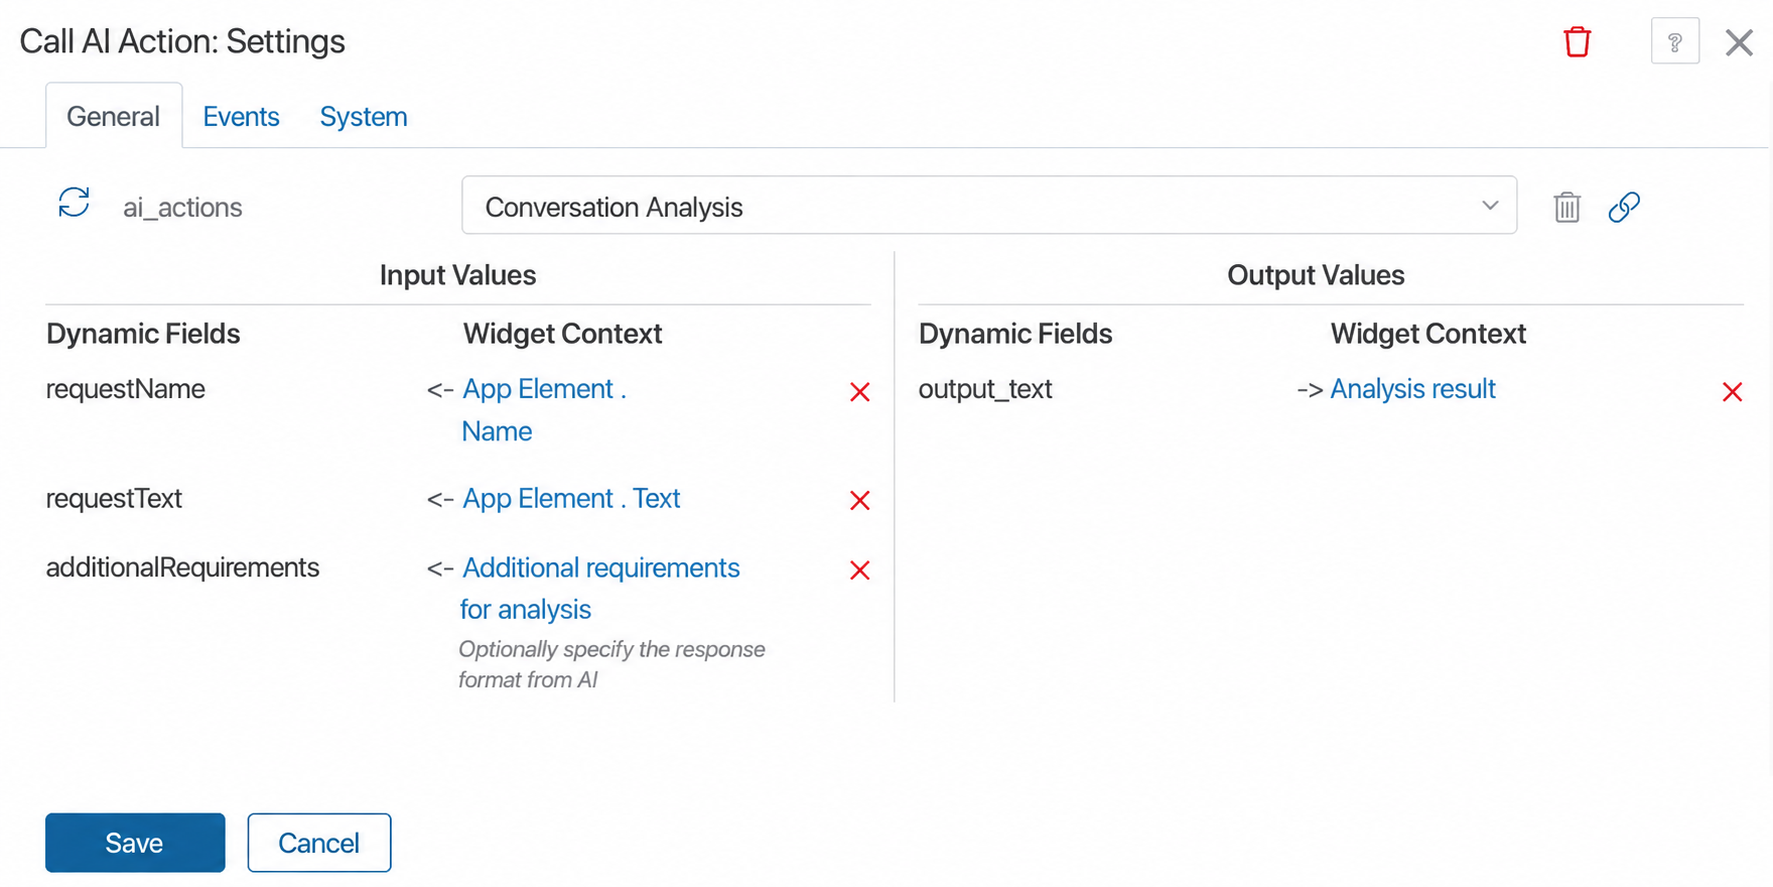
- Click Save.
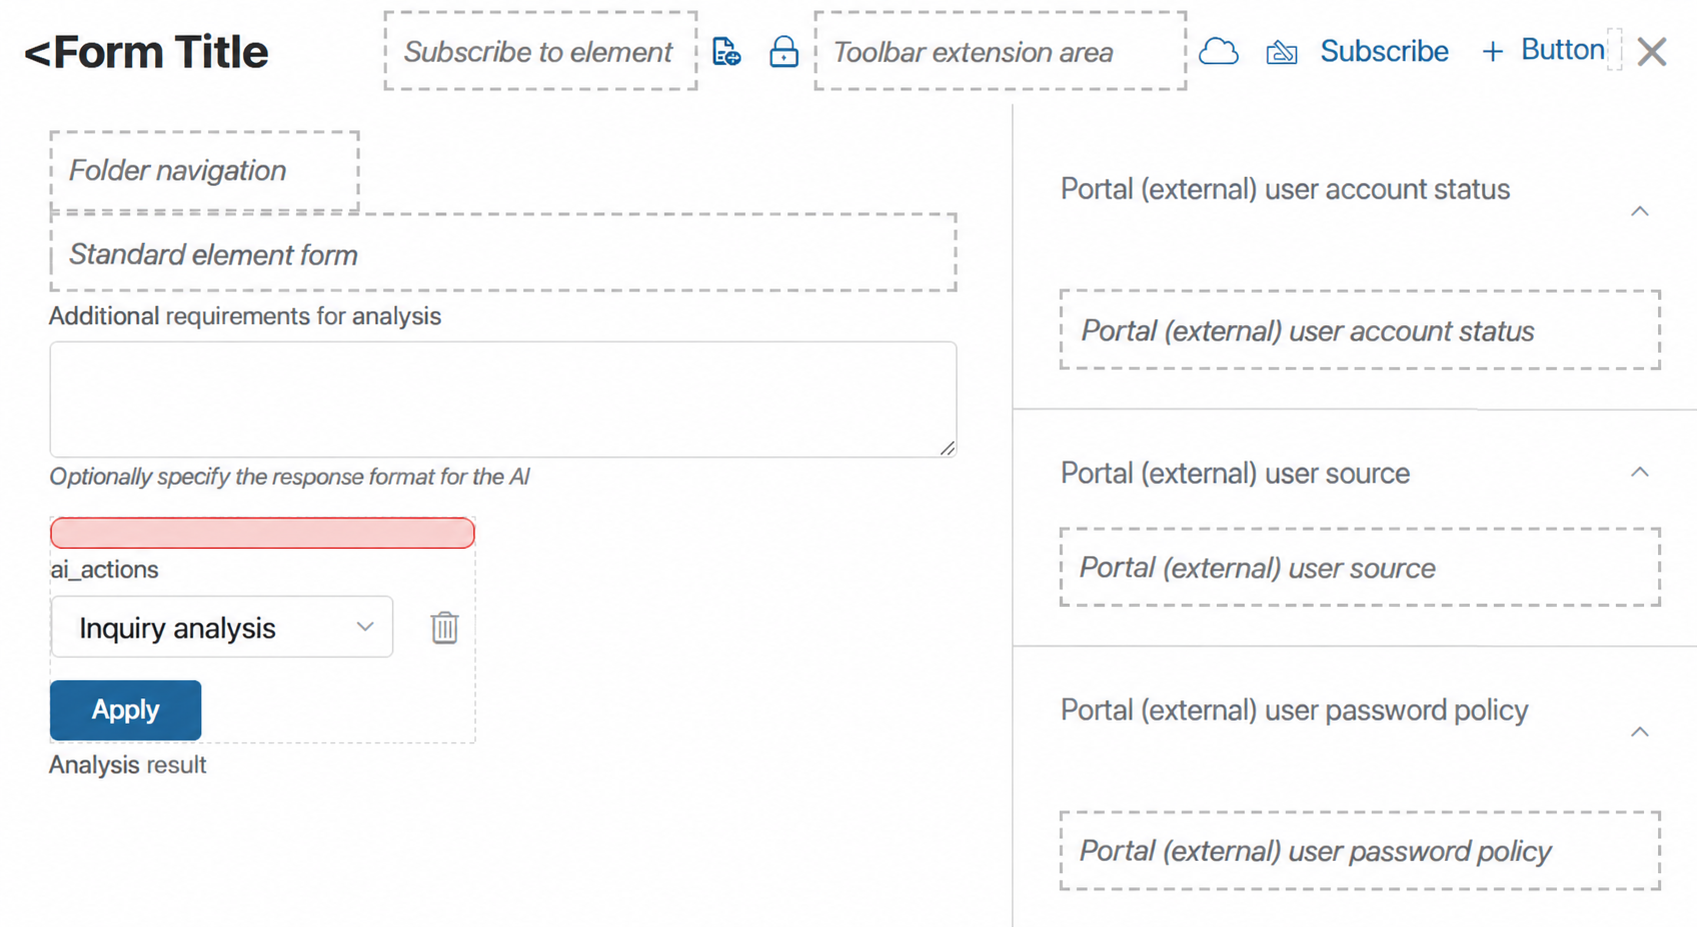
- Click Save and Publish on the top toolbar in the interface designer.
Agents can now quickly analyze an inquiry directly on its page by entering requirements and clicking Apply.
Call an AI action from a script in BRIX
You can run an AI action from a script configured at any BRIX component level.
For example, if users need an inquiry summary on an inquiry form upon clicking a button, but the standard AI action widget design doesn't suit your layout, you can add a custom button with a custom name and icon to the Inquiries app form. Clicking this button runs a script that executes the AI action.
To set this up:
- Add properties to pass input data and display results on the form.
- Write a server-side script to call the AI action from BRIX AI.
- Create a client-side script that passes input data, executes the server-side script, and displays the result on the form.
- Bind the client-side script to the button.
Let's look at these steps in detail. In our example, we use an AI action that receives inquiry text as input and returns a text summary.
Step 1. Add properties for input data and displaying results
- Open form settings for the Inquiries app and ensure its context contains a property for inquiry text. In our example, this is a String (text) field named Inquiry Text (request_text).
- In advanced form settings mode, open the app's view form in Interface Designer.
- Go to the Context tab and add a String (text) property to display the AI action result: Analysis Result (analysis_result).
- On the Template tab, place the result field on the form.
- Open the field settings by selecting it on the form template and clicking the gear icon.
- Enable Read-only and Hide if Empty.
Step 2. Write a server-side script to call the AI action
- Go to the Scripts tab and select Server in the upper-right corner.
- Write the script:
Script for calling an AI action
// AI action execution statuses |
Step 3. Write a client-side script to run the server-side script
- Go to the Scripts tab and select Client in the upper-right corner.
- Write a function that calls the server script to launch the AI action:
async function runRequestAnalysis(): Promise<void> {
await Server.rpc.runAiAction();
}
Step 4. Set up an AI action on button click
- On the Template tab, place a Button widget on the form.
- In the settings window that opens, enter the name and icon. In the Action type field, select Script and specify the function created in step 3.
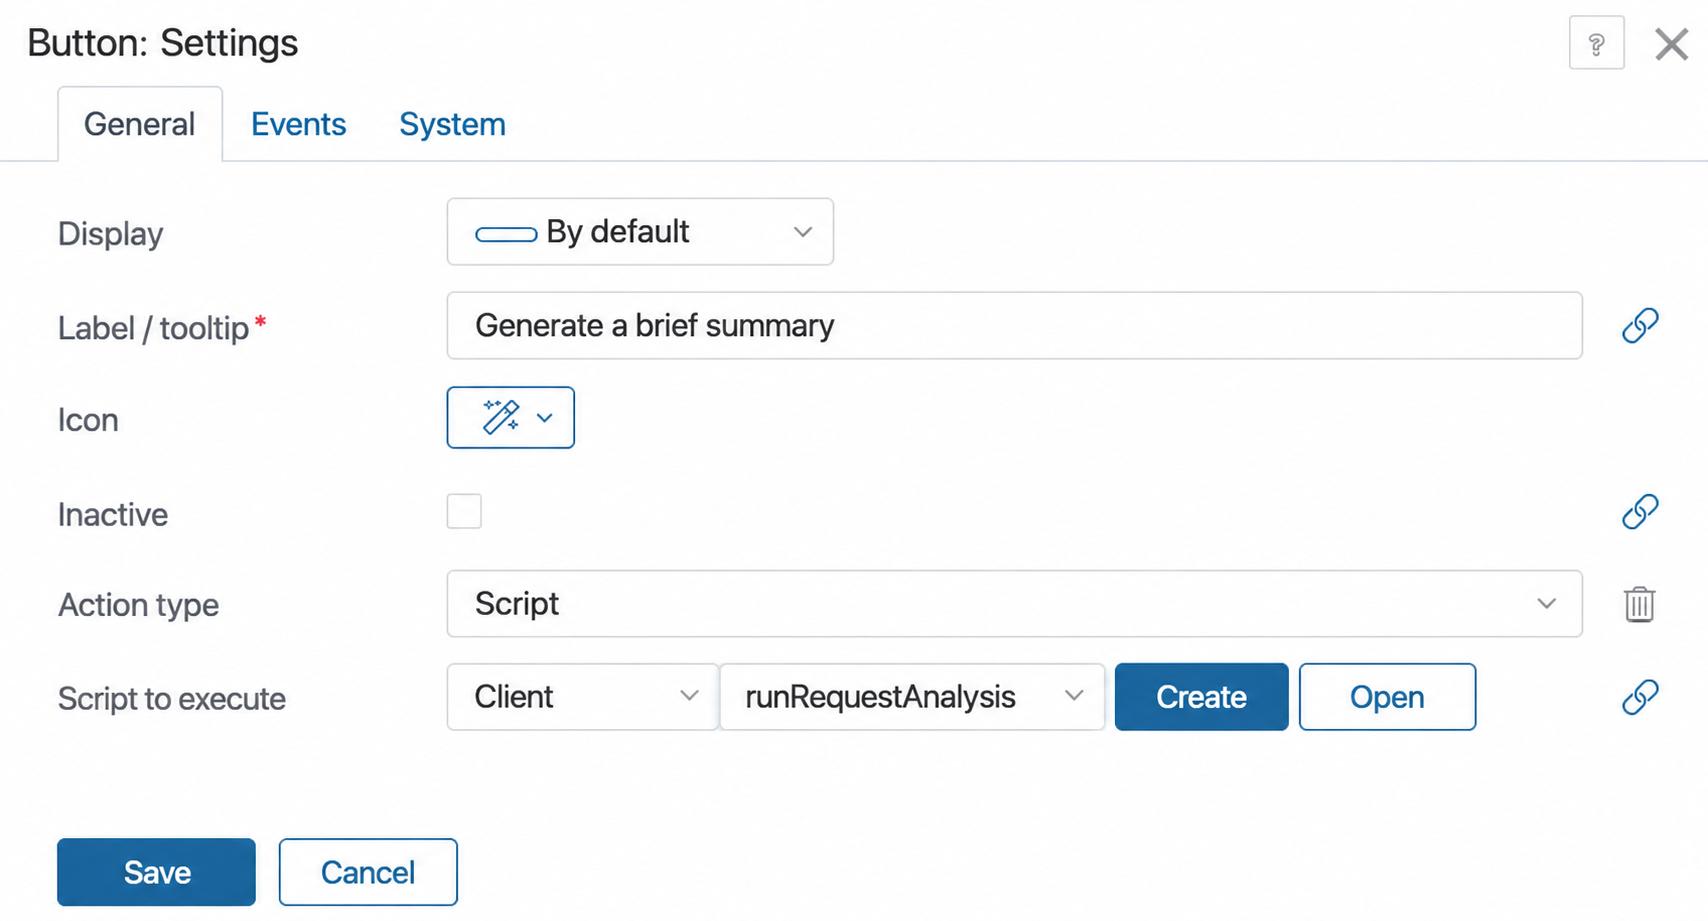
- Save the widget settings.
- On the top panel of the interface designer, click Save and Publish.
Now, if an inquiry is lengthy, an employee can click the button to generate a summary. Once the text is processed, they will see the Analysis result field (analysis_result), which displays the response from the AI action.