# Template syntax
> [HTML Version](360027003711.html)
[Document templates](360026936731.md) that you use in the system can contain text, variables, functions, conditions, and loops. When adding a template to a business process, you [can bind fields](360026720792.md#bind_shablon) of your template with process context variables.
To prepare a template, use:
- Functions:
- [ToString()](#to-string) to display different types of data in a variable.
- [NumberFormat()](#number-format) to display the number in a certain format.
- [DateTime()](#date_time_function) to display the date and time in a certain format considering a locale.
- [Count()](#count-function) to display the number of items in a table or app.
- Other special functions — \[OBJECT\], \[OBJECT\], \[OBJECT\], \[OBJECT\], and \[OBJECT\]. Read more in the [Special functions of template syntax](another-template-syntax-functions.md) article.
- [Conditions](#if) to display the text that meets a given condition.
- [For loop](#for) to display data as a list or table.
## Variable syntax
All the variables in a template must be unique and have the following form: \[OBJECT\]. For example, you can use the \[OBJECT\] variable to insert the contractor’s name in an agreement created within a [business process](360026720792.md).
In the template you can use field attributes from the app context, i.e. access nested variables. Available for fields of the [Files](360009707032.md#file_type), [Users](360009707032.md#users), [App](360009707032.md#app), [Arbitrary app](360009707032.md#arbitrary-app), etc. type.
For example, an order has the **Contract** field (code \[OBJECT\]), where the contract file is loaded, and the **Client** field (code \[OBJECT\]), where the **Contacts** app item is added. In the generated document you can display the file name or phone number of the client. To do this, the syntax of the template uses the code of the field from the source appl and the code of the nested variable separated by a dot: \[OBJECT\] or \[OBJECT\].
When writing functions, arguments and variable values are enclosed in quotation marks. The following types of quotation marks are allowed: **" ", « », “ “, ” ”, ' '**.
## Functions for working with strings
These functions allow you to display text in different formats.
For illustration, we will use the \[OBJECT\] variable and the phrase **Order shipped** as its value.
1. \[OBJECT\]. Converts text to uppercase.
````
начало примера
````
Example
\[OBJECT\] —> ORDER SHIPPED
````
конец примера
2. ````
\[OBJECT\]. Converts text to lowercase.
````
начало примера
````
Example
\[OBJECT\] —> order shipped
````
конец примера
3. ````
\[OBJECT\].** **Capitalizes the first word in the text.
````
начало примера
````
Example
\[OBJECT\] —> Order shipped
````
конец примера
4. ````
\[OBJECT\].** **Extracts a part of the text, starting with the specified character \[OBJECT\] and continuing for the specified number of characters \[OBJECT\].
You can fill in only \[OBJECT\] to keep all the text after the specified character.
````
начало примера
````
Examples
1. \[OBJECT\] —> Ord.
2. \[OBJECT\] —> r shipped.
````
конец примера
````
## ToString() function
The \[OBJECT\] function allows you to insert the following data types into your document:
- [Number](360027003711.md#number).
- [String](360027003711.md#string).
- [Category](360027003711.md#string).
- [Yes/No switch](360027003711.md#yes_no).
- [Money](360027003711.md#money).
- [Full name](360027003711.md#name).
- [Phone number](360027003711.md#phone).
- [Date/Time](360027003711.md#date_time).
You can read more about the types of data used in the system in the [System data types](360009707032.md) article.
### Number
Syntax:** **\[OBJECT\]
For illustration we will use the variable \[OBJECT\]_ _and its value 546.
````
начало примера
````
Example
\[OBJECT\] —> 546
````
конец примера
````
By default, the number is displayed as digits. Use the \[OBJECT\] format to write it as text.
````
начало внимание
````
Please note that fractions cannot be displayed as text.
````
конец внимание
начало примера
````
Example
\[OBJECT\] —> five hundred forty-six
````
конец примера
````
You can specify a locale to output as text in another language. Available locales:
1. English: \[OBJECT\] or \[OBJECT\]
2. Russian: \[OBJECT\] or \[OBJECT\]
````
начало примера
````
Example
\[OBJECT\] —>five hundred forty-six
````
конец примера
````
### String
Strings allow you to add text-based information to your document.
Syntax: \[OBJECT\].
For illustration, we will use the variable \[OBJECT\] and its value **sent for approval**.
````
начало примера
````
Example
\[OBJECT\] —> sent for approval.
````
конец примера
### ````
Category
The **Category** data type is used for selecting a value from a list, for example, when users choose the payment method: credit card or cash.
Syntax: \[OBJECT\].
When a context variable of this type is created in a process, it is given a name and a code. Specify the code in the \[OBJECT\] function so that the name of the variable is added to the document.
For illustration, we will use the variable \[OBJECT\] and payment with credit card as its value: \[OBJECT\].
````
начало примера
````
Example
The selected payment method is \[OBJECT\] —> The selected payment method is credit card.
````
конец примера
````
Also, for the **Category** data type, you can output the category name and code to the template without using the \[OBJECT\] function.
````
начало примера
````
Example
1. The selected payment method is \[OBJECT\] —> The selected payment method is credit card.
2. The selected payment method is \[OBJECT\] —> The selected payment method is credit card.
3. Code of the used category: \[OBJECT\] —> Code of the used category is card.
````
конец примера
````
### Yes/No switch
This data type has two variants: **Yes** and **No**. You can rename them, for example, to **Approved** and **Rejected**.
For illustration, we will use \[OBJECT\]. The **Yes** variant (\[OBJECT\]) is renamed as **Approved**.
````
начало примера
````
Example
\[OBJECT\] —> Approved.
````
конец примера
### ````
Money
You can convert an amount of money to text in various formats.
Syntax: \[OBJECT\].
The following format values are available:
````
начало примера
````
Example
\[OBJECT\] —> 1,005.56 (separators depend on the locale).
\[OBJECT\]** ** —> USD1,005.56.
\[OBJECT\]** ** —> 1,005 US dollars 56 cents.
\[OBJECT\]** ** —> One thousand five US dollars 56 cents.
\[OBJECT\]** ** —> you can specify your custom format, for example, \[OBJECT\]. In this case the amount will be converted to text in the following manner: 1005 usd 56 cents (\[OBJECT\] is the integer part, \[OBJECT\] is the fractional part).
````
конец примера
````
You can specify a locale in the function. Available locales:
- Russian — \[OBJECT\] or \[OBJECT\].
- English — \[OBJECT\] or \[OBJECT\].
````
начало примера
````
Example
\[OBJECT\] —> 1 005 rubles 56 kopecks.
````
конец примера
### ````
Full name
You can insert a person’s full name into a document.
Syntax: \[OBJECT\].
Available format values
\[OBJECT\]. Use it to insert the last name, first name, and the middle name (Anna Maria Quan).
\[OBJECT\].** **Use it to insert the last name and the initials (A M. Quan).
Available case values (for languages where they are applied)
\[OBJECT\]. Nominative.
\[OBJECT\]. Genitive.
\[OBJECT\]. Dative.
\[OBJECT\]. Accusative.
\[OBJECT\]. Instrumental.
\[OBJECT\]. Prepositional.
If you want to specify a person’s first name, last name, or middle name by itself, use values from the **Full name** variable, for example, \[OBJECT\], \[OBJECT\], and \[OBJECT\].
### Phone number
You can set up a mask for phone number input by using the following syntax: \[OBJECT\]
The letters in the syntax represent the following:
- **X** is the main number.
- **E** is the extension number.
If a user enters the phone number with less digits than the mask represents, the excessive X and E letters will not appear in the document.
The phone number is filled in with digits from left to right.
````
начало примера
1. ````
\[OBJECT\] —> +1-650-499-88-77.
2. \[OBJECT\] —> 1-650-499-88-77 159.
3. \[OBJECT\] —> 99-88-77 3.
````
конец примера
### ````
Date/Time
You can add a date and time to you template, for example, to specify the delivery date in a supply contract.
Syntax: \[OBJECT\]
This data type has three options: **Date/Time**, **Date**, and **Time**.
Without specifying any additional arguments, the document displays the current date and time.
````
начало примера
````
Example
\[OBJECT\]
1. **Date/Time**: 8/24/25 1:30:00 pm
2. **Date**: 8/24/25
3. **Time**: 1:30:00 pm
````
конец примера
````
If you use the **short** format in the function (\[OBJECT\]), seconds won’t be indicated.
````
начало примера
````
Example
\[OBJECT\]
1. **Date/Time**: 8/24/25 1:30 pm
2. **Date**: August 24, 2025
3. **Time**: 1:30 pm
````
конец примера
````
When using the \[OBJECT\] format, the time will include seconds, and the date the month name:
````
начало примера
````
Example
\[OBJECT\]
1. **Date/Time: **8/24/25 1:30:00 pm
2. **Date: **April 24, 2025
3. **Time:** 1:30:00 pm
````
конец примера
````
You can specify a locale
1. English: \[OBJECT\] or \[OBJECT\]
2. Russian: \[OBJECT\] or \[OBJECT\]
````
начало примера
````
Example
\[OBJECT\] 8/24/22 1:30: pm
````
конец примера
````
Please note that the **Date/Time** type takes into account the time zone of your company and shows the date accordingly. The **Date** and **Time** types show absolute values.
Example
To illustrate the use of the function in document templates, we created an agreement template and completed it with different variables and functions.
Then we [added](360026720792.md) it to a business process and bound the template variables to the process variables.
**(sodt1.png)**
During process execution, users fill in the data, and once the process flow reaches the [Generate from template](360026720792.md) activity, the system automatically creates the agreement.
**[]**
Click here to download the template used in this example.
## NumberFormat() function
Allows you to display the value of a [Number](360009707032.md#number) variable in a document in a specified format, for example, with a fixed number of decimal places, or in hexadecimal notation, etc.
Function syntax: `\{NumberFormat(, \}`.
For the example, we'll use the fractional number 1125.34 as `\$number`.
````
начало примера
````
Example
`\{NumberFormat(\{\$number\}, 3)\}` — 1125.340. The precision specifier `3` determines the number of decimal places.
````
конец примера
````
Available format values
- `"D"` or `"d"`. Decimal format. Allows you to display an integer without a decimal part, padding the string with zeros to the specified length.
`\{NumberFormat(\{\$number\}, “D5”)\} `→ 01125 — the `5` precision specifier determines the number of padding zeros.
- `"E"` or `"e"`. Scientific format. The number is displayed as a mantissa and exponent.
`\{NumberFormat(\{\$number\}, "E2")\}` → 1.13E+03 — the `2` precision specifier determines the number of decimal places.
- `"F"` or `"f"`. Fixed format. Displays a fixed number of decimal places.
`\{NumberFormat(\{\$number\}, "F2")\}` → 1125.34 — the precision specifier determines two decimal places.
- `"G"` or `"g"`. General format. Converts the number to fixed or scientific format for compactness.
`\{NumberFormat(\{\$number\}, "G4")\}` → 1125 — in this case, it was more compact to display the number in fixed format, and the `4 `precision specifier determines the number of digits without padding zeros.
- `"N"` or `"n"`. Numeric format. Displays the number with separators of digits.
`\{NumberFormat(\{\$number\}, "N3")\}` → 1,125,340 — the `3` precision specifier determines the number of decimal places.
- `"P"` or `"p"`. Percentage format. The number is multiplied by 100, and a percent sign is added.
`\{NumberFormat(\{\$number\}, "P")\}` → 112534.00 %.
- `"R"` or `"r"`. Exact number representation format without rounding. The precision specifier is not supported.
`\{NumberFormat(\{\$number\}, "R")\}` → 1125.34.
- `"X"` or `"x"`. Hexadecimal format. The number is displayed in hexadecimal notation without a fractional part.
`\{NumberFormat(\{\$number\}, "X")\}` → 465.
## DateTime() function
The \[OBJECT\] function is used to display date and time in any format. You can also specify the locale.
Syntax: \[OBJECT\].
For example, you can specify the date and time an app item was created.
````
начало примера
````
Example
\[OBJECT\] —> 2025–01–21 08:30:56
````
конец примера
````
The template supports the following quotation marks: **" ", « », “ “, ” ”, ' '**.
````
начало примера
````
Examples
1. \[OBJECT\] —> "31" August 2025.
2. \[OBJECT\] —> «31» August 2025.
3. \[OBJECT\] —> '31' August 2023.
````
конец примера
````
**Data formats**
**Display options:**
\[OBJECT\]: month (1)
\[OBJECT\]: month (01)
\[OBJECT\]: month (Jan)
\[OBJECT\]: (January)
\[OBJECT\]: day (2)
\[OBJECT\]: day (02)
\[OBJECT\]: day (Mon)
\[OBJECT\]: day (Monday)
\[OBJECT\]: year (06)
\[OBJECT\]: year (2006)
\[OBJECT\]: hours (15)
\[OBJECT\]: minutes (04)
\[OBJECT\]: seconds (05)
**Locales: **
English (United States): \[OBJECT\]
English (United Kingdom): \[OBJECT\]
German: \[OBJECT\]
French:\[OBJECT\]
Russian:\[OBJECT\]
Spanish: \[OBJECT\]
## Now() function
To add the current date and time with regard to your time zone, use the \[OBJECT\] function.
Syntax: \[OBJECT\]
With each \[OBJECT\] value the date is displayed differently.
Available format values
1. \[OBJECT\] —> date (8/12/25).
2. \[OBJECT\]** **—> 10:34 am.
3. \[OBJECT\]** **—> 10:34:22 am.
4. \[OBJECT\]** **—> April 13, 2025.
5. \[OBJECT\] (default) —> 8/12/25 10:52 am.
English language \[OBJECT\] and Russian \[OBJECT\] are available for \[OBJECT\].
\[OBJECT\] is set in the format America/Toronto.
````
начало примера
````
Examples of function syntax
1. \[OBJECT\]. Long date, en-US.
2. \[OBJECT\]. Long date en.
3. \[OBJECT\]. Date only en.
4. \[OBJECT\]. Long date ru-RU.
````
конец примера
## ````
Count() function
It gets the number of items passed in a variable of the [Table](360009707032.md#table) or [App](360009707032.md#app) type. It can be the number of rows in a table or records in a linked app.
Using this function, you can:
- Display the total number of items to estimate the amount of data.
- Check if there are any data in the variable.
- Display only the number of records instead of the table.
- Specify the number of records above a table or before a list of data, etc.
Syntax: \[OBJECT\].
````
начало примера
````
Example
\[OBJECT\]. The number of rows in the report table.
\[OBJECT\]. The number of items in the linked app.
````
конец примера
````
You can also use the function with a [for loop](#for).
````
начало примера
````
Example
1. Show the number of rows of a table that is nested in the main report table:
````
\{for row in \{\$report\_table\}\}
Subrow count: \{Count(\{\$row.execution\})\}
\{end\}
2. ````
Show the number of rows in the table, which is a property of the linked app:
````
\{for row in \{\$app\}\}
Subrow count: \{Count(\{\$row.multi\})\}
\{end\}
конец примера
````
Where:
- \[OBJECT\] is the field that contains the link to another app.
- \[OBJECT\] is a field of the **Table** type in this app.
## Conditions
You can display certain text in your document depending on conditions.
A condition starts with \[OBJECT\] and ends with \[OBJECT\]. \[OBJECT\] is any condition, for example, \[OBJECT\].
````
начало примера
````
Example 1
\[OBJECT\]** **—>** **the function's condition checks the user's name. If the name coincides, the specified text is displayed.
````
конец примера
начало примера
````
Example 2
\[OBJECT\]
\[OBJECT\]
\[OBJECT\]
\[OBJECT\]
\[OBJECT\]** **—> in this example, the current day of the week is checked. Depending on the day, one of the text options will be displayed.
````
конец примера
начало внимание
````
When using multiline conditions for **.xlsx** files, you should not place additional text in the lines with the \[OBJECT\], \[OBJECT\] and \[OBJECT\] operators. It will be removed during document generation.
````
конец внимание
````
Please note that for [Yes/No switch](360009707032.md#yes-no-switch) variables you need to specify options from the **Options** field. By default they are **Yes** and **No**.
````
Начало примера
````
Example
\[OBJECT\] —> the text will be displayed only if the value is \[OBJECT\].
````
Конец примера
````
You can use a function to check if an app item's properties have values. If the field on the form is filled in, you can display its value.
For [App](360009707032.md#app) or [Files](360009707032.md#file_type) properties, the condition function is applied only if there is one value, e.i. the **One** option is selected for the property. If the **Many** option is selected, use the [for loop](#for).
````
Начало примера
````
Example
\[OBJECT\] —> if a document is uploaded to a **Files** field, its name will be displayed in the generated file.
````
конец примера
````
In conditions you can use the following operators:
**= **Equals
**<>** Not equal to
**\>** Greater than
**\>= **Greater than or equal
**<** Less than
**<=** Less than or equal
### OR and AND logical operators
To create complex conditions, you can use the \[OBJECT\] and \[OBJECT\] operators, which allow you to specify multiple conditions as a single construction.
When using \[OBJECT\], it is sufficient that at least one of the specified conditions is met.
````
начало примера
````
Example
\[OBJECT\]
````
конец примера
````
When using \[OBJECT\], you need all of the above conditions to be met.
````
начало примера
````
Example
\[OBJECT\]
````
конец примера
````
Conditions with the logical operators \[OBJECT\] and \[OBJECT\] can be combined using parentheses.
````
начало примера
````
Example
\[OBJECT\]
The address will be specified if all the conditions are met.
````
конец примера
## ````
For loop
Use the `for `loop to display a list of items in a document. For example, list the [app items](#app-loop) or show multiple [files and images](another-template-syntax-functions.md#pasteimage).
The loop starts with the \[OBJECT\] operator and ends with the \[OBJECT\] operator. Here \[OBJECT\] is a field for a variable that will be defined as a list when [the template is loaded](360026936731.md) into the system and the \[OBJECT\] loop is extracted from the document.
````
начало примера
````
Example
\[OBJECT\]
\[OBJECT\]
\[OBJECT\]
````
конец примера
````
When you [upload your template to the system](360026936731.md), and the \[OBJECT\] loop is extracted, the field assigned for it is marked as a **list**.
**(sodt2.png)**
### For loop in apps
You can use the \[OBJECT\] loop to display display app data. You can specify field names with or without the \[OBJECT\] prefix, such as \[OBJECT\] or \[OBJECT\].
````
начало примера
````
Example
\[OBJECT\]
\[OBJECT\]
\[OBJECT\]
````
конец примера
````
A similar loop allows you to write data to a table.
````
начало внимание
````
For **.xlsx** files, additional text should not be placed in lines with the \[OBJECT\] and \[OBJECT\] operators. It will be removed during document generation, except for text in [merged cells](#merged-cells).
````
конец внимание
начало примера
````
Example
\[OBJECT\]
| | | |
|------|------|------|
| \[OBJECT\] | \[OBJECT\] | \[OBJECT\] |
\[OBJECT\]
````
конец примера
### ````
For loop in tables
You can display data in the field as a list and as a table. To let the loop work correctly, when you [add a template](360026936731.md#add_shablon) to the system, specify the [Table](360009707032.md#table) data type for a variable in the loop.
If you need to extract data from a [table](360010201779.md) into a document, for example, a list of goods with their quantity and cost filled in during order processing, you can use a template in **.xlsx** format:
1. Add the for and end commands in the first table column.
Please note, in table rows with the \[OBJECT\] and \[OBJECT\] operators, additional text should not be placed. It will be removed during document generation, except for text in [merged cells](#merged-cells).
2. Add the codes of app fields with the \[OBJECT\] or \[OBJECT\] prefix. he prefix refers to the item in a loop and allows as many rows to be filled in the document as are filled in the table in BRIX. For example, in the \[OBJECT\] function, this is the code for the **Price** field. In the template, specify it as the \[OBJECT\] or \[OBJECT\].[]
You can also add an \[OBJECT\] condition to the \[OBJECT\] loop. You can see an example in the [Templates for approval sheets and lists of informed users](ready-made-sheets-settings.md#app-file-template) article.
**Important**: You cannot place multiple tables horizontally next to each other in a template, as parallel `for` loops aren't processed during generation. You can create a [nested table](#nested-table) and then combine several tables into one, for example, during a business process using a [Script](360027203731.md) block. The template document is then generated based on the combined table.
### Template for a table in a .docx file
To generate a table from a template in a **.docx** file:
1. Separate the first row of the table using the **Split table** option.
2. In the empty row that appears, declare a \[OBJECT\] loop.
3. Configure the template in the table by specifying variables from the business process context.
4. Under the table, close the loop with the \[OBJECT\] command.
For example, the template for a table in a document might look like this:
**(template_table_doc.png)**
### Nested tables
The \[OBJECT\] loop can be used to create a nested table. When referencing columns of a nested table, instead of prefix \[OBJECT\] or \[OBJECT\] use a different prefix — \[OBJECT\] or \[OBJECT\].
**(for-brix-00.PNG)**
Please note that in rows with operators \[OBJECT\] and \[OBJECT\], you cannot place any other text as it will be deleted during generation. Cells merged vertically are an exception. For example, when generating a document from such a templte, the value of variable \[OBJECT\] will be shown in the table:
**(for-brix-01.PNG)**
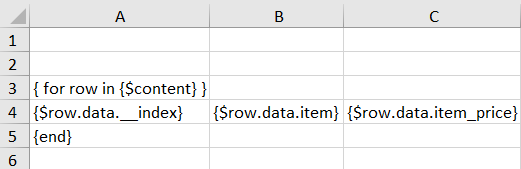
### Show index number in tables
You can use \[OBJECT\] loop to add a row's index number to the table template. This is done via the \[OBJECT\] or \[OBJECT\] prefix and the \[OBJECT\] system property. For example, \[OBJECT\].
A table template with the row number, product name and product price may look like this:
**[]**